Create a show-stopping dessert for the festive table by pairing a light, glossy pavlova with a crisp, buttery crust. This introduction guides home bakers through a simple recipe route that delivers professional results without endless effort.
The secret is mastering the technique behind the rough puff pastry crust and learning how it lifts and flakes. We explain the basic science in plain terms so you can get the texture right every time.
Whether you are new to baking or confident in the kitchen, this short guide makes making pastry from scratch clear and satisfying. Follow friendly steps to elevate seasonal recipes and delight guests with a refined festive dish.
Key Takeaways
- Simple steps help home bakers achieve flaky, professional results.
- Understanding the method improves texture and handling.
- This approach suits both beginners and experienced cooks.
- Making your own pastry adds a memorable touch to festive recipes.
- Following expert tips saves time and boosts confidence in the kitchen.
Why Choose Mary Berry Rough Puff Pastry
A quick, dependable approach brings impressive puff and flake to home bakes with less fuss.
This version of puff pastry saves precious time without losing the flaky texture of classic methods. It is ideal for anyone who wants a reliable dough for savoury pie or sweet pastries.
The method suits beginners. You need no special skills and little extra work. With a simple rolling and folding routine, the butter forms thin layers that give the dough its signature rise.
Key benefits:
- Fast to make compared with traditional puff pastry, cutting overall time in the kitchen.
- Versatile dough that works for pies, tarts and everyday baking projects.
- Making it from scratch rewards you with better flavour than shop-bought food.
| Feature | Why it matters | Best use |
|---|---|---|
| Speed | Less rolling and resting saves time | Weeknight pies and quick pastries |
| Layering | Butter creates flaky, golden layers | Turnovers, tarts, sausage rolls |
| Accessibility | Beginner-friendly technique | Home cooks baking from scratch |
Essential Ingredients for Your Pastry
The foundation of any successful bake is simple — accurate flour, a dash of salt and cold butter.
The Role of Flour and Salt
225g of plain flour gives structure to the pastry so it holds its shape while baking. Add a pinch of salt in a large bowl to lift the flavour without overpowering the finish.
Work quickly to avoid warming the flour. Keep the surface cool and clear before you begin.
Selecting the Right Butter
Use 150g very cold unsalted butter, cut into small cubes. These visible chunks form the flaky layers as the dough bakes.
Gently rub the butter into the flour with your hands. Stop while pieces remain the size of peas to avoid overworking the dough.
- Measure ingredients to the gram for best results.
- Bring together with about 150ml cold water so the dough forms a rough ball.
- Work quickly and chill as needed — a little time saved here keeps the butter firm.

Mastering the Mary Berry Rough Puff Pastry Technique
A calm, measured approach makes all the difference when building flaky layers. Start with the dry ingredients in a large bowl. Stir the flour and salt, then add cold butter cut into visible chunks. Working quickly keeps the pieces intact so the dough will puff well.
Mixing the Dry Ingredients
Use your hands to rub the butter just until pea-sized pieces remain. Add cold water a little at a time until the dough holds. Shape the mix into a neat rectangle.
The Importance of Rolling and Folding
The key is to repeat rolling folding to build layers. Roll to a rectangle, fold into thirds, rotate a quarter turn and repeat. Do this the recommended number of times to create distinct layers that give a true puff.
Chilling for Flakiness
Chill the rectangle for at least 20 minutes to firm the butter. After two folds, chill for at least 15 minutes between turns. Keeping the dough cold and using gentle handling will ensure the best rise in the oven.
- Tip: Rotate each time you roll to keep layers even.
- Tip: Short rests save time and protect the butter from melting.
Troubleshooting Common Pastry Problems
Cold ingredients and calm handling are the quickest cures for a failing pastry.
If your butter is melting too fast: chill the dough in the fridge for several minutes between each set of folds. This keeps the layers distinct and prevents a greasy finish.
When the dough tears while rolling: let it rest for a few minutes so the gluten can relax. Short rests stop tearing and make the next roll much smoother.
Pastry shrinking in the oven? Keep the circle of dough very cold right up until it goes in. A firm block of butter gives a better puff and less shrinkage.
“Using cold water and short handling times keeps the structure and flavour you want.”
- Brush away excess flour during folds to avoid dry, floury layers.
- Limit mixing and rolling times to prevent overworking the dough.
- Use cold water and keep all ingredients chilled for the best finish when baking.
Creative Variations for Sweet and Savoury Bakes
A few thoughtful additions to the dough open up lots of new recipes for tarts, pies and more.
Try replacing half of the plain flour with wholemeal flour for extra fibre and a nuttier note. This swap keeps the dough workable while giving a more wholesome crumb in your tarts or pie cases.
For savoury bakes, fold in finely chopped thyme or rosemary. Fresh herbs pair wonderfully with vegetables and meat fillings and add aroma without extra effort.
For a chocolate option, stir a tablespoon or two of cocoa powder into the dry mix and add a pinch of sugar. The result is a rich chocolate pastry that works brilliantly with fruit or a chocolate ganache tart.
Vegan and dietary swaps: use a plant-based block butter to make dairy-free versions. The block keeps layers intact and bakes to a golden finish just like regular butter.
- Adapt for a savoury pie by adding fresh thyme or rosemary into the dough.
- Add sugar or cocoa to the flour for a sweet chocolate twist.
- Replace half the plain flour with wholemeal flour to boost fibre.
- Use a plant-based block for excellent dairy-free tarts.
- Fillings from cheese to seasonal fruit turn this dough into versatile food for any occasion.
Expert Tips for Perfect Layer Formation
Perfect layer formation begins long before baking — it starts at your work surface.
Keep everything cold. Chill the butter, the bowl and the surface. Cold butter creates steam pockets that give a true puff and clear layers.
Use your hands sparingly. The heat from fingers will soften the butter and flatten the layers. Handle the dough with quick, gentle movements.
When you roll the dough into a rectangle, aim for an even thickness. Consistent rolling and regular folding keep layers uniform so the pastry rises evenly.

“Short rests in the fridge protect the butter and give you a flakier finish.”
- Rotate the dough each turn to maintain even layers across the surface.
- Avoid overworking the dough; too much work makes it tough rather than flaky.
- Remember: cold dough and firm butter are the reliable secret to good lift and crisp, light layers.
Storing and Reheating Your Homemade Pastries
Proper storage keeps texture and flavour ready for busy days or last-minute bakes.
Short-term storage: Wrap the dough tightly and keep it in the fridge for up to three days. This preserves the butter and keeps the layers intact so your dough rolls smoothly when you next use it.
Freezing for future use: For longer storage, freeze wrapped dough for up to two months. Defrost slowly in the fridge before rolling to the required thickness. Slow thawing prevents the butter from softening too quickly and losing the puff.
Quick reheating and best practice
Baked items regain crispness best in a preheated oven. Reheat at 180°C for 5–8 minutes to restore the flaky finish. Avoid the microwave; it will soften the delicate layers and spoil the texture of your pie or tart.
- Store dough wrapped tightly to prevent drying out.
- Defrost in the fridge before rolling and shaping.
- Reheat baked pastry in the oven at 180°C for 5–8 minutes.
“Keep wrapped, chill gently and reheat quickly — that way your butter layers puff as intended.”
Conclusion
A few careful folds and cold minutes in the fridge are all it takes to lift your baking to the next level.
Mastering this recipe gives you a simple route to bakery-style finishes for pies and tarts. Follow the steps, keep ingredients chilled and take your time with each fold.
This guide shows how the rough puff pastry method saves minutes in preparation while delivering great flavour and texture. Use these recipes for a quick mid-week pie or a show-stopping festive pie.
Half the battle is starting. With practice, the technique becomes second nature and you will enjoy both the process and the result.
FAQ
What is the best flour to use for rough puff pastry?
How cold should the butter and water be?
How many turns of rolling and folding are needed?
Can I make the dough by hand or should I use a food processor?
How long should I chill the pastry before baking?
What oven temperature is best for baking flaky pastries?
How do I avoid a soggy base in tarts and pies?
Can I freeze rough puff pastry dough?
How do I get distinct, even layers every time?
Is it possible to add flavour without ruining the layers?
My pastry shrinks during baking — what went wrong?
How thick should I roll the dough for turnovers and tarts?
Can I make sweet and savoury versions from the same dough?
Should I use salted or unsalted butter?
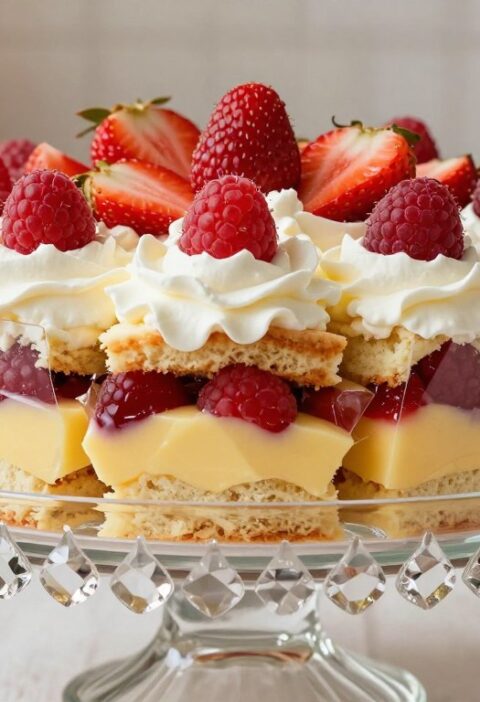
Mary Berry Christmas Pavlova
Create a show-stopping dessert for the festive table by pairing a light, glossy pavlova with a crisp, buttery crust.
Ingredients
- 225g plain flour
- 150g unsalted butter, very cold and cut into small cubes
- Pinch of salt
- 150ml cold water
Method
- Preheat the oven to 200°C (fan 180°C).
- In a large bowl, mix the plain flour and salt.
- Add the cold butter and rub it into the flour until pea-sized pieces remain.
- Gradually add cold water until the dough holds together.
- Shape the dough into a rectangle and chill for at least 20 minutes.
- Roll the dough into a rectangle, fold into thirds, rotate a quarter turn, and repeat this process 3 to 5 times.
- Chill the dough for at least 15 minutes between each fold.
- After the final fold, chill the dough for at least 30 minutes before baking.
- Roll out the dough to the desired thickness for your pavlova base.
- Bake in the preheated oven for about 1 hour until golden and crisp.