This classic UK recipe brings the warm scent of home into the kitchen. Emma Duckworth and many families swear by this simple, moist creation that suits an afternoon tea or a quick snack.
Whether you are new to baking or experienced, the method is forgiving and reliable. The technique focuses on ripe fruit, gentle mixing and the right oven timing to produce a tender crumb every time.
The guide that follows explains the essential steps and small tips that make the mary berry banana loaf so celebrated across British households. You will learn how tiny adjustments affect texture and flavour, helping you bake with confidence.
Expect a loaf that slices cleanly, stays moist and tastes homely. This introduction sets the scene for a straightforward recipe and tried-and-tested baking advice.
Key Takeaways
- The Mary Berry Banana Bread Loaf is a tried-and-tested family favourite in the UK.
- Ripe fruit and gentle mixing are key to a moist, tender crumb.
- The recipe suits both novice and experienced bakers.
- Small technique tweaks can improve texture and flavour consistently.
- Follow the steps to ensure reliable results every time.
Why You Will Love This Mary Berry Banana Bread Loaf
This recipe makes the most of over‑ripe fruit, turning soft bananas into a moist, light-textured cake that tastes homemade and honest.
It is forgiving for beginners yet satisfying for seasoned bakers. The method uses simple pantry staples, so you can skip complex chocolate desserts and still impress guests.
“Baking two small cakes is perfect for school fetes — one to sell and one to keep at home.”
The recipe is versatile. Emma Duckworth recommends doubling up for fetes, which lets you share one while keeping a second for family. The natural sweetness of the fruit cuts down on added sugar and gives a reliably tender crumb.
- Versatile: Great for teatime, picnics or fundraisers.
- Simple: Uses cupboard staples and minimal fuss.
- Consistent: Produces even rise and moist texture every bake.
| Feature | Why it matters | Outcome |
|---|---|---|
| Over‑ripe fruit | Higher sugar and moisture | More flavour and softer crumb |
| Simple ingredients | No specialist items needed | Easy to make anytime |
| Small cakes option | Shareable portions for events | One for home, one to give away |
For more classic cake recipes and ideas, see a trusted seed cake tutorial via this seed cake recipe, which pairs well with afternoon tea.
Essential Ingredients for Your Baking Success
Success begins with careful measuring and ripe fruit — the small details shape the final crumb and flavour.

Choosing the Right Bananas
Use very ripe bananas. The freckled skins mean higher sugar and deeper flavour. Mash them well in your mixing bowl so they blend evenly.
Tip: If your fruit is only slightly ripe, leave it in a paper bag for a day to speed ripening.
Dry Ingredient Measurements
Accurate dry measures matter. Weigh 225g plain flour and add 3 tsp baking powder. Use digital scales for consistency.
- 100g unsalted butter, room temperature helps the batter emulsify.
- 175g caster sugar and 2 large eggs bind and sweeten the mix.
- 30ml milk keeps the crumb moist; 40g chopped walnuts are optional for texture.
| Ingredient | Quantity | Why it matters |
|---|---|---|
| Plain flour | 225g | Structure and light crumb |
| Baking powder | 3 tsp | Reliable rise without extra fuss |
| Butter & sugar | 100g / 175g | Emulsifies and sweetens the cake |
| Eggs, milk, walnuts | 2 / 30ml / 40g | Bind, add moisture and optional crunch |
Stick to these core ingredients to keep the authentic mary berry banana recipe true to form. Even if tempted by chocolate additions, the classic mix gives the best results.
Preparing the Perfect Batter
Getting the batter right is where this recipe moves from good to reliably great.
Grease a 2 lb loaf tin (23 x 14cm) and line it with baking paper, leaving an overhang sling to lift the loaf out easily.
In a medium mixing bowl, beat 100g butter with 175g caster sugar. Add 2 eggs and 2 mashed bananas. Use a hand-held beater or a wooden spoon to keep the batter airy.
Sift 225g plain flour and 3 tsp baking powder into the bowl. Fold gently to combine. Avoid over-mixing so the crumb stays tender.
“Take ten minutes of calm mixing and you will reward yourself with an even rise and a neat slice.”
Tip: This recipe does not need melted chocolate — the creamed butter and sugar give lift. After about 10 minutes of prep, your mixture should be level and ready for the tin.
| Step | Action | Why it matters |
|---|---|---|
| Prepare tin | Grease and line with baking paper | Prevents sticking and helps removal |
| Cream | Butter, sugar, eggs, mashed bananas | Creates airy structure without melting chocolate |
| Fold dry | Sift flour & baking powder, fold gently | Maintains lift and avoids tough crumb |
Baking and Cooling Your Loaf
Get the oven ready at 180C/350F so the mixture bakes steadily and the slices hold their shape. Preheating ensures the centre rises as the edges set, giving a neat top and even crumb.
Oven Temperature and Timing
Preheat the oven to 180C/350F and place the tin on a middle shelf. Bake for 50–60 minutes until the surface is golden.
Check after 40 minutes: if the top is too dark, tent with foil to prevent over-browning while the centre finishes.
Testing for Doneness
The most reliable test is to insert a skewer into the centre. If the skewer inserted comes clean, the banana bread is done.
Allow a few extra minutes if the skewer has moist crumbs. This prevents a gummy middle that spoils the texture.
Cooling on a Wire Rack
Rest the loaf in the tin for ten minutes, then lift it out using the baking paper sling and place it on a wire rack.
Using a wire rack matters: air circulates under and around the bread, stopping the base from going soggy.
- Give each tin space in the oven so heat circulates and cakes bake evenly.
- After full cooling, slice into about 10 even slices for sharing.
| Stage | Time | Tip |
|---|---|---|
| Preheat oven | — | Set to 180C/350F |
| Bake | 50–60 minutes | Check at 40 minutes; tent if needed |
| Cool in tin | 10 minutes | Then transfer to wire rack |
Expert Tips for a Moist Texture
A few expert habits at the bench will keep the crumb tender and evenly textured.
Use very ripe bananas: the riper the fruit, the more natural sweetness and flavour you get. Emma Duckworth highlights that this is the single best trick for a moist result.
Avoiding Over-mixing
When you combine dry ingredients into the mixing bowl, fold by hand using a gentle motion. Stop as soon as the streaks of flour disappear.
Over-mixing develops gluten in the flour and leads to a tough bread rather than a soft cake. A light, airy mixture gives the best crumb.
“Fold gently and trust the batter — the gentler you are, the better the texture.”
- Check the tin at 40 minutes; avoid over-baking so the centre stays moist.
- Test with a skewer inserted into the centre — if it comes clean, the bake is done.
- Cool fully on a wire rack so the base does not steam and soften the crust.
- If the mixture feels stiff, make sure butter and eggs are at room temperature before mixing.
Final note: even if you bake other cake recipes often, this mary berry banana recipe rewards a gentle touch and simple timing for reliably delicious slices.
Storing and Freezing Your Banana Bread
Keep your loaf tasting fresh by following simple storage steps that preserve texture and flavour.

Wrap the cooled mary berry banana loaf tightly in plastic wrap to store at room temperature. Stored this way, the cake will stay moist for 4 to 5 days.
If you need a little extra time, refrigerate for a few more days. Note that chilling may dry the crumb slightly compared with room storage.
- For long-term keeping, freeze the whole loaf or individual slices in a freezer-safe container for up to 3 months.
- Thaw at room temperature and warm briefly in a medium oven to revive the fresh-baked texture.
- This recipe without chocolate holds its structure well after freezing and thawing.
Tip: Always cool completely before wrapping. Trapped heat causes sogginess and shortens shelf life.
With these simple steps you can enjoy slices any hour, and have ready-made treats without last-minute baking.
Conclusion
This final note celebrates how a handful of storecupboard staples can yield a reliably moist, comforting cake every time.
Follow the gentle mixing and use very ripe fruit to get the best texture. The mary berry name here stands for a simple, proven approach to baking that rewards care not complexity.
This recipe shows that classic technique turns plain ingredients into a treat fit for cakes at a school fete or a quiet afternoon at home. Wrap cooled slices well to keep the crumb soft.
Please leave a star rating or a short comment below to tell us how your loaf and the method worked for you. Thank you for choosing our guide to master this beloved bread recipe.
FAQ
What size of loaf tin should I use?
How ripe should the bananas be for best flavour?
Can I add chocolate or other mix-ins?
What oven temperature and timing are recommended?
How do I test if the loaf is done?
Should I line the tin with baking paper?
How long should I cool the cake before slicing?
How can I avoid over-mixing the batter?
What gives the loaf a moist texture?
Can I store or freeze slices?
Is caster sugar fine to use in this recipe?
Do I need to grease the tin as well as line it?
What if the top browns too quickly?
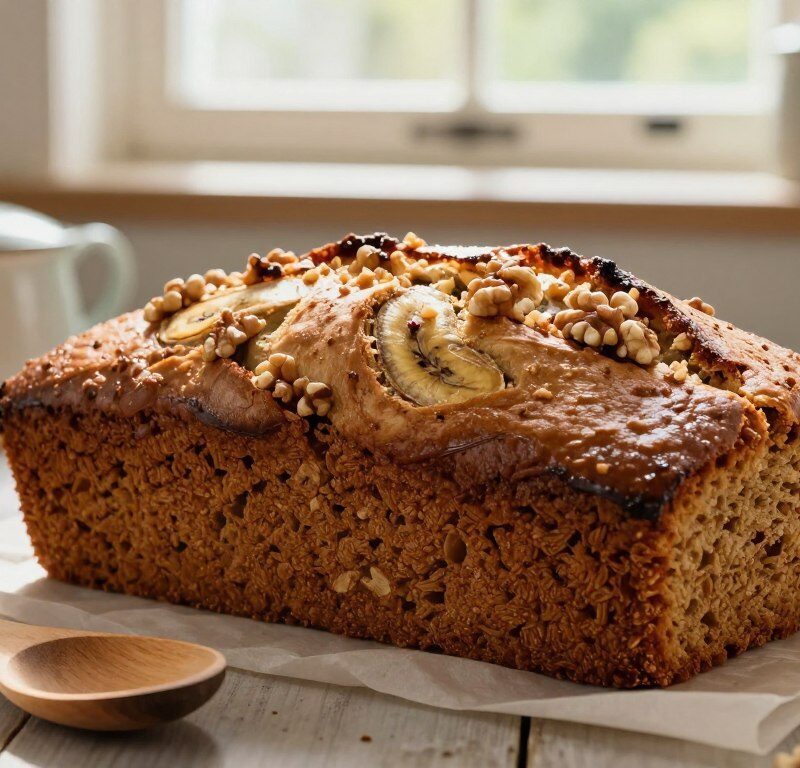
Mary Berry Banana Bread Loaf
This classic UK recipe brings the warm scent of home into the kitchen. A simple, moist creation that suits an afternoon tea or a quick snack.
Ingredients
- 225g plain flour
- 3 tsp baking powder
- 100g unsalted butter, room temperature
- 175g caster sugar
- 2 large eggs
- 2 very ripe bananas, mashed
- 30ml milk
- 40g chopped walnuts (optional)
Method
- Preheat the oven to 180C/350F.
- Grease a 2 lb loaf tin (23 x 14cm) and line it with baking paper.
- In a medium mixing bowl, beat 100g butter with 175g caster sugar until creamy.
- Add 2 eggs and 2 mashed bananas to the mixture and mix well.
- Sift 225g plain flour and 3 tsp baking powder into the bowl and fold gently to combine.
- Pour the batter into the prepared loaf tin.
- Bake for 50-60 minutes until the surface is golden and a skewer inserted into the center comes out clean.
- Allow the loaf to cool in the tin for 10 minutes, then lift it out using the baking paper and place it on a wire rack to cool completely.
- Slice into about 10 even slices for sharing.