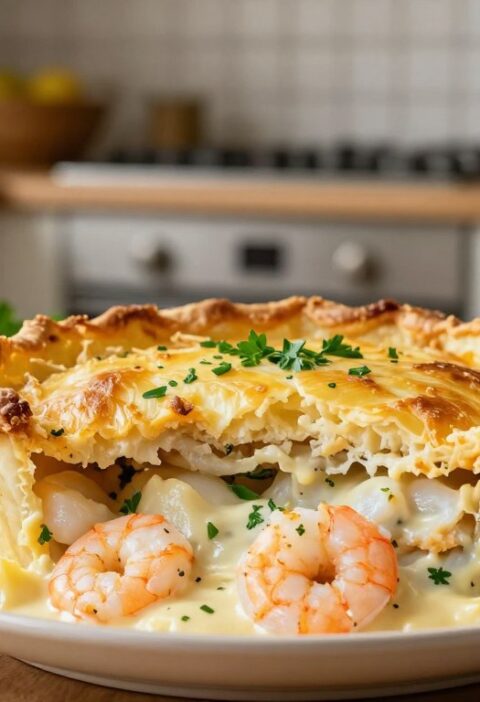
Transform leftover roast into a cosy, hand-held feast. This classic dish pairs tender turkey with fresh vegetables and a rich gravy, all sealed in a golden, flaky pastry.
Perfect for lunch, dinner or a picnic, the method is simple and rewarding. The filling is hearty but not heavy, so it suits family meals on chilly evenings.
Whether you are new to baking or a confident cook, this recipe guides you to the right texture and flavour. The result is a portable, satisfying meal that celebrates plain good ingredients and traditional baking.
Key Takeaways
- Versatile: Ideal for lunch, dinner or a picnic.
- Simple to make: Suits both novice and experienced bakers.
- Comforting: Uses leftover turkey to create a warm, hearty dish.
- Portable: Hand-held and convenient for busy days.
- Traditional flavour: Buttery pastry with savoury filling.
Why You Will Love Mary Berry Turkey Pasties
These pasties turn leftover roast into a warm, portable meal that delights every time. They rescue cooked turkey and give it a second life in a buttery, flaky case.
They are wildly versatile. Add your favourite vegetables and seasonings to suit taste and seasonality. That makes them ideal for busy weekdays.
Portability matters. Pack them for a picnic or a packed lunch and enjoy a hearty, hand-held supper wherever you are.
- Great for leftovers: Prevents waste and makes a tasty meal.
- Easy to customise: Swap in different vegetables and herbs.
- Comforting flavour: Savoury turkey filling with rich pastry.
- Quick to prepare: Good results without hours in the kitchen.
| Benefit | Why it matters | Best use |
|---|---|---|
| Uses leftovers | Reduces waste and saves time | Post-roast meals |
| Customisable filling | Adapts to family tastes | Weeknight dinners |
| Portable | Easy to eat on the go | Picnics and packed lunches |
| Impressive yet simple | Great for hosting without stress | Casual entertaining |
Essential Ingredients for Your Pastry
Start with simple staples — flour, chilled butter and a little cold water — and you are halfway there. This small list of ingredients creates a sturdy, flaky pastry that holds its filling well.
Flour and Butter Basics
250g plain flour forms the base. Add 125g chilled, diced butter to the bowl.
Rub the butter into the flour until the mixture looks like fine breadcrumbs. This step creates the flaky layers you want.
The Importance of Cold Water
It is essential to add cold water. Use 3–4 tablespoons to bring the dough together without warming the butter.
- Measure ingredients accurately; the flour-to-butter ratio is key.
- Rubbing until crumbs form keeps the butter suspended in the mixture.
- Add cold water sparingly to form a soft dough — do not overwork it.
- Use one beaten egg for glazing later to give a golden finish.
Preparing the Savoury Turkey Filling
Begin by gathering the diced meat and veg in a large bowl so the flavours can meld easily.
In the bowl mix 250g diced cooked turkey with one diced carrot, one parboiled potato and 50g frozen peas. Add one small, finely chopped onion to boost savoury depth.
Stir in 100ml of hot gravy to bind the filling and give a rich taste. For extra richness, fold in a little grated cheddar — it melts into the mixture nicely.
Season well with salt and black pepper to taste. Add a few fresh herbs if you like; a sprig of thyme or chopped parsley lifts the flavour and echoes classic mary berry suggestions.
Allow the mixture to cool completely before using. This step stops heat ruining the pastry and keeps the final pasties crisp.

| Ingredient | Amount | Purpose |
|---|---|---|
| Diced cooked turkey | 250g | Main protein; hearty texture |
| Carrot, potato, peas, onion | 1 carrot, 1 potato, 50g peas, 1 small onion | Sweetness, body, colour and flavour |
| Gravy | 100ml | Bind the filling; adds rich taste |
| Grated cheddar & seasoning | To taste | Depth of flavour; salt and pepper balance |
Mastering the Art of Pastry Dough
A short, chilled rest for the dough is the small trick that makes a big difference to texture. Begin by combining the flour, diced butter and a pinch of salt in a large bowl.
Chilling for Texture
After rubbing the butter into the flour so the mixture looks like fine crumbs, slowly add cold water, a tablespoon at a time, until a firm, cohesive dough forms.
Handle the dough gently and avoid overworking it. That one careful step stops the pastry becoming tough and keeps the layers light and flaky.
- Wrap the dough in cling film and place it in the fridge for 20–30 minutes.
- This chill lets the butter firm up so it creates steam pockets while baking.
- When ready, roll on a lightly floured surface to about 3mm thickness; this prevents sticking and tearing.
- Season the filling later with salt and a twist of black pepper to balance richness.
Rolling and Shaping Your Pasties
Work on a lightly floured surface to roll the chilled dough thin and even, ready for cutting. Aim for about 3mm thickness so the pastry cooks through and stays crisp.
Use a plate or a circular cutter to stamp out 6–8 rounds, roughly 15cm in diameter. Place each circle on a clean area of the bench while you fill them.
Put a generous spoonful of the cooled filling in the centre of each circle. Take care not to overfill; that is one important step to prevent leaks.
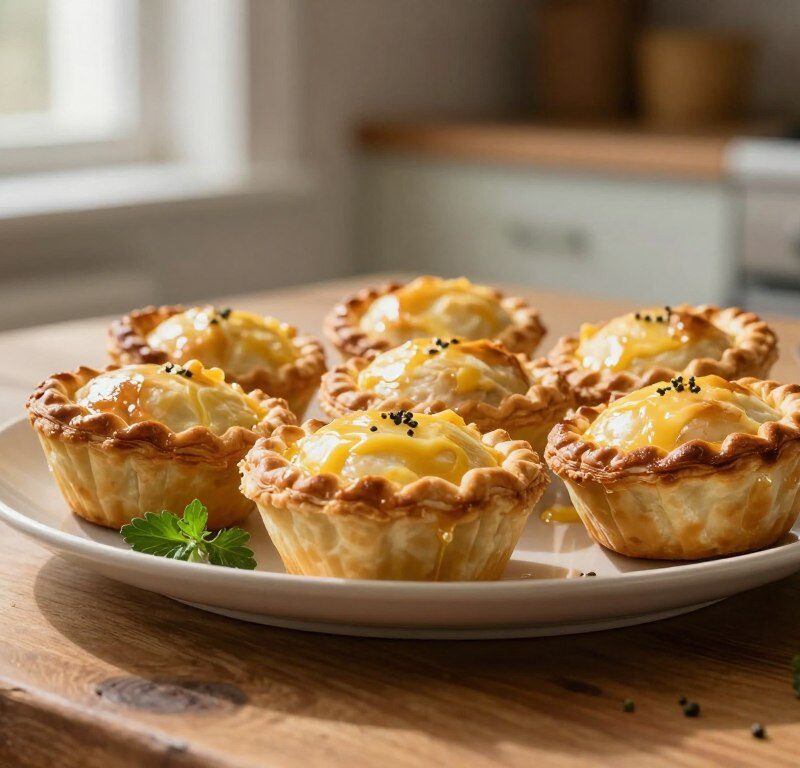
Brush the edges with beaten egg to act as glue, then fold to form a neat semicircular pasty. Press the rim firmly, then crimp with a fork for a tidy seal.
- Leave space between each pasty on the baking tray or tray so heat circulates evenly.
- Use a plate to keep circle sizes consistent and speed the process.
Achieving the Perfect Golden Glaze
A careful egg wash is the simple step that lifts texture and colour on every pasty.
Brush the tops of each assembled pasty with a light coating of beaten egg. Use a soft pastry brush and cover the whole surface so the pastry goes glossy and even when baked.
Place the filled items on a baking tray lined with parchment. This prevents sticking and keeps the base crisp without extra fuss.
- To get that signature golden brown finish, apply the egg wash just before the oven.
- Avoid pooling of the egg at the bottom of the tray so the filling and base stay neat.
- Work quickly; one steady brush stroke gives the most even colour.
- Once glazed, place the tray in the preheated oven and let the heat turn the dough into a crisp, glossy result.
This small step makes every pasty look as good as it tastes and gives a professional finish for serving to family or guests.
Baking Instructions for Crispy Results
A hot oven is the secret to flaky pastry and a piping-hot centre. Preheat to 200°C (180°C fan) or 400°F so the pastry begins to puff as soon as it hits the heat.
Use a lined baking tray and place the assembled pasties with space between each one. This helps air circulate and gives an even bake across the tray.
Oven Temperature Settings
Set the oven to the stated temperature and slide the tray in once the heat is steady. Bake for 20–25 minutes, watching until the pastry is golden brown and firm to the touch.
For a fan-assisted oven use the 180°C setting for consistent results across all pasties on the tray. The high initial heat is the key step for a crisp, flaky crust that keeps the filling from going soggy.
- Brush each pasty with beaten egg before baking for a glossy, golden finish.
- Check after about 20 minutes; extend by a few minutes if needed until the minutes golden colour appears.
- Remove and rest for a few minutes so the filling firms up and is safe to eat.
Serving Suggestions for a Hearty Meal
Choose bright, tangy or crunchy accompaniments to balance the rich filling and pastry.
Green salad works well. A mix of peppery leaves and crisp cucumber cuts through the richness and adds freshness.
For comfort food fans, a hot portion of chips or fries as a classic side makes the meal more filling.
Add a spoonful of pickles or a tangy chutney to bring contrast. The sharpness lifts the turkey flavour and keeps each bite lively.
- Serve extra gravy for dipping — it’s a popular final step that deepens taste.
- Pair with roasted vegetables or a bowl of warm soup for a heartier plate.
- Offer simple sides so guests can choose their favourite balance of textures and tastes.
| Side | Why it works | Best for |
|---|---|---|
| Green salad | Adds freshness and crunch | Light lunch or picnic |
| Chips / fries | Comforting, hearty texture | Family dinners |
| Pickles / chutney | Tangy contrast to rich filling | Anyone who likes bold flavours |
| Roasted vegetables | Adds colour and warmth | Substantial evening meal |
Expert Tips for Flaky Pastry
A few careful habits in the kitchen make flaky pastry simple to achieve every time.
Keep everything cold. Use chilled butter and add cold water a tablespoon at a time so the fat stays firm. Cold ingredients create steam pockets that lift the layers when baking.
Chill the dough in the fridge for 20–30 minutes. This short rest is a vital step that helps the pastry keep its structure and gives a light, flaky result.
Don’t overfill your pasty. Too much filling causes leaks and breaks during the minutes in the oven. Fill each circle sparingly and leave a margin for sealing.
Seal the edges properly by crimping with a fork. This simple step secures the mixture and stops gravy or juices escaping while baking.

- Taste the filling and adjust salt and pepper before assembling.
- If the dough feels soft, return it to the fridge for a few minutes to firm up.
- Work quickly and keep a clean bowl for mixing to avoid warming the butter.
Creative Variations to Try
Small swaps to the filling can transform the whole bake without adding extra time.
Vegetarian Alternatives
Replace the meat with mushrooms and lentils for a rich, savoury filling that still feels hearty. Sauté onion and chopped mushrooms in butter, add cooked lentils and a splash of stock, then season with salt and pepper.
Cool before filling the pastry so the dough stays crisp. This option keeps the taste full-bodied without meat and works well with grated cheddar stirred through for extra depth.
Adding a Spicy Kick
If you like heat, stir in chilli flakes or smoked paprika to the filling. A little goes a long way and lifts the flavour without overpowering the vegetables or cheese.
For a lighter change, use diced chicken with sautéed leeks. Or, save time by using ready-made puff pastry and finish with a beaten egg for a glossy glaze before the oven.
| Variation | Key swap | Best for |
|---|---|---|
| Vegetarian | Mushrooms + lentils + onion | Meat-free family meals |
| Spicy | Chilli flakes or paprika | Anyone who likes heat |
| Cheesy | Grated cheddar added | Richer, indulgent taste |
| Quick | Store-bought puff pastry | Short on time |
Conclusion
In under an hour you can turn scraps into a golden brown, hand-held meal that pleases everyone. This mary berry inspired recipe makes flaky pastry parcels filled with leftover turkey, buttery veg and a touch of seasoning.
Keep ingredients cold and chill the dough before rolling. Bake for 20–25 minutes in an oven 180C so the tops go a lovely minutes golden colour. Use steady heat and watch the oven minutes to get an even, crisp result when baking.
Try a chicken or vegetarian swap if you prefer. The simple steps and short time make this a great comfort option for home cooking. Enjoy the process as much as the eating — these pasties celebrate good, thrifty food.
FAQ
How long do the pasties need in the oven and at what temperature?
Can I use leftover cooked meat or chicken for the filling?
What type of flour and fat should I use for the pastry?
How much cold water should I add to the pastry dough?
Do I need to chill the dough, and for how long?
How do I prevent the filling from making the pastry soggy?
Can I freeze the assembled pasties before baking?
What filling seasonings work best with poultry?
Are there vegetarian alternatives that still feel hearty?
How do I get a glossy, golden finish on the pastry?
What equipment do I need to shape and seal the pasties?
Can I add cheese to the filling and which type is best?
Mary Berry Turkey Pasties
Transform leftover roast into a cosy, hand-held feast. This classic dish pairs tender turkey with fresh vegetables and a rich gravy, all sealed in a golden, flaky pastry.
Ingredients
- 250g plain flour
- 125g chilled, diced butter
- 3-4 tablespoons cold water
- 1 beaten egg (for glazing)
- 250g diced cooked turkey
- 1 diced carrot
- 1 parboiled potato
- 50g frozen peas
- 1 small finely chopped onion
- 100ml hot gravy
- Grated cheddar (to taste)
- Salt (to taste)
- Black pepper (to taste)
- Fresh herbs (optional, e.g., thyme or parsley)
Method
- Preheat the oven to 200°C (180°C fan) or 400°F.
- In a large bowl, combine the flour, chilled butter, and a pinch of salt. Rub the butter into the flour until it resembles fine breadcrumbs.
- Gradually add cold water, one tablespoon at a time, until a firm dough forms. Avoid overworking the dough.
- Wrap the dough in cling film and chill in the fridge for 20-30 minutes.
- In a large bowl, mix the diced turkey, carrot, potato, peas, and onion. Stir in the hot gravy and season with salt, pepper, and herbs. Allow to cool completely.
- On a lightly floured surface, roll out the chilled dough to about 3mm thickness. Cut out 6-8 rounds, roughly 15cm in diameter.
- Place a spoonful of the cooled filling in the center of each round. Brush the edges with beaten egg, fold to form a semicircle, and crimp the edges with a fork to seal.
- Brush the tops of each pasty with beaten egg for a golden glaze.
- Place the pasties on a lined baking tray, ensuring space between each one.
- Bake in the preheated oven for 20-25 minutes, or until golden brown and firm to the touch.
- Remove from the oven and let cool for a few minutes before serving.