These classic festive biscuits yield about 18 treats and are ideal for gifting or a refined tea-time plate. The method is straightforward, so even a novice can follow the recipe and achieve a professional finish.
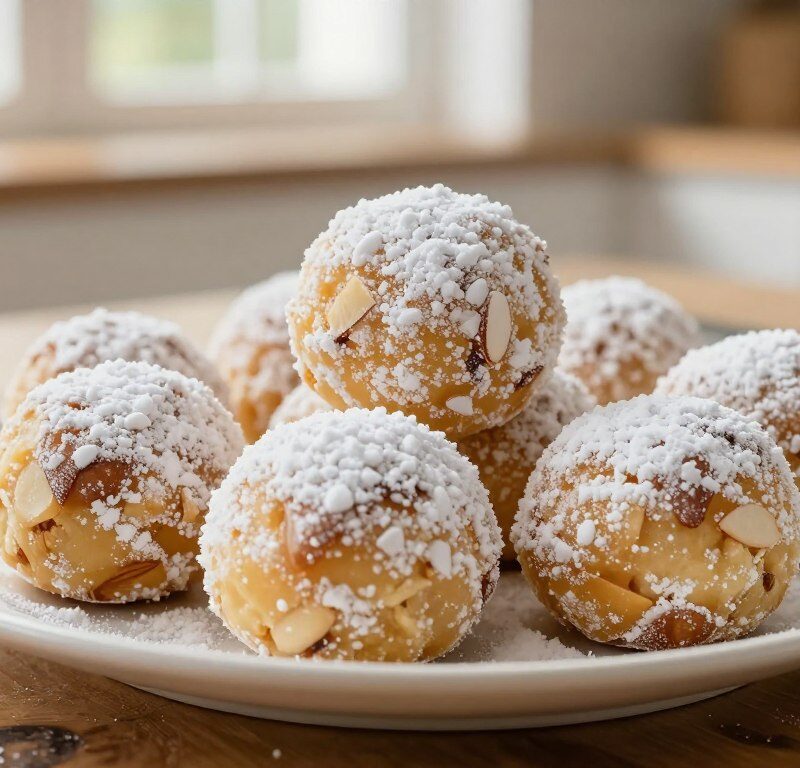
The secret lies in the gentle almond flavour and the light icing sugar finish. Roll warm rounds in sugar to create the signature snowy appearance that gives each biscuit its delicate look.
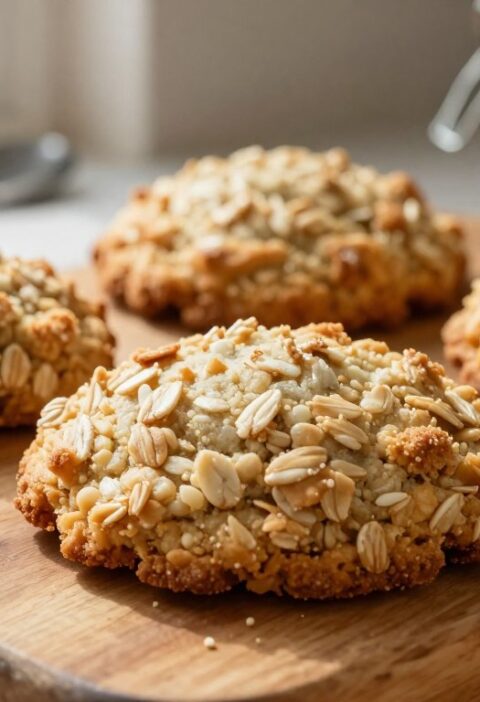
Expect melt-in-the-mouth bites — these almond snowballs soft biscuits pair a nutty base with a whisper of sweetness. Simple pantry staples like plain flour, butter, caster sugar and ground almond keep the process friendly and reliable.
Follow the steps to make mary berry inspired berry almond snowballs that capture a delicate almond aroma and an irresistible coating. The result is a traditional, popular festive biscuit that is both elegant and comforting.
Key Takeaways
- Yields roughly 18 biscuits — perfect for sharing or gifting.
- Simple ingredients make the recipe accessible to beginners.
- The icing sugar coating creates the signature snowy appearance.
- Soft, melt-in-the-mouth texture with a gentle almond aroma.
- Balanced sweetness complements the nutty base.
The Charm of Mary Berry Almond Snowballs
Perfect for a festive platter, these biscuits bring warmth and a subtle almond note to any tea. Their snowy coating makes them look special, so they work brilliantly as gifts or on decorative plates.
The real appeal is how they scent the kitchen while baking. The aroma is gently nutty and inviting. The texture stays light and crumbly, giving a melt-in-the-mouth finish that guests adore.
One thoughtful advantage is that this egg-free version suits many households. It keeps the recipe simple and accessible, without losing that refined flavour profile.
“A delicate biscuit can lift a tea tray — these are both elegant and comforting.”
- Festive appearance ideal for gifting.
- Light, crumbly texture with a warm, nutty aroma.
- Egg-free and family-friendly.
- Melt-in-the-mouth finish perfect with a cup of tea.
Essential Ingredients for Your Biscuit Dough
Measure carefully and choose fresh, well-textured ingredients to get a consistent dough every time. The right balance of flour, fat and ground nuts gives these biscuits their signature crumb.
Selecting Quality Butter
Use 100g of softened butter. Soft butter blends evenly and creates the melt-in-the-mouth texture you want.
Cold butter will make the dough tough; over-soft butter makes it oily. Aim for a soft, spreadable consistency before mixing.
The Role of Ground Almonds
Combine 150g plain flour with 40g of ground almonds for structure and nutty flavour. This mix holds the shape of each biscuit while keeping the crumb light.
Add 50g caster sugar to sweeten without weakening the dough. Stir in ½ teaspoon of almond extract if you want a stronger nutty note.
- 150g flour — base for structure.
- 100g butter — richness and texture.
- 40g ground almonds — authentic nutty flavour.
- 50g sugar — gentle sweetness.
- ½ teaspoon almond extract — optional flavour boost.
“Accurate measures and good butter make this mary berry almond recipe reliable every bake.”
Preparing Your Kitchen and Equipment
A tidy prep area and the right tools save time and help the biscuits bake evenly. Before you start this recipe, gather all the necessary ingredients and equipment.
Have a large mixing bowl ready so you can combine butter, sugar and dry items without spills. Keep a wooden spoon or an electric hand mixer to suit your comfort while mixing.
Measure ingredients precisely with a reliable weighing scale. This step cuts down on fuss and shortens overall time.
Line your baking tray with good-quality baking parchment to prevent sticking and to ensure even baking. Place a wire rack nearby for the cooling stage so air can circulate under each biscuit.
| Item | Purpose | Tip |
|---|---|---|
| Mixing bowl | Combine ingredients | Use a bowl big enough to avoid splashes |
| Weighing scale | Accurate measures | Weigh dry and wet items separately |
| Parchment & tray | Even bake, non-stick | Line before you begin |
| Cooling rack | Finish and crisp edges | Allow full air flow |
Creaming the Butter and Sugar
A gentle but thorough creaming of butter and sugar creates the lift that makes these biscuits so tender.
Beat 100g softened butter with 50g caster sugar together until the mixture is light, creamy and smooth. This step builds the tiny air pockets that give the dough a fine crumb.

Achieving the Right Consistency
Use an electric hand mixer or a sturdy wooden spoon in a mixing bowl. Both work — the mixer is faster; the spoon gives you more control.
When you cream the butter caster sugar together, stop when the mix is pale and fluffy. This ensures proper aeration and prevents a dense dough later.
- Tip: Scrape the bowl halfway through to mix evenly.
- Tip: Add a few drops of almond extract now so the flavour spreads through the buttery base.
- Tip: If the mix looks greasy, chill for 10 minutes before proceeding.
“Creaming the butter and caster sugar together thoroughly is vital — it shapes the final texture and structure of the biscuits.”
Incorporating Almonds and Flour
Folding in the ground nuts and flour in stages keeps the texture tender and reliable.
Gently fold the 40g of ground almonds into the creamed mixture. Do this slowly so the nuts distribute evenly without overworking the dough.
Now add plain flour in stages. Add plain flour a little at a time and mix only until the mixture starts to come together.
When you add plain flour, stop as soon as a soft dough forms. Overmixing or adding too much flour will make the biscuits dry and heavy.
The final dough should be soft to the touch but not sticky. If it feels sticky, dust a touch more plain flour sparingly and shape quickly.
“The balance of flour and almonds is critical; gentle handling preserves the tender crumb.”
| Step | Amount | Action |
|---|---|---|
| Ground nuts | 40g | Fold in gently to the creamed mix |
| Add plain flour | In stages | Mix only until just combined |
| Final dough | Soft, not sticky | Adjust with minimal flour if needed |
Shaping the Perfect Dough Balls
Scoop modest portions of dough and shape them into uniform balls to ensure consistent results. Aim for walnut-sized pieces so each biscuit bakes at the same rate and colours evenly.
Roll gently with your palms until the surface is smooth. The dough should be firm enough to hold its shape, yet soft enough to give a melt-in-the-mouth finish once baked.
If the mix feels sticky, lightly dust your hands with a little plain flour. This helps you make neat, round balls without adding too much extra flour to the dough.
Place the balls on the prepared tray with space between each to allow for slight spreading. Uniform shaping gives a consistent golden finish and the classic, elegant look these biscuits are known for.
- Size tip: walnut-sized balls for even baking.
- Texture tip: firm but soft—avoid overworking the dough.
- Finish tip: neat rounds = tidy, classic appearance.
“Perfectly round balls are the secret to a uniform bake and that traditional, refined look.”
Chilling Before the Oven
A short time in the fridge firms the dough and stops excess spreading. Refrigerate the shaped dough balls for 10–15 minutes before you bake.
Chilling is crucial because the lower temperature solidifies the butter. This firmness helps the balls keep a neat, round profile while they hit the heat.
If your dough feels too soft to shape, extend the chilling by a few more minutes. A firmer dough makes rolling easier and helps maintain even sizing.
Always preheat your oven to the correct temperature before you remove the chilled dough balls. That way, they go straight from cold to hot and set quickly, reducing spread.
“A brief chill gives a tidy bake and keeps each biscuit perfectly formed.”
| Action | Why it helps | Timing |
|---|---|---|
| Refrigerate shaped balls | Firms butter, prevents spreading | 10–15 minutes |
| Extend chill if soft | Makes shaping easier | +5 minutes as needed |
| Preheat oven first | Ensures quick set on baking | Correct recipe temperature |
Baking to Golden Perfection
A careful bake at moderate heat brings out the gentle nut flavour while preserving a tender crumb.
Place the tray in a preheated oven and bake for about 12–15 minutes. Aim for a pale golden edge rather than a deep brown. This keeps the centres soft and crumbly.
Check the biscuits in the last few minutes. They are done when they feel firm to the touch but still pale. They will continue to set as they cool, so remove them promptly to avoid over-baking.
Lightly tap a biscuit to test the texture. If it springs back gently, the bake is complete. A quick dusting of sugar after cooling seals the appearance and adds a delicate finish.
“Monitor the oven closely in the final minutes to keep a tender, melt-in-the-mouth crumb.”
| Goal | Indicator | Timing |
|---|---|---|
| Even colour | Pale golden edges | 12–15 minutes |
| Texture | Firm to touch, soft inside | Check final 2–3 minutes |
| Finish | Dust with sugar | After cooling |
Tip: For a tried-and-tested result, follow the mary berry almond style and enjoy these berry almond snowballs while fresh for best texture.
Achieving the Signature Snowy Appearance
A warm dusting of icing sugar is what turns plain biscuits into a festive showstopper.
Remove the tray and, while each biscuit is still hot, roll it gently in a shallow bowl of sugar. The heat helps the sugar melt slightly and cling for a neat, even coating.
For the best results, work in batches so every piece has that perfect finish. If you want a heavier white finish, roll the cookies powdered sugar a second time once they have cooled.
Tip: Applying the sugar while the biscuits are sugar still warm ensures the granules adhere and form a subtle glaze. This contrast between the golden biscuit and the white surface is the iconic, festive look.
“A quick roll in fine sugar while warm gives the most reliable, picture‑perfect finish.”
Pro baker note: a light first coat sets the shape; a second coat builds the snowy depth without masking the crisp edge.
Cooling and Final Dusting
Give the biscuits time to cool on a wire rack so their shape and crumb remain perfect.
After the first roll, place each piece on a clean rack and leave for several minutes to cool. The rack prevents trapped steam from making the bottoms soggy and helps the sugar set evenly.
Once completely cool, you can roll cookies powdered sugar again to refresh the snowy look. Do this gently to avoid breaking the delicate, crumbly biscuits.
When you roll cookies powdered for a second coat, work in small batches. A light second coat evens the final coating and adds a neat, professional finish.
“Allowing full cooling on a rack makes the final coat more reliable and keeps the base crisp.”
Final checks: the sugar should cling without sliding, and each biscuit should feel firm. Leave them on the rack for a few more minutes before packing or serving so the coat can set properly.
| Action | Why it helps | Timing |
|---|---|---|
| Cool on a wire rack | Prevents soggy bases and sets shape | Several minutes until fully cool |
| Roll cookies powdered sugar again | Refreshes snowy finish and adds sweetness | Once fully cooled, gently re-roll |
| Rest before storage | Ensures coating sets and avoids smudges | Leave on rack a few extra minutes |
Troubleshooting Common Baking Issues
Small adjustments in technique can rescue a dry biscuit or one that has collapsed. These troubleshooting tips help you correct problems fast so the next bake is spot on.
Preventing Cracks
Chill the dough balls for 10–15 minutes before baking. A brief rest firms the butter and helps each piece hold its shape in the oven.
If cracks persist, check that ingredients were at room temperature and that you weighed the flour and almonds accurately. Overworking the dough can also cause splitting.
Fixing Dry Texture
If the crumb feels dry, add 1 tablespoon of milk to the mix and rework gently. This restores moisture and helps bind the flour with the ground almonds.
Also verify your baking time — even a few extra minutes can dry these delicate biscuits.
Avoiding Collapsed Biscuits
Collapsed pieces often come from over-creaming the butter and sugar. Reduce creaming to keep structure firm during baking.
To refresh slightly flattened treats, warm them in a low oven at 120°C for 3–4 minutes. Do not use a microwave.
“Keep ingredients at room temp and measure precisely — small changes prevent the most common faults.”
| Issue | Quick Fix | Timing |
|---|---|---|
| Excessive cracks | Chill dough balls | 10–15 minutes |
| Dry texture | Add 1 tbsp milk | Before baking |
| Collapsed biscuits | Reduce creaming time | During mixing |
Creative Variations and Flavour Twists
A few simple changes to the basic recipe create exciting new versions of this biscuit.
Chocolate option: add 1–2 tablespoons of cocoa powder to the dough or dip cooled biscuits in melted chocolate for a richer finish. This version pairs well with a second light roll in sugar.
Spiced and citrus twists: stir a pinch of nutmeg or mixed spice into the flour for festive warmth. Alternatively, add finely grated orange or lemon zest to lift the flavour and balance the nutty note.
Need a substitute? Instead ground almonds with ground hazelnuts or pistachios for a different kind of richness. If you prefer milder flavour, swap the almond extract for vanilla extract.

Vegan and storage tips: use a dairy-free spread instead of butter for a vegan version. Once cool, store airtight container at room temperature for up to 1 week to keep texture and sugar coating fresh.
“Small adjustments make each batch suit different tastes and diets.”
Conclusion
Finish each batch with care and you’ll have elegant, tender treats ready to share or store.
This simple recipe uses basic ingredients—flour, butter and ground almonds—to create a delicate, melt-in-the-mouth texture. Use fresh butter and a little extract for depth and work quickly to avoid excess fat in the dough.
Follow baking time and preheat the oven, line trays with parchment and cool on a rack for best results. Roll warm pieces in sugar for the signature snowy appearance that makes these berry almond snowballs so festive.
Store airtight container once fully cool; they keep well for up to one week. These tips help you make mary berry almond biscuits with consistent richness and charm.
FAQ
What makes these almond snowball biscuits so special?
Can I use salted butter instead of unsalted?
Is caster sugar essential, or can I substitute granulated sugar?
How important is the almond extract and can I omit it?
Should I use ground almonds or plain flour alternatives?
What is the correct dough consistency before shaping?
How large should I roll the dough balls and how long to bake?
Do the biscuits need chilling before baking?
How do I get that perfect powdered sugar coating?
My biscuits cracked or collapsed—how can I prevent that?
How should I store the biscuits to keep them fresh?
Can I add chopped almonds on top or use sliced almonds inside?
Are there gluten-free options for this recipe?
Any tips for achieving a richer flavour?
Mary Berry Almond Snowballs
These classic festive biscuits yield about 18 treats and are ideal for gifting or a refined tea-time plate. Expect melt-in-the-mouth bites with a gentle almond flavor and a light icing sugar finish.
Ingredients
- 150g plain flour
- 40g ground almonds
- 100g softened butter
- 50g caster sugar
- ½ teaspoon almond extract (optional)
- Icing sugar for dusting
Method
- Preheat your oven to the correct temperature and line a baking tray with parchment paper.
- In a large mixing bowl, cream together the softened butter and caster sugar until light and fluffy.
- Gently fold in the ground almonds and plain flour in stages until just combined to form a soft dough.
- Scoop walnut-sized portions of dough and roll them into balls, placing them on the prepared baking tray with space between each.
- Refrigerate the shaped dough balls for 10–15 minutes to firm them up.
- Bake in the preheated oven for 12–15 minutes until they are pale golden around the edges.
- Remove from the oven and while still warm, roll each biscuit in icing sugar to create a snowy appearance.
- Allow the biscuits to cool on a wire rack before serving or storing.