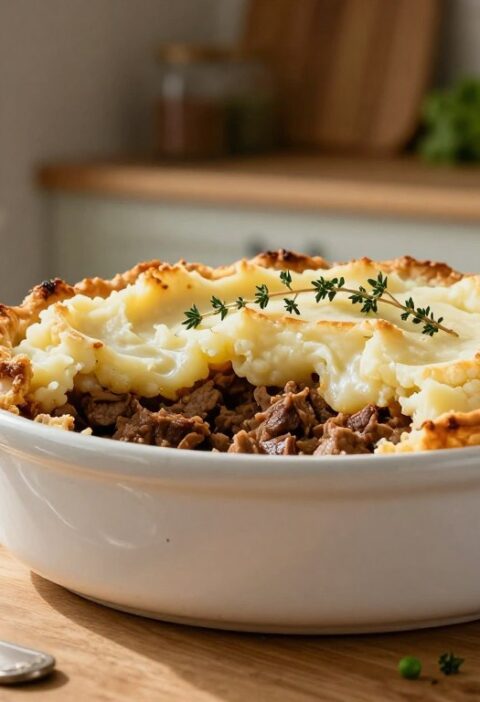
This classic centrepiece combines rich vegetables, mushrooms and cheese wrapped in a golden puff pastry shell. It makes a show-stopping main for festive meals or a stylish Sunday lunch. Each serving gives about 420 kcal, so it feels indulgent yet satisfying.
The simple steps let you make this mary berry inspired dish at home. The flaky pastry keeps the filling moist and flavoursome. Follow the recipe for a reliable, impressive result.
Key Takeaways
- The dish is a hearty, vegetarian main wrapped in golden puff pastry.
- Ready for special occasions and family dinners.
- About 420 kcal per serving makes it filling yet balanced.
- Use fresh mushrooms and spinach for best texture and taste.
- Chill the pastry before baking for a crisp, golden finish.
Why Choose a Mary Berry Vegetable Wellington
A well-made meat-free main can be the highlight of any festive table, offering both taste and theatre.
The Appeal of Meat-Free Mains
Choosing a vegetarian main lets you showcase seasonal produce and bold flavours. It gives guests a hearty alternative that still feels special.
The flaky pastry shell creates a luxurious mouthfeel. That crisp exterior seals in steam and keeps the filling rich and satisfying.
A Festive Favourite
This garden-centred centrepiece works well for Christmas and other family gatherings. It proves that a meat-free roast can be elegant and comforting.
“Try this mary berry recipe for a striking seasonal centrepiece — guests will ask how you did it.”
- Showcases seasonal vegetables while staying filling.
- Easy to adapt so you can make mary berry style meals with confidence.
- The versatile pastry allows for creative presentation and a professional finish.
Essential Ingredients for Your Vegetarian Centrepiece
The success of this centrepiece hinges on a few quality ingredients and careful seasoning.
Use 75g of cheddar or goat cheese to add creaminess and a tangy lift to the filling. Choose fresh mushrooms (250g) for texture and one diced red pepper for colour.
One large sheet of ready-rolled puff pastry forms the golden shell, and 2 tbsp of olive oil will roast the butternut squash and other veg until caramelised. Season with salt and black pepper to bring out natural sweetness.
Beat one egg for the glaze to create a glossy finish during baking. Check that your mushrooms and squash are fresh—good ingredients make this vegetarian main stand out.
| Ingredient | Quantity | Purpose |
|---|---|---|
| Cheddar or goat cheese | 75g | Creamy, tangy filling |
| Mushrooms | 250g | Texture and umami |
| Red pepper | 1, diced | Colour and sweetness |
| Butternut squash | To taste; roast with 2 tbsp olive oil | Caramelised depth |
| Puff pastry sheet | 1 large sheet | Golden, flaky pastry shell |
Preparing Your Fresh Vegetables
Careful prep makes all the difference. Begin by trimming and chopping the produce so each piece cooks evenly and the filling holds together.
Sautéing and Roasting Techniques
Start with 150g of spinach and 250g of mushrooms, finely chopped to create a uniform texture. This helps the filling bind and slice neatly.
Heat 2 tbsp olive oil in a large pan. Sauté onion and garlic until soft and fragrant, then add mushrooms, courgette and one diced red pepper.
- Cook until all liquid has evaporated — this prevents a soggy base when you wrap the sheet of pastry.
- Roast butternut squash with a drizzle of olive and season salt and black pepper in the oven for caramelised depth.
- Once the veg are tender, stir in the spinach and cook until wilted, then remove from the heat to cool.
Drain well before assembly. Remember a single pastry sheet must hold this mixture, so well-drained, cool vegetables and a little goat cheese folded in will keep the centre creamy without weeping.
The Importance of Cooling the Filling
Allowing the filling to chill fully helps the pastry keep its crisp, professional finish.
Chill the assembled log in the fridge for 60 minutes. This one-hour rest stops the warm cheese and vegetables from melting the pastry before baking.
Ensure the mushrooms, butternut squash and goat cheese are completely cold. A cold mix is firmer and easier to shape into a neat log for wrapping.
Using a little olive oil during cooking helps the veg hold their shape after cooling. When cooled, the filling will not steam the puff pastry, so the shell rises evenly.
Tip: Apply the egg wash just before baking. A chilled filling ensures the egg sets quickly, giving a glossy, golden pastry finish.

| Step | Why it matters | Timing |
|---|---|---|
| Cool filling | Prevents soggy pastry and keeps shape | 60 minutes |
| Drain and chill | Keeps cheese from melting into the base | Until cold |
| Apply egg wash | Sets quickly on a cold surface for a golden finish | Just before baking |
Selecting the Perfect Puff Pastry
The pastry you pick is the single most important choice for a flaky, golden finish.
Choose a high-quality all-butter puff pastry for the best layers and flavour. Cold, well-laminated pastry gives the crisp lift that makes the dish look professional.
Keep the sheet in the fridge until the last possible moment. Work quickly on a lightly floured surface or one with a little olive oil to stop sticking.
When you follow mary berry style recipes, pastry quality matters as much as mushrooms and cheese. Check the sheet for any tears and patch small holes with extra pastry before wrapping.
“A hot oven at the start of baking is what sets the layers and creates a bakery-style rise.”
- Preheat the oven fully to get an early burst of heat.
- Brush with beaten egg just before baking for a glossy finish.
- Handle gently to keep layers intact and avoid compressing the pastry.
| Choice | Why it matters | Quick tip |
|---|---|---|
| All-butter puff | Best flavour and rise | Buy chilled, not frozen |
| Chilled handling | Prevents soggy pastry | Return to fridge if warm |
| Work surface | Stops sticking and tearing | Light dusting of flour or oil |
Assembling Your Wellington
Arrange the chilled puff sheet on a lined baking sheet and pile the cooled filling along its centre.
Brush the pastry edges with a little beaten egg. This acts as a glue and helps the seal hold during baking.
Fold the pastry over the filling and press the edges together firmly. Take your time to crimp or pinch the seam for a tidy finish.
Creating a Neat Log
Gently shape the filling into a compact log before folding. The goat cheese helps bind the mushrooms, squash and red pepper so the mixture holds together.
Trim any excess pastry so the base cooks evenly. Turn the log over so the sealed side sits on the baking sheet for a cleaner presentation.
- Place the puff pastry on the baking sheet first to make transfer easier.
- Use the beaten egg to secure seams and add shine later with a final glaze.
- Crimp edges not just for looks but to prevent leaks while in the oven.
| Action | Why it matters | Tip |
|---|---|---|
| Brush edges with beaten egg | Seals pastry and prevents filling escape | Use a light touch to avoid soggy pastry |
| Trim excess sheet | Ensures even cooking and a crisp base | Save trimmings for decorations |
| Place seam underneath | Gives a neater final look | Press seam firmly on the baking sheet |
Achieving a Golden Finish with Egg Wash
A careful brush of beaten egg is the last small step that makes a big visual difference. It gives the log a deep, glossy colour that guests expect from a special roast.
Brush the entire surface evenly so no pale patches remain. An even coat helps the pastry brown uniformly and creates a tidy, professional look.
The egg wash also helps seal seams and adds crispness to the shell. Use a soft pastry brush and light strokes to avoid tearing the delicate surface.
Consistency matters: have enough glaze prepared to cover the whole log and apply one last thin layer just before baking. This small care transforms the appearance into something worthy of a dinner party.
“A perfectly glazed pastry is the signature of the style and shows attention to every detail.”
Baking to Perfection
Getting the bake right makes the whole dish sing — timing and steady heat are everything. A short, confident bake crisps the pastry while keeping the filling warm and flavourful. Use a clear routine so you can relax while it cooks.
Monitoring Oven Temperatures
Place your prepared log in a preheated oven at 200°C (180°C fan) and bake for 30-35 minutes until the pastry is perfectly golden brown. Put the pastry on a hot baking sheet so the base crisps in the first few minutes and does not go soggy.
- Keep an eye on the oven temperature — consistent heat helps the pastry rise and the filling to heat through.
- If the pastry starts to brown too fast, loosely cover it with foil to let the centre finish without burning.
- After about 30-35 minutes, the log should feel firm and sound hollow when tapped; that tells you it is ready.
- Always rest for a few minutes after removing from the oven. This makes slicing neater and the filling settle.
| Oven setting | Temperature | Timing |
|---|---|---|
| Preheated oven minutes | 200°C (180°C fan) | 30–35 minutes |
| Finish check | Visual and tactile | Firm and hollow when tapped |
| Quick fix | Foil if browning too fast | Cover loosely during remaining minutes golden |
Tip: Brush a light layer of beaten egg just before the bake for a deep, glossy colour. That final glaze and steady heat are what give the shell its crisp, golden finish.
Tips to Avoid Soggy Pastry
Crisp pastry starts with dry, well-cooked filling and a few careful tricks.
Cook off all liquid from mushrooms and other vegetables so nothing weeps into the base. This step is essential to avoid soggy pastry and gives a neat slice when serving.
Cool the filling completely before assembly. Steam trapped inside the log will soften the pastry during baking.
Place the wrapped log on a preheated baking sheet so the bottom seals quickly. A hot base cooks the underside fast and stops moisture being absorbed.
- Sprinkle a light layer of breadcrumbs on the pastry to soak any residual juices.
- Use a quality sheet of puff pastry and handle it cold to preserve the layers.
- Heat your oven fully — the correct preheated oven temperature gives an early lift and keeps the crust crisp.
| Action | Why it helps | When |
|---|---|---|
| Drain and dry vegetables | Stops excess moisture | Before assembly |
| Use a hot baking sheet | Crisps base quickly | Place in oven minutes before baking |
| Chill filling | Prevents steam inside pastry | At least 60 minutes |
Follow these steps and your vegetable wellington will slice cleanly, with a flaky, golden crust every time.
Creative Filling Variations
A clever mix of textures—soft squash, crisp nuts and tangy cheese—keeps each slice interesting.
Toast a handful of walnuts or chopped chestnuts and fold them into the cooled filling. The crunch contrasts nicely with roasted butternut squash and helps the filling slice cleanly.
Incorporating caramelised onions
Slowly cook onions in a splash of olive oil until deep brown and sweet. Stir them through with the mushrooms to add a rich, savoury-sweet layer that balances the tang of goat cheese.
Using different cheeses
If you want a bolder taste, swap the goat cheese for feta or a crumbly blue. These alternatives lift the overall depth while keeping the pastry crisp.
- You can also add mushrooms such as chestnut or portobello to enhance earthiness.
- Include diced red pepper for colour and mild sweetness.
- Season with thyme or rosemary before roasting to complement the flavours.
Recommended Side Dishes for a Hearty Meal
Think about contrast: crisp textures and fresh greens balance the buttery pastry and creamy cheese.
Classic roast potatoes make the meal traditional and filling. Serve them crisped in goose or olive oil for a golden, crunchy bite.
Light sides like steamed green beans or a fresh garden salad bring colour and lift. They cut through the richness of the filling and refresh the palate.
Vegetarian gravy ties flavours together. A rich gravy made from roasted veg drips into each slice and warms every mouthful.
For sweet contrast, a spoon of cranberry sauce works brilliantly with savoury notes. Try carrot and parsnip mash for a silky, sweet pairing.
- Include a sprinkle of cracked black pepper to finish the plate.
- Fold in toasted nuts or seeds for extra crunch.
- Remember: versatile sides let you use seasonal produce and customise the meal.
Storing and Reheating Leftovers
Proper cooling, storage and a short oven refresh bring the pastry back to life. Allow the log or slices to cool completely before wrapping. This stops condensation and keeps the crust crisp.
Store slices in an airtight container in the fridge for up to 3 days. Keep layers separate with parchment if you must stack them. Chilled slices are firmer and easier to reheat.

To reheat, preheat the oven and warm slices for 15–20 minutes until piping hot and the pastry has crisped. Brushing the edges with a little leftover egg wash helps restore a golden colour and keeps the surface moist.
Avoid the microwave where possible. Microwaving softens the pastry and can make the goat cheese filling lose texture and turn runny.
- The cooking style behind this recipe often tastes better the next day as flavours settle.
- Check that slices are heated through; use a moderate oven to prevent over-browning in the first few oven minutes.
“Reheating in the oven gives the best results for texture and flavour.”
Freezing Your Wellington for Future Use
An unbaked log freezes well, so you can plan dinners days in advance. This saves time and keeps the pastry ready for guests at short notice.
Freeze for up to one month. Wrap the uncooked roll tightly in cling film, then in foil to prevent freezer burn and preserve the pastry layers.
When ready to cook, place the frozen log straight into the oven and add 10 minutes to the usual baking time. No thawing is required unless you prefer to defrost first.
The filling, including the goat cheese, keeps its texture and flavour when frozen. This means a fresh-tasting result that slices neatly after baking.
- Wrap tightly to protect pastry and flavour.
- Bake from frozen for convenience, or defrost overnight if you like.
- Use freezing to prepare ahead for parties and busy days.
Tip: Label with the date so you use the log within a month for best quality.
Conclusion
strong, A neat seal, a hot oven and a short rest are the small steps that give you clean slices and a crisp finish. Use a preheated oven and a hot baking sheet to get that golden puff pastry lift.
This recipe turns roasted vegetables, mushrooms and goat cheese into a hearty vegetarian main. Follow the tips to avoid soggy pastry, brush with beaten egg before baking and season with salt and black pepper for a polished result.
Enjoy: serve with simple sides, carve in confident minutes, and savour a show-stopping centrepiece that uses good ingredients and a little patience to shine.
FAQ
What makes this vegetable wellington a good meat-free main?
Which vegetables work best for the filling?
How do I avoid a soggy pastry bottom?
Can I add other ingredients like caramelised onions or nuts?
What type of puff pastry should I use?
How should I seal and shape the wellington?
What oven temperature and baking time work best?
How can I ensure an even, golden finish?
Can I prepare this in advance?
Is it suitable to freeze before baking?
What are good side dishes to serve with it?
How should I reheat leftovers to keep pastry crisp?
Mary Berry Vegetable Wellington
This classic centrepiece combines rich vegetables, mushrooms and cheese wrapped in a golden puff pastry shell. It makes a show-stopping main for festive meals or a stylish Sunday lunch.
Ingredients
- 75g cheddar or goat cheese
- 250g fresh mushrooms, finely chopped
- 1 red pepper, diced
- 1 large butternut squash, to taste; roasted with 2 tbsp olive oil
- 1 large sheet of ready-rolled puff pastry
- 2 tbsp olive oil
- 1 egg, beaten for glaze
- 150g spinach, finely chopped
- Salt and black pepper to taste
Method
- Preheat the oven to 200°C (180°C fan).
- Heat 2 tbsp olive oil in a large pan and sauté onion and garlic until soft.
- Add mushrooms, courgette, and diced red pepper, cooking until all liquid has evaporated.
- Roast butternut squash with a drizzle of olive oil, salt, and black pepper until caramelised.
- Stir in the spinach and cook until wilted, then remove from heat and let cool.
- Drain the filling well to avoid soggy pastry.
- Chill the filling completely before assembly.
- Roll out the puff pastry on a lightly floured surface.
- Place the cooled filling along the center of the pastry.
- Brush the edges of the pastry with beaten egg to seal.
- Fold the pastry over the filling and crimp the edges to secure.
- Place the wellington seam-side down on a lined baking sheet.
- Brush the top with beaten egg for a glossy finish.
- Bake in the preheated oven for 30-35 minutes until golden brown.
- Let rest for a few minutes before slicing and serving.