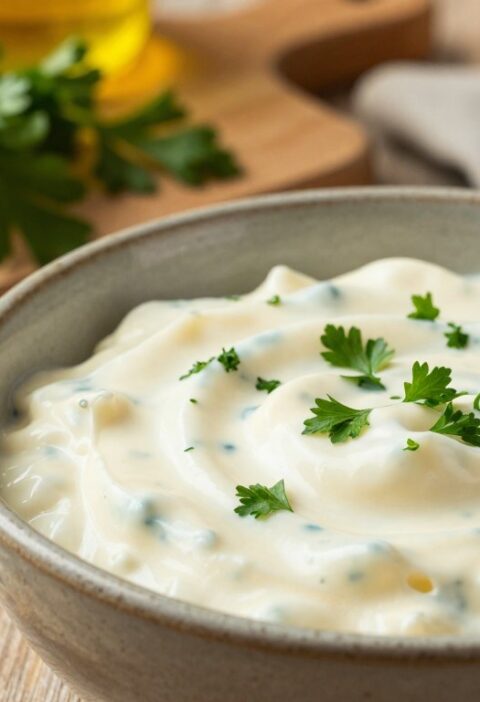
This delightful recipe brings a touch of elegance to your table. Inspired by a beloved British cook, the guide shows how simple pantry staples turn into a smooth, creamy dip. You will find clear steps that make the process quick and enjoyable.
Whether hosting a small gathering or preparing a healthy snack, the result is versatile and crowd-pleasing. The method focuses on achieving the perfect consistency and balanced flavour using basic tools common in UK kitchens.
The instructions reflect the practical techniques that made mary berry a household name. With a few easy tips you can make a classic version at home that friends and family will love.
Key Takeaways
- Simple ingredients transform into a creamy dip suitable for many occasions.
- Clear, practical steps help you hit the right texture every time.
- Technique matters more than fancy equipment.
- Great for parties or a healthy snack at home.
- Recipe adapts easily to UK pantry staples and tastes.
The Appeal of Mary Berry Hummus
Here is a recipe that proves homemade dips can be elegant without fuss.
Since 1970 the cook has published over 70 cookery books and was honoured with a CBE in 2012. This background explains why the recipe feels both trustworthy and simple.
This dip is a great example of quick cooking. Use it as a sandwich spread, a salad dressing, or a tasty side with grilled chicken.
- It adapts easily — think whipped feta twists or a spiced vegetable curry variation.
- The method keeps ingredients straightforward so the food tastes fresh and bold.
- Perfect for informal gatherings or weekday meals when you need flavour fast.
Accessible techniques and a flexible recipe make this an ideal addition to any pantry. It balances convenience with the subtle touch of classic British cookery.
Essential Ingredients for Your Pantry
A handful of quality staples lifts this recipe from simple to superb. Keep these on hand to make the spread quickly and consistently.
Pantry Staples
Chickpeas (400g can) form the creamy base. Rinse and drain before blending for the best texture.
Fresh lemon juice and a small clove of garlic add bright flavour. Use 2 tbsp lemon juice and one garlic clove as a starting point.
Keep salt, pepper and a little extra oil nearby to adjust the taste. A few tablespoons of cold water help loosen the mix if it feels too thick.
Selecting Quality Tahini
Tahini is vital for the nutty depth. Use 2 tbsp of a well-stirred, sesame-based tahini to achieve a smooth, creamy result.
Olive oil (2 tbsp) adds silkiness and a clean finish. If you plan to serve with roasted garlic or a chicken dish, these ingredients pair beautifully.
- 400g chickpeas
- 2 tbsp tahini
- 2 tbsp lemon juice
- 1 small clove garlic
- 2 tbsp olive oil + 2–3 tbsp cold water
- ½ tsp salt, plus pepper to taste
Necessary Kitchen Equipment
Using the right kit helps you reach a silky, even result every time.
A high-quality food processor is the single most important item to achieve the signature smooth texture. It slices through chickpeas, tahini and small garlic cloves quickly, saving effort and time.
With only 10 minutes prep time, prep is fast. Measure 2 tbsp olive oil and add 2–3 tbsp cold water while blending to loosen the mix. Keep measuring spoons and a small spatula to scrape down the sides.
Quick cooking works best with simple organisation. Have lemon juice, salt and other ingredients at hand so you can blend without pauses.
“A little oil and a steady processor turn basic pantry items into creamy, professional-quality dip.”
- Food processor for smooth texture
- Measuring spoons for precise tbsp amounts
- Small spatula to incorporate every last bit
- Bowls for staging ingredients plus extra lemon juice and water
With these tools in your kitchen, you can cook a reliable batch in minutes and finish with a drizzle of oil and olive garnish for a neat presentation.
Preparing the Chickpeas for Success
Start this stage by treating the chickpeas with care—small steps here make a big difference to texture.

Removing Skins for Silkiness
The first step to make hummus that is truly silky is to ensure your 400g of chickpeas are thoroughly drained and rinsed before use.
For an ultra-smooth texture, the classic tip from mary berry is to remove the skins. Gently rub the chickpeas in a clean towel and pick off loose skins. This takes a few minutes but greatly improves mouthfeel.
Once prepared, add the chickpeas to your food processor with the garlic, tahini, lemon juice and a pinch of salt. Begin blending, then drizzle a little oil or cold water to loosen the mix.
Taste after the initial blend. Adjust salt or lemon to get the right balance. This careful prep is a vital step for any home cook who wants light, creamy results that rival a pro.
Blending the Perfect Mary Berry Hummus
A few mindful seconds in the processor turn pantry staples into a restaurant-quality dip. Start by combining the chickpeas, tahini, lemon juice, garlic and salt in your food processor. Pulse for about 30 seconds until the mix is roughly combined.
With the motor running, slowly pour in 2 tbsp olive oil. Next add 2–3 tbsp cold water in a steady stream to build a smooth creamy consistency. This helps the oil and water emulsify for a light texture.
- Blend chickpeas, tahini, lemon juice, garlic and salt for 30 seconds.
- With motor on, add 2 tbsp olive oil, then 2–3 tbsp cold water.
- Taste and adjust with extra lemon juice or salt if needed.
- Finish with a quick pulse to fully incorporate.
This quick cooking step beats store-bought versions for freshness. Check seasoning for pepper and lemon, then spoon into a bowl and serve with an olive or drizzle of oil on top.
“A steady pour and short bursts of blending create the smooth, creamy result every cook wants.”
Achieving the Ideal Consistency
Finding the right balance of liquid and fat is the secret to a pillowy, restaurant-style dip.
Add cold water slowly while the processor runs. This is the key step most home cooks miss. A steady stream lifts the mix and keeps the flavour intact.
If the hummus turns too thick, add an extra tablespoon of water and blend for a few more seconds. Blending longer than you expect whips air into the chickpea base and gives a smooth creamy finish.
Taste often and adjust with a little lemon juice or a dash of olive oil to balance the garlic and tahini. Frequent tasting ensures the seasoning stays lively as you refine texture.
Note: chilled hummus firms up slightly. Aim for a texture just a touch looser than your final preference so it sets perfectly after cooling.
Customising Your Dip with Fresh Herbs
Bright herbs and simple add-ins let you tailor the dip to every plate and palate. Start small and taste as you go so the balance of lemon, olive and garlic stays fresh.
Adding Roasted Red Pepper
Fold in one roasted red pepper before the final blend for a sweet, smoky twist. Roast or buy jarred, then drain well to avoid thinning the mix.
This simple step gives colour and depth without changing the base technique.
Incorporating Fresh Parsley
Stir through a handful of chopped parsley or coriander at the end. Chopped parsley adds a bright, herby snap that lifts the dip for salads and sandwiches.
Creating Spicy Variations
For heat, add a pinch of cayenne or chilli flakes. Start with a small amount and increase to suit your taste.
Try roasted garlic for a mellow, caramelised flavour if you prefer less bite. Every cook should follow each step carefully so texture remains smooth and consistent.
- Tip: Add extras while blending, not before measuring, to keep the oil and water balanced.
- Experiment in small batches so you can adjust seasoning and make the recipe your own.
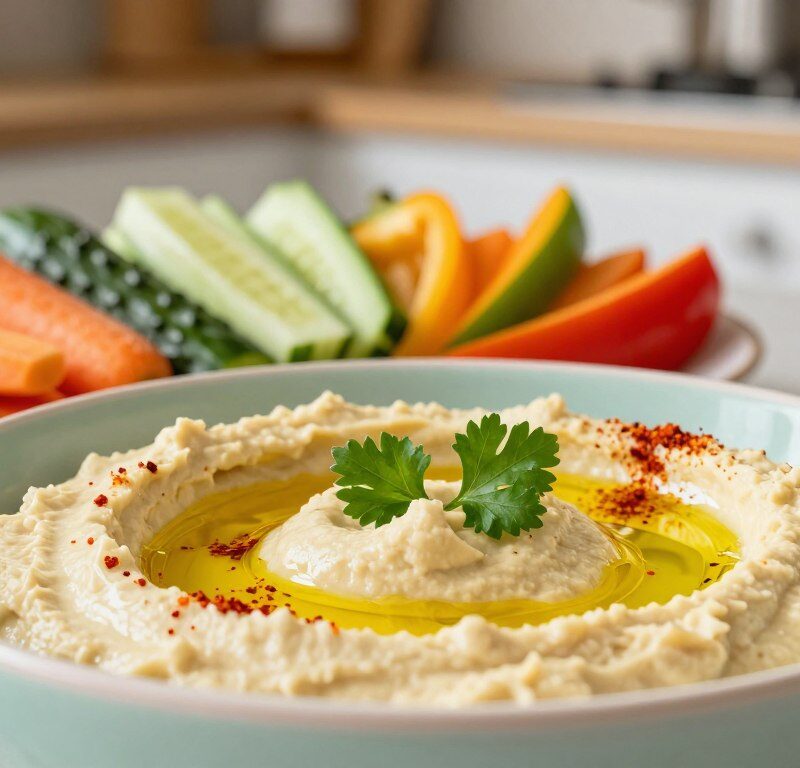
Serving Suggestions for Every Occasion
Serve this creamy dip in ways that suit a picnic, weekday lunch or an evening platter. It adapts easily and shines with just a few finishing touches.

For a classic approach, offer warm pita or flatbreads. This simple pairing is the most satisfying way to enjoy the mary berry recipe at social gatherings.
For a lighter plate, arrange carrot, cucumber and celery sticks. These vegetable choices make a healthy side and are perfect for dipping.
- Use the spread as a sandwich layer for added protein and flavour.
- Stir a spoonful into a grilled chicken salad for a creamy boost.
- Build a sharing board with olives and other Mediterranean appetisers to showcase the quick cooking style.
Finish each bowl with a drizzle of olive oil and a single olive or herb for colour. That small step lifts appearance and taste, so your dish looks as good as it tastes.
“A neat drizzle of oil and thoughtful pairings make all the difference.”
Troubleshooting Common Texture Issues
A few targeted adjustments will get your batch back to silky and fresh. If the dip is too thick, add cold water a tablespoon at a time while the processor runs. This helps you reach a smooth, creamy consistency without diluting flavour.
If you notice a bitter edge, check the tahini and the garlic. Old tahini or too much raw garlic can both cause bitterness. Reduce either ingredient and taste as you go.
Grainy texture? Blend for longer and add a little more oil to help emulsify. A steady pulse and scraping down the bowl will turn that grainy mix into a silkier spread.
If the flavour seems flat, up the lemon juice and salt in small amounts, then blend briefly to combine. A final pinch of pepper brightens the overall taste.
- Too thick: add cold water during the blending step.
- Bitter: reduce tahini or garlic and taste.
- Grainy: blend longer and add more oil.
- Bland: increase lemon juice and salt, then blend.
“Every cook hits bumps now and then; a few simple steps will rescue your dip and ensure a perfect final result.”
Storing Your Homemade Hummus
Proper storage keeps the flavours bright and the texture silky.
Place your dip in an airtight container and refrigerate. It will stay fresh for up to 5 days.
Before sealing, drizzle a thin layer of olive oil over the surface. This simple step prevents drying and keeps the top glossy.
- Stir well when you take it out — the mix can firm up slightly as it cools.
- A teaspoon or tbsp of cold water stirred through will loosen the texture if needed.
- Avoid freezing: thawing often changes the smooth balance and can ruin the texture.
One tip for the home cook: keep a small reserve of oil to refresh the surface before serving. A neat drizzle and a single olive or sprinkle of paprika lifts the presentation.
“Store well and you always have a quick, healthy snack ready for any moment.”
Nutritional Benefits of Chickpea Dips
A simple scoop of this creamy dip supplies steady energy and useful nutrients. Each serving provides about 180 kcal, so it works well as a satisfying snack or light meal.
Per portion you get roughly 6g protein and 4g fibre. That protein-fibre mix helps you feel full and supports steady blood sugar.
Using drained rinsed chickpeas ensures a clean base with fewer preservatives and a better nutrient profile. The texture also improves when the legumes are drained rinsed before blending.
The combination of lemon or lemon juice, garlic and olive oil adds flavour and antioxidants. A splash of oil and a little water while you blend keeps the dip smooth and light.
- Pair with fresh vegetable sticks for a low-calorie side.
- Add grilled chicken for a protein-rich plate.
- Enjoy as a versatile spread to boost everyday meals when you cook at home.
“Simple ingredients deliver big nutrition — a real winner for quick, healthy eating.”
Conclusion
This simple yet refined dip shows how basic storecupboard items can create a standout party centrepiece.
Follow this recipe and you can make hummus that rivals shop-bought jars in both flavour and texture. The method suits quick cooking and fits easily into a busy kitchen routine.
Experiment with roasted garlic, red pepper or a scatter of chopped parsley and herbs. Try a whipped feta twist or stir a spoonful into a vegetable curry or grilled chicken for an extra layer of flavour.
Enjoy the process of cooking and sharing this healthy, protein-packed snack. Keep the ingredients simple, store jars carefully, and let this dip become a staple in your collection of recipes.
FAQ
What makes this Mary Berry hummus recipe special?
Which pantry staples do I need to make this hummus?
How do I choose the best tahini?
Do I need any special equipment?
Is it worth removing chickpea skins?
How long should I blend the mix for a silky texture?
How do I get the right consistency?
Can I add herbs or roasted vegetables?
How can I make a spicy version?
What are good serving suggestions?
Why is my hummus grainy or dry?
How long does homemade hummus keep in the fridge?
Is this dip a healthy choice?
Mary Berry Hummus
This delightful recipe brings a touch of elegance to your table. Inspired by a beloved British cook, the guide shows how simple pantry staples turn into a smooth, creamy dip.
Ingredients
- 400g canned chickpeas, drained and rinsed
- 2 tbsp tahini
- 2 tbsp lemon juice
- 1 small clove garlic
- 2 tbsp olive oil
- 2-3 tbsp cold water
- ½ tsp salt
- pepper to taste
Method
- Remove the skins from the chickpeas for a smoother texture by rubbing them with a clean towel.
- Add the chickpeas, garlic, tahini, lemon juice, and salt to a food processor.
- Blend for about 30 seconds until roughly combined.
- With the motor running, slowly pour in the olive oil and then add cold water gradually until you achieve a smooth consistency.
- Taste and adjust with extra lemon juice or salt if needed.
- Pulse briefly to fully incorporate all ingredients.
- Serve in a bowl with a drizzle of olive oil and an olive or herb for garnish.