This treasured dessert brings an immediate sense of comfort. Adapted from the book Everyday, the approach is designed so every home cook can achieve perfect results.
The recipe uses simple ingredients — quality rice, creamy milk and a pinch of sweetness — to create a luxuriously smooth texture. Baking gently in the oven lets the grains absorb the dairy slowly, giving a rich, velvety finish that many find soothing.
It is budget-friendly and needs little fuss, yet it rewards patience with a deeply satisfying flavour. Follow the classic method here and you can recreate a true mary berry classic at home with ease.
Key Takeaways
- The recipe is adapted from the book for consistent results.
- Simple ingredients produce a luxurious, velvety texture.
- Baking in the oven creates a creamy, evenly cooked dessert.
- Suitable for family meals — economical and low effort.
- Allow a little time; the result is well worth the wait.
The Timeless Appeal of Mary Berry Rice Puddings
Generations have turned to this simple, oven-baked treat when they want trustworthy comfort and familiar flavour.
The pudding’s charm lies in warmth and nostalgia. It is a dessert that gathers family around the table.
The slow oven bake gives a dependable, creamy texture. Gradual cooking lets the grains soften and absorb milk evenly. The result is a melt-in-your-mouth finish that pleases everyone.
This classic rice pudding has stood the test of time. Basic pantry staples become something gently refined and homely.
Whether for a relaxed supper or a family celebration, the mary berry classic delivers consistent results. It shows that simple cooking still wins in modern homes.
- Slow baking = creamy texture and even cooking.
- Comforting flavour that suits family meals.
- Reliable method for a classic rice dessert.
| Attribute | Why it Matters | Tip |
|---|---|---|
| Texture | Creamy and smooth from slow heat | Use steady oven temperature and full-fat milk |
| Suitability | Perfect for family gatherings | Serve warm with a spoonful of jam or fruit |
| Classic appeal | Simple ingredients, lasting flavour | Make ahead and reheat gently |
“Every spoonful feels like home.”
Why This Classic British Dessert Remains a Favourite
This beloved classic British pudding wins hearts because it reliably turns humble store-cupboard staples into something gently indulgent.
The mary berry classic version is famed for converting simple ingredients into a rich, creamy result. The recipe is forgiving, so even newcomers to baking get steady outcomes.
Slow oven baking gives the grains time to soften and produce a delicate texture. That steady time and low heat are central to a classic rice pudding’s smooth finish.
The dish is versatile. Serve it warm on a cold evening or chilled as a comforting dessert. Many prefer this berry classic rice version to shop-bought tins for its authentic, homemade flavour.
- Reliable method for predictable results.
- Versatile serving options: warm or cold.
- Slow baking creates that sought-after texture.
| Why it Endures | Benefit | Quick Tip |
|---|---|---|
| Classic British heritage | Familiar and comforting | Serve with jam or roasted fruit |
| Simple recipe | Easy for new bakers | Use full-fat milk for creaminess |
| Slow oven baking | Delicate texture, even cooking | Allow resting time before serving |
“Every spoonful feels like home.”
Essential Ingredients for the Perfect Pudding
Gathering the right pantry items is the single best step toward a flawless, creamy pudding. Keep everything measured and ready before you begin.
Key measurements for this mary berry recipe:
- 1/3 cup (75g) pudding rice — for the correct starch release.
- 3 3/4 cups (900ml) full-fat milk — to deliver richness.
- 1 heaped tablespoon caster sugar — for balanced sweetness.
- 1/2 tsp freshly grated nutmeg — warm, traditional flavour.
Use a little butter to grease the dish; it stops sticking and adds depth. Always measure milk and rice with a reliable jug and scale to keep ratios accurate.
These simple ingredients are the foundation. Choosing the best quality versions will noticeably lift the final result.
“Precise measures make a cosy, consistent dessert every time.”
Selecting the Right Type of Rice
Not all rice behaves the same in a slow-baked, milk-based dessert; pick wisely.
Always opt for pudding rice — its high starch content breaks down during the long bake and thickens the milk to give a smooth finish.
If pudding rice is unavailable, Arborio makes a fine substitute. It releases starch well and gives a creamy texture close to the original.
Avoid long-grain varieties such as Jasmine or Basmati. These stay separate and firm, and they will not soften enough during a gentle oven cook.
- The starch in short-grain rice is what creates the signature consistency of a classic rice pudding.
- mary berry often stresses picking the right grain so the kernels become tender rather than hard.
- Always check the packet to confirm you have pudding rice before you begin.
Choosing the correct grain ensures a uniform, velvety mouthfeel in every spoonful. The specific properties of short-grain rice can transform simple milk and sugar into a truly luxurious treat.
Preparing Your Baking Dish for Success
Good equipment prep makes a pudding sing. Choose a wide-based baking dish of about 2 qt / 1.6 litre so the mixture spreads thinly and cooks evenly in the oven.
Greasing Techniques
Use softened butter to grease the entire interior. Rub it into the corners and up the sides so no part is missed.
Why this matters: a well-buttered baking dish prevents sticking, keeps the edges from becoming overly crusty and helps the pudding release cleanly when you serve.
- Soft butter creates a reliable non-stick surface for easier serving.
- A wide-based dish promotes even cooking and lets the rice distribute across the base.
- Correct depth (2 qt / 1.6 litre) gives the right balance of milk and grain for steady baking.
Take the extra minute to check the dish before pouring in the mixture. This small care step is typical of classic baking routines and lifts the final result.
“A tidy dish is the first step to a confident bake.”
The Importance of Using Full-Fat Milk
A higher-fat milk brings a silkier mouthfeel that lifts this classic pudding above the ordinary.
Full-fat milk is essential for the richest flavour and most luxurious texture in your rice pudding. The fat coats each grain, helping them stay tender and giving the mix a creamy, satisfying body.
Semi-skimmed can work in a pinch, but it will not deliver the same depth. If you want an indulgent finish that feels true to the tradition, choose the best full-fat milk you can find.
The magic comes from the starch in the rice interacting with the milk fat to create a velvety consistency. High-quality ingredients matter—milk is the single most important component in this recipe.
- Use full-fat milk for a creamier texture and richer flavour.
- Lower-fat milks yield a thinner, less indulgent result.
- Better milk = better pudding; it’s that simple.
“The quality of the milk defines the character of the final dessert.”
Mastering the Slow Baking Technique
Gentle, low-temperature baking helps the mix transform from thin milk into a silky, spoonable treat.
Preheat the oven to 320°F / 160°C / gas mark 3. A steady oven temperature prevents the milk from curdling and gives even cooking across the baking dish.
Combining milk and rice matters. Tip the pudding rice into the dish, add the full-fat milk and caster sugar, then stir so every grain sits evenly in the liquid. Dot a little butter around the edge for richness.
The mid-bake stir is crucial. Bake for 30 minutes, then sprinkle the nutmeg and give the mixture a gentle stir to stop clumping. Return the dish to the oven and continue baking for 1¼–1½ hours.
The pudding is ready when the rice is tender and a golden skin has formed. Allow a short rest; the surface will settle and the creamy texture will deepen with time.
| Step | Temperature & Time | Expected Result |
|---|---|---|
| Initial bake | 320°F / 160°C — 30 minutes | Milk warms, grains begin to swell |
| Mid-bake | Add nutmeg and stir; continue 75–90 minutes | Rice softens; surface develops a skin |
| Final | Rest for 10–15 minutes off heat | Thicker body and improved flavour |
“Slow and steady heat is the secret to a deep, nostalgic flavour.”
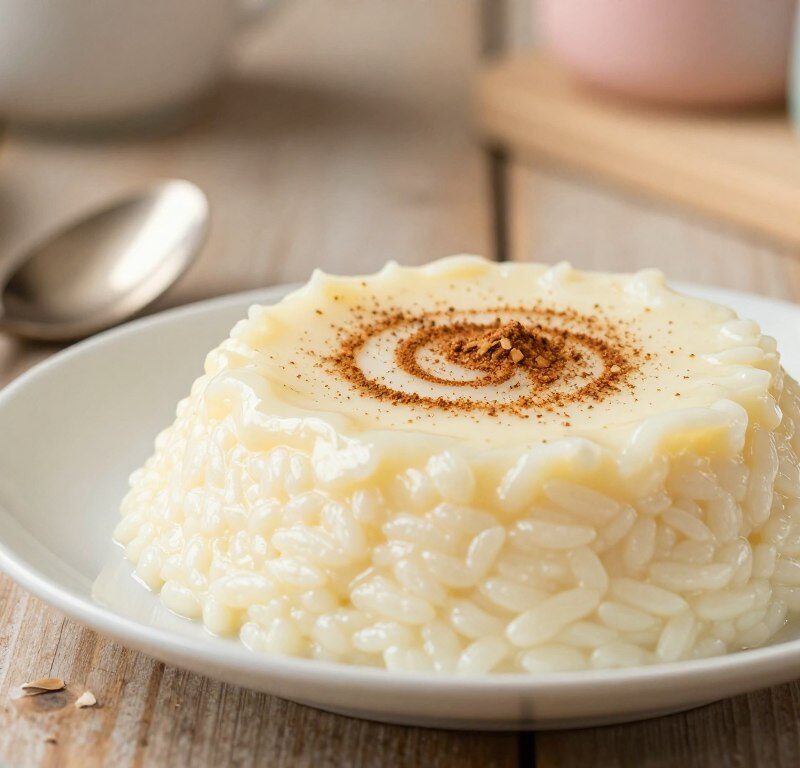
Achieving That Signature Golden Skin
A broad baking dish and gentle heat are the secret pair that encourage a wide, even golden skin. Increased surface area helps more of the milk reach the oven air and brown nicely.
The golden skin forms when milk proteins and sugars gently caramelise during baking. For best results, avoid stirring during the final hour so the top can set undisturbed.
Dot a little butter across the surface before the last stretch of baking. This will enrich the skin and create a glossy finish that contrasts with the creamy interior.
Keep the oven temperature steady; fluctuations spoil uniform colour and may stop the skin from forming. Using a wide dish also spreads the pudding thinly, giving a larger, more uniform top layer.
The finished skin will be slightly firmer than the body of the pudding. Many consider it the best bit and enjoy the textural contrast at each spoonful.
“That caramelised top gives the classic rice pudding its most beloved texture.”
How to Incorporate Nutmeg and Vanilla
Correct timing and restraint are the keys to using nutmeg and vanilla well in a baked pudding.
Stir vanilla into the milk and caster sugar mixture before you pour it over the rice. This ensures the flavour spreads evenly through the dish rather than concentrating in one spot.
Halfway through baking, sprinkle freshly grated nutmeg over the top. A light hand is best — a small pinch will warm the dessert without overwhelming its natural sweetness.
Some cooks add a tiny pinch of cinnamon alongside the nutmeg for depth. If you prefer, dot a little butter around the edge before the final bake to enrich the top and help the skin colour evenly.
Adjust to taste: start small and add more next time if you want a stronger aroma. These simple steps make each spoonful fragrant and comforting in a traditional British style.
| Flavoring | When to Add | Effect |
|---|---|---|
| Vanilla extract | Stir into milk and caster sugar | Even, rounded sweetness |
| Grated nutmeg | Sprinkle over top halfway through bake | Warm, aromatic lift |
| Cinnamon (optional) | Add with nutmeg | Subtle spiced depth |
“A gentle touch of spice makes a simple dessert sing.”
Managing Oven Temperatures for Creamy Results
A steady oven setting is the single most important control for a silky, even pudding.
Preheat the oven to the correct temperature so the rice can absorb the milk slowly and evenly. Start with a low heat and avoid large fluctuations during the oven bake.
Gentle heat helps the pudding thicken naturally. High temperatures force the milk to separate and the grains to harden. Keep the dish in a consistent spot so the top can form a delicate skin without burning.
Use full-fat milk for the creamiest texture; fat helps protect the milk from splitting. If the top is browning too fast, move the dish down a shelf or tent it lightly with foil to slow colouring.
- Preheat and maintain a low, steady temperature.
- Place the dish centrally for even baking and a broad skin.
- Shield the top with foil if browning exceeds the desired colour.
- Check the oven occasionally to keep conditions stable and protect flavour and texture.
| Issue | Recommended Action | Expected Result |
|---|---|---|
| Milk separating | Lower oven temperature and shorten direct heat | Smoother, unbroken texture |
| Top browning too fast | Move dish down or cover with foil | Even, golden skin without burnt spots |
| Undercooked grains | Extend baking time at same low temp | Soft, tender rice with creamy body |

“A calm oven and full-fat milk are the quiet secrets behind every classic rice pudding’s silky finish.”
Troubleshooting Common Texture Issues
A few simple checks will often fix a loose or over-browned pudding without wasting your bake. The notes below help you judge when to return the dish to the oven and how to protect the top as it browns.
Fixing Watery Puddings
If the mix seems watery, it usually needs more baking time. Return the dish to the oven for another 20 minutes so the grains can absorb more milk and thicken.
Check that your pudding rice was used; other grains may stay firm. Ensure the rice is soft before you stop cooking. Remember the pudding will continue to set as it cools, so wait at least 10 minutes before deciding.
Preventing Burnt Tops
To avoid an over-darkened top, cover the baking dish with foil if the surface begins to brown too quickly. Lower the oven temperature slightly or move the tray down a shelf.
Dot a little butter before the final stretch to help even colouring and protect the skin. Managing temperature over the hours of baking is key to a perfect golden skin and a creamy texture within.
| Issue | Action | Result |
|---|---|---|
| Too watery | Return to oven +20 minutes | Grains absorb liquid; thicker body |
| Top browning too fast | Cover with foil or lower rack | Even golden skin without burning |
| Grains still firm | Check you used pudding rice; extend time | Rice soft and pudding creamy |
“Patience with time and gentle temperature control saves many a bake.”
Creative Ways to Customise Your Recipe
Small swaps and a few bold additions can turn this familiar pudding into something new.
Try a spoonful of jam in the bowl just before serving for a bright, fruity contrast. A scatter of sultanas added at the start will plump during baking and lift the texture.
For spice, swap or add a pinch of cinnamon with the nutmeg. You can also replace caster sugar with brown sugar for a subtle caramel note that pairs well with full-fat milk.
- Use coconut milk for a tropical version, but expect a different flavour profile.
- Keep the pudding rice to milk ratio steady to ensure the dish still sets correctly.
- Experiment in small batches so you can judge texture and time without risking a full bake.
“These simple ingredients adapt easily — one classic recipe, endless variations.”
Serving Suggestions for a Comforting Treat
A warm bowl can turn a simple pudding into a memorable family moment. Serve straight from the oven to enjoy the creamiest texture and the comforting steam that rises from the top.
Adding jam or fruit is an easy way to introduce bright flavour. A single spoonful of jam at the table brings sweet-tart contrast, while fresh strawberries or raspberries add a lively, acidic note.
Quick ideas to try
- Hot from the oven: the pudding is at its silkiest and most soothing when served warm.
- Jam or fresh fruit: a spoonful of jam or a scatter of berries balances the sugar and cream.
- Cream or syrup: drizzle a little cream or syrup for extra indulgence.
- Crunch: offer shortbread or biscuits on the side for textural contrast.
| Serve | What it Adds | When to Use |
|---|---|---|
| Jam | Sweet-tart lift | At the table, spoonful per bowl |
| Fresh fruit | Bright acidity and colour | Summer or chilled serving |
| Cream & biscuits | Extra richness and crunch | Cold evenings or sharing with family |
“Keep it simple — the pudding’s charm is in its warmth and familiar flavours.”
Storing and Reheating Leftovers
Portioning and gentle reheating make leftovers a reliable go-to after a long baking time.
Store cooled pudding in an airtight container and place it in the fridge. It will keep for up to 3 days and often tastes even better the next day.
Before reheating, add a small splash of milk to the dish to revive the creamy texture that thickens during storage.
- Reheat gently on the stovetop over low heat, stirring regularly to warm evenly.
- Or use the microwave in short bursts, stirring every 20–30 minutes of heating to avoid hot spots.
- Portion before chilling if you have a large amount — this saves reheating time and reduces waste.
Always let the pudding cool completely before refrigerating for food safety. With these simple steps, the mary berry classic stays convenient and comforting for busy evenings.
“A well-stored bowl is ready in minutes and keeps the flavour from the original oven bake.”
Freezing Your Rice Pudding for Later
Put leftover pudding in the freezer so a comforting bowl is always on hand. Cool the dish completely before transferring to an airtight container to avoid ice crystals and flavour loss.
You can keep the pudding frozen for up to 3 months. Label each container with the date so you can track how long it has been stored.
Defrost overnight in the refrigerator. When reheating, warm gently on the hob or in the microwave with a splash of milk to restore the texture and creaminess.
- The top may lose some crispness, but the interior stays delicious.
- Use shallow containers so the pudding thaws evenly in minutes rather than hours.
- Freeze in portion sizes to save reheating time and reduce waste.

| Step | Action | Result |
|---|---|---|
| Cool completely | Chill on the counter then in the fridge | Prevents freezer burn and condensation |
| Pack | Use airtight, labelled containers | Keeps flavour and avoids odours |
| Defrost & reheat | Overnight fridge, warm with milk | Restores creamy texture and flavour |
“A frozen portion means homemade comfort is always minutes away.”
Conclusion
With a little patience and the right ingredients, you can achieve a picture-perfect , golden skin and silky centre every time.
This mary berry rice pudding recipe celebrates simple pantry staples and a classic British baking method.
Remember to preheat oven, choose full-fat milk and pudding rice, and add a light touch of nutmeg or cinnamon to taste.
Serve warm with a spoonful of jam or chill for later. Small adjustments make this dessert your own.
Use these tips and careful technique to turn an everyday set of ingredients into a lasting family favourite.
FAQ
What type of pudding rice works best for this classic recipe?
Do I need to use full-fat milk?
Should I preheat the oven and what temperature is ideal?
How long should I bake the pudding to get a creamy centre?
Why does my pudding sometimes become watery?
How can I prevent the top from burning while the inside cooks?
Is it necessary to stir the rice during baking?
Can I add flavourings like nutmeg or vanilla and when should I add them?
What are simple ways to customise the pudding?
How should I prepare the baking dish to ensure even cooking?
How do I store and reheat leftovers?
Can you freeze baked rice pudding?
What finishing touches make the pudding feel more indulgent?
Mary Berry Rice Puddings
This treasured dessert brings an immediate sense of comfort. Adapted from the book Everyday, the approach is designed so every home cook can achieve perfect results. The recipe uses simple ingredients — quality rice, creamy milk and a pinch of sweetness — to create a luxuriously smooth texture.
Ingredients
- 1/3 cup (75g) pudding rice
- 3 3/4 cups (900ml) full-fat milk
- 1 heaped tablespoon caster sugar
- 1/2 tsp freshly grated nutmeg
- Butter for greasing the dish
Method
- Preheat the oven to 320°F (160°C).
- Grease a wide-based baking dish with softened butter.
- In the baking dish, combine the pudding rice, full-fat milk, and caster sugar, stirring to ensure even distribution.
- Dot a little butter around the edge of the mixture.
- Bake for 30 minutes, then sprinkle the grated nutmeg over the top and give the mixture a gentle stir.
- Continue baking for 1¼ to 1½ hours until the rice is tender and a golden skin has formed.
- Allow the pudding to rest for 10-15 minutes before serving.