This classic British bake brings together butter, light brown sugar and dried fruit in a simple saucepan method. It needs 200g of butter and 200g of light brown sugar to make a rich, moist base that stays tender for days.
The recipe is quick to prepare — about 15 minutes on the worktop — and then it gently bakes for over an hour. Many home bakers favour this approach because it skips long soaking times and still delivers deep flavour.
Ideal for lunchboxes or a quiet afternoon with a cup of tea, the loaf keeps well for up to five days in an airtight container. You’ll find its taste improves after a day or two, making it a reliable choice for busy households.
Slice it thick, spread with butter, or enjoy plain as a simple, sweet treat that fits right into everyday baking.
Key Takeaways
- Ready in roughly 15 minutes of prep and over an hour to bake.
- Uses 200g butter and 200g light brown sugar for a moist result.
- Saucepan method removes the need for long soaking.
- Keeps up to five days in an airtight container.
- Flavour improves after a day or two; good for batch baking.
The Appeal of a Traditional Mary Berry Boiled Fruit Cake
Simmering dried pieces together is a simple trick that turns storecupboard staples into a moist, richly flavoured loaf.
This saucepan method keeps the crumb tender and the fruit plump without an overnight soak. The result is a reliable loaf that stays soft for days, making it perfect for busy households.
Serve a slice with a hot cup of tea to enjoy the classic balance of spice and sweetness. The warmed flavours pair especially well with a milky British tea.
You can easily adapt the dried mix—raisins, sultanas or chopped cherries—to suit your taste. That flexibility is part of this recipe’s lasting appeal.
| Feature | Benefit | Why it matters |
|---|---|---|
| Simmered fruit | Plump, soft pieces | No long soaking required |
| Saucepan method | Tender, moist crumb | Ideal for everyday baking |
| Simple ingredients | Easy to source | Quick, reliable results |
Essential Ingredients for Your Fruit Cake
Picking quality ingredients makes a big difference to the final bake. Measure items carefully and prepare fruit so it mixes evenly through the batter.
Selecting Quality Dried Fruit
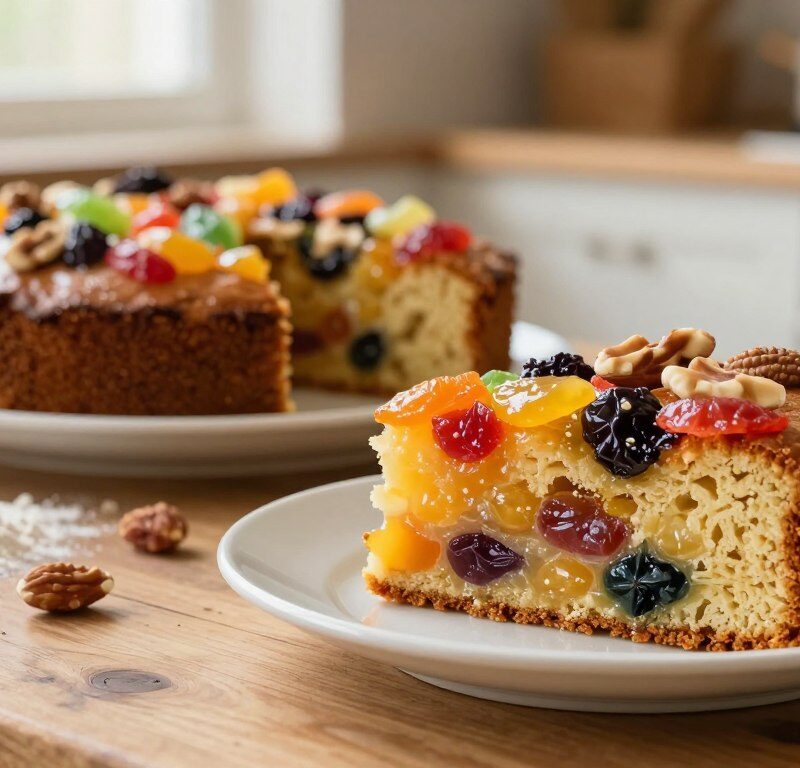
Use 250g of mixed dried fruit — raisins, sultanas and currants — for texture and sweetness. Chop larger pieces so they distribute evenly during mixing.
Add 100g of glacé cherries, halved, to give a bright colour and chewy bite.
Choosing Your Liquid
The liquid matters for plumping and flavour. You need 200ml of water, strong tea or orange juice to simmer the dried mix.
For the batter, combine 225g self-raising flour with 1 tsp baking powder, 2 tsp mixed spice and a pinch of salt.
- 200g light brown sugar for a deeper, caramel taste.
- Two large beaten eggs to bind and give structure.
Tip: Weigh ingredients on scales and keep pieces uniform. This helps the loaf rise and cook evenly in the oven.
Preparing Your Kitchen and Equipment
Start by organising your workspace so every tool is within reach before you begin. This keeps the process calm and helps you follow the timings exactly.
Preheat the oven to 160°C, or 140°C if using a fan. Make sure it reaches temperature before the tin goes in; a fully preheated oven helps the loaf rise and bake evenly.
Grease a deep 20cm round cake tin thoroughly and line the base and sides with baking parchment. A proper grease line and neat lining prevent sticking during the longer bake time.
Have a large saucepan ready for the simmer stage where butter, sugar and dried mix combine. Also set out mixing bowls, a wooden spoon and a wire cooling rack for when the bake comes out of the oven.
| Item | Why it matters | Tip |
|---|---|---|
| 20cm round cake tin | Correct depth for a dense loaf | Use deep tin, not shallow |
| Large saucepan | Room to simmer fruit and butter | Use a wide base for even heat |
| Wire cooling rack | Prevents soggy base | Cool for 30–60 minutes before turning out |
The Boiling Method Explained
Combine the butter, sugar, dried fruit, cherries and your liquid in a large saucepan and bring the mixture to a gentle boil. Use water or a cup of strong tea for added depth; the hot liquid helps extract spice and colour from the mix.
Once it reaches a soft boil, reduce the heat and simmer the mixture for exactly 5 minutes. This short simmer plumps raisins and sultanas so the loaf stays moist after baking.
After five minutes, remove the pan from the heat and leave the mixture to cool for 10–15 minutes. Cooling is essential — adding eggs to a very hot mix will scramble them and spoil the batter.
Why boiling the fruit matters
The process dissolves the sugar and creates a sticky, flavourful base. It also replaces the need for overnight soaking, which speeds up preparation for busy bakers.
- The heat softens the dried pieces and helps them absorb spice.
- Sugar fully dissolves, lending a glossy, rich mixture that binds well into the batter.
- Using tea adds a classic, robust note that suits a traditional boiled fruit cake.
Combining the Wet and Dry Ingredients
Once the fruit mix is cool, bring the wet and dry components together with slow, careful folds.
Stir in the two beaten eggs gradually, ensuring each addition is fully incorporated into the mixture. This prevents curdling and gives a smooth, even batter.
Sift 225g self-raising flour with 1 tsp baking powder and a pinch of salt. Fold these dry ingredients into the wet mixture gently. Use wide, sweeping motions to avoid overmixing.
Fold until no dry pockets of flour remain, but take care not to deflate the batter. The 200g light brown sugar and the dried fruit give the mix a rich, dark colour and glossy finish.
Distribute the glacé cherries, raisins and sultanas evenly so every slice has a cherry or two. The final mixture should be thick, glossy and ready to be spooned into your prepared 20cm round cake tin.
| Step | What to do | Why it matters |
|---|---|---|
| Eggs | Stir in gradually | Prevents curdling and ensures smooth texture |
| Dry mix | Sift flour and baking powder, fold gently | Maintains light crumb and even rise |
| Cherries & fruit | Distribute evenly | Consistent flavour and appearance in each slice |
| Final check | No dry streaks; glossy batter | Ready for baking with correct texture |
Baking Your Cake to Perfection
Positioning the tin centrally helps the whole bake get even heat and rise uniformly. Preheat the oven to 160°C and level the surface of the batter in the round cake tin before it goes in.
Monitoring Oven Temperatures
Place the tin on the middle shelf and set a timer for one hour. Bake for 1 hour to 1 hour 10 minutes until the top is well risen and deep golden-brown.
If the top browns too quickly, cover it loosely with foil for the final 15 minutes to prevent over-colouring while the interior finishes.

Testing for Doneness
Start checking after 1 hour. Insert a skewer into the centre — the skewer inserted should come out clean when the cake is ready.
A properly baked loaf will feel firm to the touch and show an even, deep colour across the surface. Once the skewer is clean, remove the tin and place the cake on a wire rack to cool.
| What to check | How to check | Why it matters |
|---|---|---|
| Even rise | Level batter before baking | Ensures uniform texture and appearance |
| Top colour | Cover with foil if browning | Prevents a burnt crust while interior cooks |
| Doneness | Skewer inserted into centre | Confirms the mixture is cooked through |
| Firmness | Light press to surface | Indicates set crumb without sogginess |
Cooling and Turning Out the Cake
Allow the loaf to rest undisturbed in the tin for 15 minutes so the crumb can set and the structure firms up.
Cooling in the tin makes the loaf easier to release without cracking or crumbling. If it clings slightly, run a palette knife around the edge before attempting to turn it out.
After the brief wait, carefully invert the tin to release the loaf onto a wire cooling rack. The rack lets air circulate underneath, preventing a soggy base while the bake finishes cooling.
“Patience at this stage rewards you with neat slices and a moist, dense loaf.”
Ensure the loaf is completely cool before slicing. This allows the interior to firm properly and keeps slices tidy.
Once cool, the loaf can be served straight away or stored to mature, depending on whether you prefer a fresh or rested finish.
Creative Serving Suggestions
A warm slice and a well-brewed cup transform this loaf into a charming teatime treat. Keep portions small for classic tea service or go generous for a more indulgent finish.
Pairing with Afternoon Tea
Serve thin slices with a cup of hot tea for a traditional combination that works every time. The moist texture and spice pair perfectly with a robust black tea.
For something richer, offer thicker slices with a dollop of clotted cream or warm custard. A smear of butter on a cooled slice also highlights the loaf’s deep flavours.
Balance the sweetness by serving fresh berries on the side or a piece of sharp cheddar for a regional twist popular in parts of northern England.
This loaf also suits coffee and a range of herbal teas, making it versatile for groups with varied tastes. Finish with a light dusting of icing sugar for a neat, professional look.
“Serve slices warm or cooled—either way, this loaf is a reliable centrepiece at any afternoon tea.”
Best Practices for Storage and Longevity
Keep your loaf tasting its best by storing it correctly once it has fully cooled. Place the cooled cake in an airtight container at room temperature to stay fresh for up to five days.
For longer storage, wrap the whole loaf or individual slices first in baking parchment, then in foil. Freeze for up to three months to retain texture and flavour.
Always make sure the loaf is completely cool before sealing. If you pack it warm, condensation can form and make the crumb damp.
Defrost frozen slices at room temperature. Let them come to room warmth before serving for the best crumb and taste.
Store the container in a cool, dry place away from direct sunlight. After a day or two the loaf’s flavours often deepen, so proper storage really matters.

| Action | Method | Result |
|---|---|---|
| Short-term | Place in an airtight container at room temperature | Fresh for up to 5 days |
| Long-term | Wrap in parchment, then foil and freeze | Keeps up to 3 months |
| To serve | Defrost fully at room temperature | Best texture and flavour |
“Proper packing and patience when defrosting will keep each slice ready to enjoy.”
Troubleshooting Common Baking Issues
Spotting the cause of a heavy or curdled batter early stops a minor blunder becoming a ruined loaf. Use these quick checks to rescue your bake and keep the loaf moist and even.
Preventing Curdled Eggs
Cool the pan first. If the fruit mixture is still hot when you add eggs, they will curdle. Let the mixture rest for 10–15 minutes before stirring in eggs.
Avoiding Dense Texture
Fold, don’t beat. Gently fold flour and baking powder into the wet mix to avoid knocking out air. Overmixing makes the batter heavy and the slice dense.
Managing Moisture Levels
If the loaf seems dry, check your oven temperature and timing. In a fan-assisted oven set to 140°C you can better control heat and prevent quick browning at the edges.
Test doneness with a skewer inserted into the centre. If it does not come clean, bake for an additional five minutes and test again.
- Boil the dried fruit for the full five minutes to build gloss and moisture.
- Ensure a tidy grease line and proper lining so the loaf releases cleanly.
- Store fully cooled slices in an airtight container to keep the crumb soft.
“Simple temperature and timing checks will usually put your loaf back on track.”
Conclusion
With minimal fuss you can produce a deeply flavoured loaf that keeps for days.
Boiling the fruit for five minutes builds flavour and removes the need for an overnight soak. Let the mix cool before adding the eggs to avoid curdling and keep texture even.
Allow roughly 1 hour and 10 minutes of baking time for a fully set centre. A skewer test and a light press will confirm doneness.
This recipe suits afternoon tea or a simple family treat. Store the cooled loaf in an airtight tin; the sugar and slow bake help it improve with age.
Enjoy your homemade boiled fruit cake with a warm cup of tea and share the results with friends and family.
FAQ
What size and type of tin is best for this boiled fruit recipe?
How long should the dried fruit be boiled before adding to the batter?
Can I substitute self-raising flour with plain flour?
How do I stop the cake from becoming too dark on top?
What’s the best way to test if the cake is done?
How long should the cake cool before turning out of the tin?
Can I add mixed spice or other flavours to the recipe?
How should I store the cake to keep it moist?
Is it possible to make this recipe ahead for a celebration?
How can I avoid a heavy, dense texture in the final cake?
Can I use light brown sugar instead of caster sugar?
What liquids can be used when boiling the fruit?
Mary Berry Boiled Fruit Cake
This classic British bake brings together butter, light brown sugar and dried fruit in a simple saucepan method, resulting in a rich, moist cake that improves in flavor over time.
Ingredients
- 200g butter
- 200g light brown sugar
- 250g mixed dried fruit (raisins, sultanas, currants)
- 100g glacé cherries, halved
- 200ml water or strong tea
- 225g self-raising flour
- 1 tsp baking powder
- 2 tsp mixed spice
- pinch of salt
- 2 large eggs, beaten
Method
- Preheat the oven to 160°C (140°C for fan ovens) and grease a deep 20cm round cake tin, lining the base and sides with baking parchment.
- In a large saucepan, combine the butter, light brown sugar, mixed dried fruit, glacé cherries, and your chosen liquid. Bring to a gentle boil.
- Once boiling, reduce the heat and simmer for exactly 5 minutes, then remove from heat and let cool for 10-15 minutes.
- In a separate bowl, sift together the self-raising flour, baking powder, mixed spice, and salt.
- Gradually stir the beaten eggs into the cooled fruit mixture, ensuring each addition is fully incorporated.
- Fold the dry ingredients into the wet mixture gently until no dry pockets of flour remain.
- Spoon the mixture into the prepared cake tin and level the surface.
- Bake in the preheated oven for 1 hour to 1 hour 10 minutes, until the top is well risen and golden brown.
- Check for doneness by inserting a skewer into the center; it should come out clean.
- Allow the cake to cool in the tin for 15 minutes before turning it out onto a wire rack to cool completely.