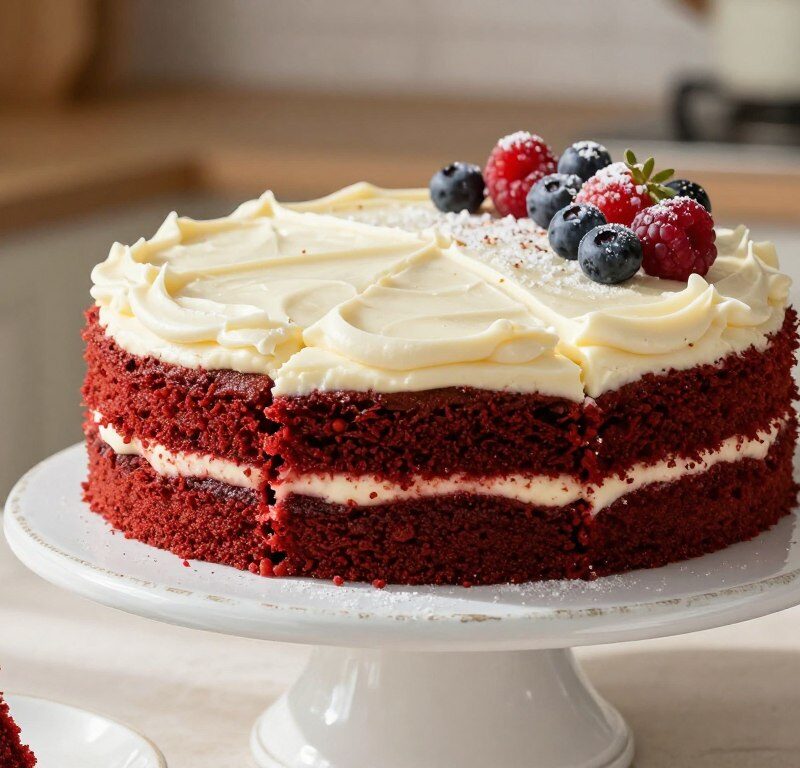
This classic recipe is crafted so that a complete beginner can succeed. Follow clear steps and you will produce a show-stopping sponge with a vivid colour and soft, moist crumb. The method blends cocoa with buttermilk to create a balanced, slightly tangy flavour that lifts the sweet notes.
British baking traditions meet easy technique in this guide. You will learn tips on timing, mixing and temperature to ensure each layer stays even and tender. The instructions aim to help you achieve consistent, professional results at home.
Perfect for celebrations, this version is elegant yet straightforward. With attention to detail, your sponge will deliver the delicate velvet texture and the distinctive taste that made this recipe a staple among those who love traditional baking.
Key Takeaways
- The recipe is suitable for beginners and uses classic British techniques.
- The sponge combines cocoa and buttermilk for a tangy, rich flavour.
- Simple, clear steps help ensure even layers and a moist crumb.
- Attention to timing and temperature yields consistent results.
- This recipe creates an elegant centrepiece for special occasions.
The Appeal of a Classic Mary Berry Red Velvet Cake
The true charm of this recipe lies in its soft crumb and the contrast between cocoa and tangy icing. The sponge manages a light chocolate flavour while still boasting a deep, festive hue.
Home bakers favour this classic because it feels approachable yet produces a professional finish. A careful mix of buttermilk and a touch of vinegar keeps the crumb moist and tender.
The texture is consistently described as soft and moist, which makes slices melt on the tongue. The striking sponge makes a bold statement at anniversaries and romantic dinners.
- Balanced flavour: cocoa with a tangy frosting.
- Reliable texture: buttermilk and vinegar for softness.
- Show-stopping look: ideal for special occasions.
Many cooks praise mary berry for sharing a recipe that is both elegant and simple to follow. This berry red velvet keeps presentation and taste in perfect harmony.
Essential Ingredients for Your Sponge
Gathering the right pantry staples makes all the difference to a light, even sponge. Below are the core items you must have to follow this classic recipe reliably.
Selecting Quality Components
Dry goods: 250g plain flour gives structure while 1 tbsp cocoa powder adds subtle chocolate notes. Use 200g caster sugar and, if you prefer, light muscovado or soft light brown as a swap for depth.
Fats and liquids: Cream 100g unsalted butter with the sugar until pale and fluffy. Add 100ml sunflower or vegetable oil to keep the sponge moist.

The Importance of Buttermilk
Buttermilk (250ml) is vital for tenderness and tang. It activates the 1 tsp bicarbonate of soda and helps give the sponge lift and a fine crumb.
Have 2 large eggs and 1 tsp vanilla extract ready to add moisture and aroma. Keep buttermilk in the chiller aisle near yoghurt and cream at larger supermarkets for easy access.
- Flour 250g
- Buttermilk 250ml
- Butter 100g, sugar 200g, oil 100ml
Preparing the Batter and Baking
Start by setting the oven to 180°C (160°C fan) and greasing two 20cm sandwich tins with baking paper. Having tins ready means the batter goes straight from bowl to oven for an even rise.
Sift the dry ingredients — flour, cocoa powder and bicarbonate soda — into a large bowl to remove lumps and aerate the mix. In a separate jug, whisk the wet ingredients: buttermilk, sunflower oil and vanilla, then pour them into the dry ingredients.
Stir in 1–2 tsp of red food colouring (professional gel gives the best, vibrant hue). The batter will be smooth and slightly thin; avoid overmixing to keep the sponge light.
Divide the mixture between the tins and bake for 25–30 minutes. Check that sponges are firm to the touch and a skewer comes out clean from the centre.
Let the sponges cool in their tins for 5 minutes, then turn them out onto a wire rack to cool completely before frosting. The reaction between vinegar, baking soda and buttermilk produces bubbles that make the sponge delightfully light and soft — a key step for a classic red velvet cake inspired by mary berry.
Crafting the Perfect Cream Cheese Frosting
A silky cream cheese frosting transforms a simple sponge into an elegant centrepiece. Follow a few clear steps to achieve a smooth, spreadable icing that sits neatly on each layer and creates tidy sides for decoration.
Achieving the Right Consistency
Start in a large bowl: beat 250g full-fat cream cheese with 100g softened unsalted butter until creamy. Use an electric whisk to avoid lumps and to get an even, airy mixture.
Gradually add 300g sifted icing sugar and 1 tsp vanilla extract. Beat until the frosting is thick and smooth. If the mixture feels too runny, chill for 10 minutes to firm it up before spreading.
Want richer icing? Swap the cream cheese for 250g full-fat mascarpone for a more luxurious finish. If you prepare the icing up to 24 hours ahead, return it to room temperature and re-whisk to regain spreadability.
- Beat cheese and butter in a bowl until smooth.
- Add sifted icing sugar gradually and whisk well.
- Stir in vanilla extract; chill if needed for 10 minutes.
- Spread, smooth the sides and create decorative lines with a knife.
| Ingredient | Amount | Role |
|---|---|---|
| Full-fat cream cheese | 250g | Tangy base, stabilises icing |
| Unsalted butter (softened) | 100g | Adds richness and smoothness |
| Icing sugar (sifted) | 300g | Sweetens and thickens mixture |
| Vanilla extract | 1 tsp | Enhances flavour |
| Mascarpone (optional) | 250g | For a richer, creamier finish |
Assembling and Decorating Your Masterpiece
Take your time when assembling — the result will look far more polished for little extra effort. Peel the baking paper off the sponges once they have cooled in their tins for 10 minutes to ensure a clean surface.
First, spread a thin layer of icing over the whole cake as a crumb coat and chill for 30 minutes to set the base. This keeps crumbs from mixing into the final layer and makes smoothing much easier.
Assemble by spreading half of the remaining frosting on one sponge, then place the second sponge on top. Use a flat knife or spatula to smooth the sides before using a knife to create wide lines up the edges for a neat finish.
For decoration, place eight white chocolate truffle balls on the top, or drizzle melted chocolate in a loose pattern for an elegant look. A piping bag gives professional swirls, and a small piece of sponge crumbled over the top adds a traditional crumb finish.
- Peel paper after 10 minutes in cool tins.
- Apply crumb coat and chill 30 minutes.
- Spread remaining icing, smooth sides and finish with decorations.
Pro Tips for Vibrant Colour and Texture
A few practical tips will help you achieve a vivid hue and a feather-light sponge. Small adjustments to ingredients, timing and mixing make a big difference to both colouring and crumb.
Choosing the Right Food Colouring
Use a professional-grade gel food colouring for a reliable, vibrant tone. Liquid dyes can shift in the oven and sometimes give an unwanted green cast.
Avoiding Overmixing
Handle the batter gently. Overmixing develops gluten and leads to a dense crumb. Fold wet and dry ingredients until just combined and stop once the streaks disappear.
Balancing Sweetness
To add depth and cut cloying sugar, stir a teaspoon of hot coffee or espresso into the wet mix. Fresh berries or a little orange zest also bring a bright contrast to cocoa powder and icing.
| Tip | Why it matters | When to apply |
|---|---|---|
| Gel food colouring | Stable, vibrant shade without greening | Mix into batter before folding |
| Stop mixing early | Preserves light, tender crumb | After liquids and dry ingredients combine |
| Check at 25 minutes | Prevents overbaking and dryness | Insert skewer into centre |
| Room-temperature ingredients | Even mixing and consistent rise | Before you start baking |

Storing and Freezing Your Cake
Proper storage keeps the sponge light and the icing creamy, whether you plan to serve within days or freeze for later.
For a part-cut cake, place it in an airtight, lidded container and chill. It will stay fresh for up to 3 days in the fridge. This protects the butter and cream-based icing from absorbing other food smells.
If you need to freeze sponges, cool them completely first. Set each layer on a circle of baking paper, then wrap in two layers of kitchen foil. Frozen sponges keep for up to 1 month.
Thaw sponges at room temperature before you apply the icing. If you bake ahead, you can cook the sponges up to three days in advance and leave them wrapped until you assemble.
Before serving, allow the assembled cake to stand for 60 minutes so the sponge softens and the icing becomes creamy. If condensation appears on the icing after refrigeration, pat gently with kitchen paper.
| Action | Method | Storage time |
|---|---|---|
| Part-cut cake | Airtight, lidded container in fridge | Up to 3 days |
| Freeze sponges | On baking paper, wrapped in two layers of foil | Up to 1 month |
| Make ahead sponges | Wrap securely at room temp or chilled | Up to 3 days |
Conclusion
Finish confidently: a balanced sponge and neat frosting deliver the look and taste of a bakery-quality treat.
Mary Berry’s red velvet remains a timeless dessert, where cocoa meets tangy cream cheese icing to create a memorable centrepiece. By following the simple steps here, you can achieve professional results in your own kitchen.
For the most vibrant colour, use a good gel food colouring rather than liquid dyes. Store the assembled cake in an airtight container to keep it moist for up to three days.
Whether for a birthday or an anniversary, this berry red velvet on the top of any celebration will impress. Enjoy the baking and savour the texture and flavour of this classic recipe.
FAQ
How do I prevent the sponge from sinking in the middle?
Can I use oil instead of butter in the recipe?
What’s the best way to replace buttermilk if I don’t have any?
How much cocoa powder should I use for a hint of chocolate without overpowering the flavour?
Which red food colouring gives the most consistent colour?
How do I achieve a smooth cream cheese or mascarpone frosting?
Can I freeze layers or the whole baked sponge?
What causes a dense crumb and how can I avoid it?
How long should I cool the layers before icing?
Is it better to use white chocolate in the frosting or stick to cream cheese?
How can I reduce overall sweetness without losing flavour?
What tools make assembling and decorating easiest?
Mary Berry Red Velvet Cake
This classic recipe is crafted so that a complete beginner can succeed. Follow clear steps and you will produce a show-stopping sponge with a vivid colour and soft, moist crumb.
Ingredients
- 250g plain flour
- 1 tbsp cocoa powder
- 200g caster sugar
- 100g unsalted butter
- 100ml sunflower or vegetable oil
- 250ml buttermilk
- 2 large eggs
- 1 tsp vanilla extract
- 1 tsp bicarbonate of soda
- 1-2 tsp red food colouring
- 250g full-fat cream cheese
- 100g unsalted butter (softened)
- 300g icing sugar (sifted)
- 1 tsp vanilla extract (for frosting)
- 250g full-fat mascarpone (optional)
Method
- Preheat the oven to 180°C (160°C fan) and grease two 20cm sandwich tins with baking paper.
- Sift the dry ingredients (flour, cocoa powder, bicarbonate of soda) into a large bowl.
- In a separate jug, whisk the wet ingredients (buttermilk, sunflower oil, vanilla extract) and pour them into the dry ingredients.
- Stir in 1-2 tsp of red food colouring until the batter is smooth and slightly thin.
- Divide the mixture between the tins and bake for 25-30 minutes until firm to the touch and a skewer comes out clean.
- Let the sponges cool in their tins for 5 minutes, then turn them out onto a wire rack to cool completely.
- For the frosting, beat 250g cream cheese with 100g softened unsalted butter until creamy.
- Gradually add 300g sifted icing sugar and 1 tsp vanilla extract, beating until thick and smooth.
- Spread a thin layer of icing over the whole cake as a crumb coat and chill for 30 minutes.
- Assemble by spreading half of the remaining frosting on one sponge, then place the second sponge on top.
- Smooth the sides with a flat knife or spatula and decorate as desired.