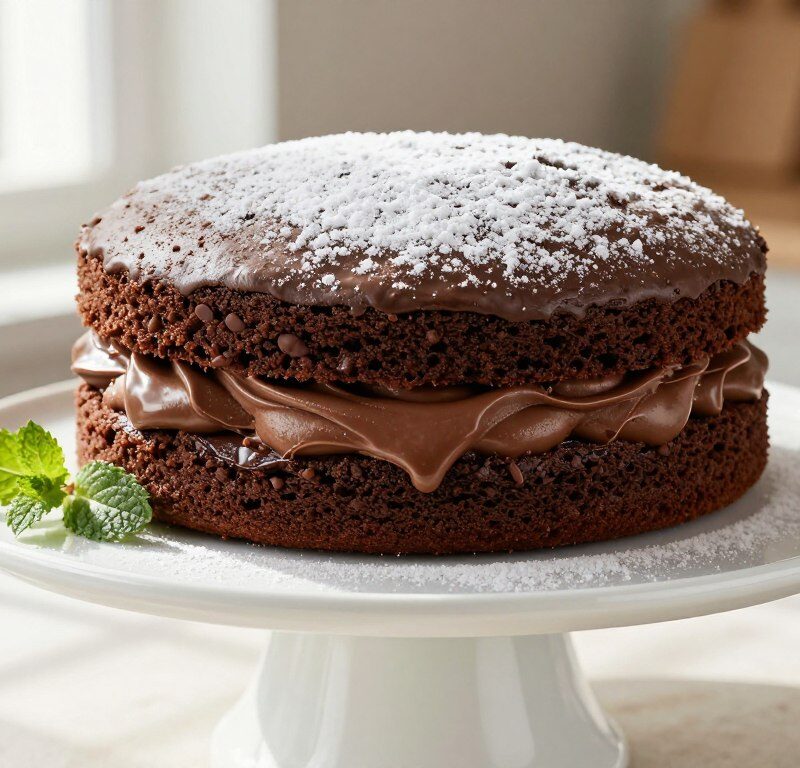
This twist on a classic British sponge pairs light, airy texture with a bold cocoa flavour. It uses simple storecupboard ingredients — 175g self-raising flour, 175g caster sugar and 175g softened unsalted butter — plus 40g cocoa powder and 3 large eggs.
The all-in-one mixing method makes the recipe quick and foolproof. Combine the ingredients in a large bowl, divide the mixture between two 20cm tins and bake for around 25 minutes in a preheated oven at 180°C (160°C fan).
Finish the cake with a dusting of icing sugar or cocoa powder, or add apricot jam or a glossy ganache for extra indulgence. This chocolate cake is ideal for afternoon tea and celebrations, offering a moist sponge and dependable results for home bakers.
Key Takeaways
- Simple all-in-one method for a reliable, moist sponge.
- Uses equal weights of flour, sugar and butter for balance.
- Bake in two 20cm tins for about 25 minutes at 180°C.
- Finish with icing sugar, cocoa, apricot jam or ganache.
- Perfect for tea time and easy enough for novice bakers.
Why You Will Love This Mary Berry Chocolate Victoria Sandwich
Adding cocoa powder gives the classic sponge a bold, chocolatey character without losing its lightness. The result is a soft, airy sponge cake that still feels traditional and familiar.
The all-in-one method keeps the process simple and reliable. Home bakers will appreciate a quick, foolproof technique that saves time and reduces fuss.
The two layers are perfect for filling. Choose a rich cocoa buttercream for depth or a fresh whipped cream filling for a lighter finish. Both keep the sponge moist and pleasingly tender.
- Balanced flavour: deep cocoa notes with a gentle sponge texture.
- Quick method: mixes in one bowl and bakes evenly.
- Versatile: fills well with buttercream or whipped cream.
Many home cooks rate this recipe among their favourites because it feels like a bakery-quality cake made at home. It uses all-in techniques so you spend less time baking and more time enjoying the result.
| Feature | Texture | Best Fillings |
|---|---|---|
| All-in-one method | Soft, airy | Chocolate buttercream, whipped cream |
| Cocoa addition | Moist, rich | Jam or ganache |
| Suitability | Everyday & special occasions | Afternoon tea or celebration |
Essential Ingredients and Equipment
Good results start with the correct equipment and measured ingredients laid out on your work surface. Gather everything before you preheat the oven to 180°C (160°C fan).
Choosing the Right Tins
Use two 20cm sandwich tins. Grease them, then line with baking paper to prevent sticking.
Preparing Your Ingredients
Measure precisely: 175g self-raising flour, 175g caster sugar, 175g softened unsalted butter, 3 large eggs, 40g cocoa powder, 1.5 tsp baking powder and 2 tbsp milk.
- Tools: electric whisk or stand mixer, mixing bowls, cooling rack and an offset spatula.
- Tip: beat the mixture for 1 minute with an electric whisk to combine fully.
- Filling: 150g butter, 300g sifted icing sugar, 2 tbsp cocoa powder and 1–2 tbsp milk; have jam or ganache ready if using.
| Item | Amount | Use |
|---|---|---|
| Flour | 175g | Base for sponge cake |
| Caster sugar | 175g | Sweetens and aerates |
| Cocoa powder | 40g | Gives chocolate depth |
To soften butter, cut into cubes and leave at room temperature for at least 30 minutes.
Mastering the All-in-One Mixing Method
Mastering the single-bowl approach makes baking a reliable and quick task for any home baker.
The Blooming Technique
Blooming cocoa with a little boiling water unlocks deeper flavour. Mix 40g cocoa powder with a few tablespoons of hot water, then fold it into the batter for a richer chocolate note.
Warm, very soft butter is vital when you use the one method. Add flour, caster sugar, butter, eggs, 1.5 tsp baking powder and 2 tbsp milk into a large bowl and beat the mixture for 1 minute until smooth.
- Use one method: place all ingredients in the bowl to save time and reduce fuss.
- Spoon the batter evenly into prepared tins and smooth the top with a spatula for an even bake.
- Weigh the batter for each tin to ensure flat tops and consistent rise in the oven.
| Ingredient | Amount | Note |
|---|---|---|
| Flour | 175g | Self-raising for a light sponge |
| Cocoa powder | 40g | Bloom with boiling water |
| Baking powder | 1.5 tsp | Helps a steady rise |
Expert Tips for a Light and Moist Sponge
A few simple checks in the kitchen will help you bake a lighter, moister cake every time. These practical tips focus on temperature, timing and gentle handling to deliver a soft chocolate sponge with reliable rise.
Achieving the Perfect Rise
Preheat the oven and avoid opening the door for at least 20 minutes while baking. Weigh the batter between tins so both sponges rise evenly.
- Bake for 20–25 minutes until the tops are springy.
- Test with a skewer — it should come out clean.
Avoiding a Dry Sponge
Use room temperature ingredients and beat the mixture only until smooth. Sift the flour and cocoa powder together to add air and prevent lumps.
If the batter seems tight, add 1–2 tbsp milk to keep the cake moist.
Testing for Doneness
Leave the sponges in their tins for 5 minutes, then transfer to a wire rack to cool completely before you add icing, ganache or cream.
This prevents fillings from melting and keeps your apricot jam or buttercream neat.

| Tip | Why it matters | Quick action |
|---|---|---|
| Room temperature ingredients | Better emulsion and rise | Bring out 30–60 minutes before baking |
| Sift flour & cocoa powder | Incorporates air for a soft crumb | Sift together into bowl before mixing |
| Cool on wire rack | Prevents soggy top and melting filling | Keep sponges on rack until cold |
Creative Flavour Variations and Fillings
Try simple twists to lift the basic sponge into exciting flavour combinations. Small additions to the mixture can change the mood of a cake without extra fuss.
For a citrus twist, add the finely grated zest of one orange to the batter and spread with fine-shred marmalade instead of apricot jam. The zest brightens the cocoa notes and keeps the crumb lively.
You can replace the cocoa powder with 60g of melted dark chocolate for a richer, more indulgent result. This works especially well when paired with a smooth ganache icing.
Prefer lighter fillings? Use freshly whipped cream rather than buttercream, or layer raspberry or apricot jam for a fruity contrast. For coffee lovers, mix a shot of espresso into the batter to create a mocha-flavoured cake.
- Use high-quality cocoa powder or dark chocolate for best flavour.
- Let ganache cool for up to an hour so it is spreadable and glossy.
- Adjust sugar slightly if you add marmalade or extra jam to balance sweetness.
| Variation | What to add | Best filling | Result |
|---|---|---|---|
| Orange cocoa | Finely grated orange zest | Marmalade | Citrus-bright, zesty cake |
| Melted dark chocolate | 60g melted dark chocolate instead of cocoa powder | Chocolate ganache | Richer, fudgy sponge |
| Mocha | Single shot of espresso in batter | Whipped cream or ganache | Subtle coffee-chocolate note |
Storing and Freezing Your Cake
Knowing how to store and freeze sponges keeps them tasting fresh and makes busy days easier.
How to Freeze and Thaw
Short-term storage: keep a finished chocolate cake in an airtight container at room temperature for up to two days.
If the cake is filled with fresh cream, refrigerate it and consume within 24 hours for safety.
Freezing unfilled sponges: let sponges cool completely on a wire rack. Wrap each layer in baking paper, then two layers of kitchen foil. Store in the freezer for up to two months.
To thaw, unwrap and place the frozen sponges on a wire rack, loosely covered with foil, for about an hour at room temperature before you add icing or ganache.
For a warm slice, reheat an unfilled sponge in the oven at 140°C for 5 minutes or microwave for 8–10 seconds. Use gentle heat to avoid drying the top.

| Action | Condition | Timing |
|---|---|---|
| Room storage | Airtight container | Up to 2 days |
| Refrigerate | Filled with cream | Consume within 24 hours |
| Freeze | Wrapped in baking paper & foil | Up to 2 months |
| Thaw / Reheat | Wire rack, loosely covered | Thaw ~1 hour / Oven 140°C for 5 minutes |
Conclusion
This straightforward recipe shows how reliable technique and good ingredients make baking rewarding. Follow the one‑bowl method and you will get even, moist sponges every time.
Use high‑quality cocoa powder and weigh your sugar and flour for best results. Bake for the recommended minutes and test with a skewer before cooling.
Whether you dust with icing sugar or finish with a glossy ganache, the finished chocolate cake suits afternoon tea and special occasions. Try this mary berry recipe with confidence — it’s one of the easiest, most dependable recipes for home bakers.
FAQ
Can I use a different cocoa powder for this recipe?
What size sandwich tins should I use?
Is the all-in-one method suitable for beginners?
How do I achieve a light and moist sponge?
What is the blooming technique and when should I use it?
How can I prevent the sponge from sinking in the middle?
What fillings work well besides whipped cream and jam?
How long should I cool the sponges before assembling?
Can I freeze the sponge layers and how should I thaw them?
How do I test a sponge for doneness?
Can I adapt the recipe for a fan oven?
What icing options are best for a chocolate sponge?
Mary Berry Chocolate Victoria Sandwich
This twist on a classic British sponge pairs light, airy texture with a bold cocoa flavour. It uses simple storecupboard ingredients and an all-in-one mixing method for a quick and foolproof recipe.
Ingredients
- 175g self-raising flour
- 175g caster sugar
- 175g softened unsalted butter
- 40g cocoa powder
- 3 large eggs
- 1.5 tsp baking powder
- 2 tbsp milk
Method
- Preheat the oven to 180°C (160°C fan).
- Grease and line two 20cm sandwich tins with baking paper.
- In a large bowl, combine the self-raising flour, caster sugar, softened unsalted butter, cocoa powder, eggs, baking powder, and milk.
- Beat the mixture for 1 minute with an electric whisk until smooth.
- Divide the batter evenly between the prepared tins and smooth the tops.
- Bake in the preheated oven for around 25 minutes until the tops are springy and a skewer inserted comes out clean.
- Allow the cakes to cool in the tins for 5 minutes before transferring to a wire rack to cool completely.
- Finish the cake with a dusting of icing sugar or cocoa powder, or add apricot jam or a glossy ganache if desired.