This classic British cake is a smaller, elegant version of the traditional teatime favourite. The method is simple and reliable, so home bakers can expect a light, fluffy result each time.
Using precisely 175g of main ingredients gives a balanced flavour that many households now know and love. It is ideal for a small gathering or a cosy afternoon with a cup of tea.
The step‑by‑step recipe focuses on clear technique rather than fuss. We will guide you through mixing, baking and assembling so your kitchen fills with the warm scent of fresh baking.
Key Takeaways
- The recipe offers a compact, reliable version of a classic victoria sponge for teatime.
- Exact 175g measures help achieve consistent, light texture.
- Clear steps make the cake accessible to home bakers of any skill level.
- Perfect for small gatherings or a simple, sweet treat at home.
- The guide emphasises technique to ensure a fluffy sponge every time.
The Timeless Appeal of the Mary Berry 3 Egg Victoria Sponge
A smaller take on a time-honoured teatime favourite keeps the charm while making the bake easier to manage. This version trims the egg ratio to create a slightly lighter crumb but retains the rich, traditional flavour that many recipes are loved for.
Soft, buttery sponge, a smear of jam and a layer of cream form the classic sandwich that works perfectly for a family tea or an intimate get-together. Home bakers prize this scaled-down victoria sandwich for its simplicity and dependable results.
Whether you choose whipped cream or a smooth buttercream, the combination of jam and filling makes each slice feel elegant. The cake is ideal when you want a classic victoria sponge cake without baking a large batch.
“A compact cake that captures the essence of British teatime: light sponge, sweet jam and delicate cream.”
- Perfect for small tea gatherings.
- Maintains traditional flavour with a lighter texture.
- Easy to fill with jam and either cream or buttercream.
Essential Ingredients for Your Sponge
Gathering the right ingredients sets the foundation for a light, dependable sponge every time.
Dry Ingredients
Measure carefully: you will need 175g self-raising flour and 175g caster sugar. Add 1½ tsp baking powder to ensure a good rise.
Wet Ingredients
For the sponge itself use 175g unsalted butter, softened, and 3 large eggs. Stir in 1 tbsp milk and 1 tsp vanilla extract in your mixing bowl to finish the wet mix.
The balance of 175g for flour, sugar and butter keeps texture even and predictable. Using high-quality ingredients helps the cake stay moist and flavoursome. Softened butter combines more easily and prevents a dense crumb.
- 175g self-raising flour
- 175g caster sugar
- 175g unsalted butter, softened
- 3 large eggs
- 1½ tsp baking powder
- 1 tbsp milk and 1 tsp vanilla extract
Tip: For best results, let the butter reach room temperature before you start mixing.
Preparing Your Kitchen and Equipment
Start by readying your oven and tools so the batter goes into steady, even heat. Preheat to 180°C, or 160°C if you are using a fan oven. This step is vital for a consistent rise and an even bake.
Prepare two 18cm round sandwich tins. Lightly grease the sides and line the bases with baking paper. Proper lining prevents sticking and makes it easy to remove the layers once cool.
Having everything in place saves valuable time and keeps the process calm. Gather scales, mixing bowl, spatula and timer before you start mixing. A tidy workspace helps when you are focused on the baking steps.
- Preheat to 180°C (160°C fan) before you begin.
- Grease and line both 18cm sandwich tins with baking paper.
- Check the oven is fully up to temperature before placing tins inside.
Professional bakers often stress that prep is the first step to perfect cakes that release easily from their tins. A little preparation now makes the bake far more predictable.
The All-in-One Mixing Method
The all-in-one method brings every component together in a single bowl for a quick, reliable batter.
Mixing Techniques
This approach, championed by mary berry, asks you to add butter, caster sugar, eggs, flour, tsp baking powder, milk and vanilla into one bowl.
Use an electric mixer or stand mixer and beat for about one minute. The goal is a smooth, creamy batter that traps just enough air for a light sponge.
Divide the batter evenly between your tins. Use a spatula to level the top so each layer bakes flat and rises evenly in the oven.
- Beat together with an electric whisk for about 1 minute until smooth and creamy.
- Using a mixer gives consistent results and saves time.
- Smooth the top of each tin with a spatula before baking.
| Step | Action | Timing |
|---|---|---|
| 1 | Combine butter, caster sugar, eggs and vanilla in bowl | 30 seconds |
| 2 | Add flour and tsp baking powder, beat until creamy | 30–45 seconds |
| 3 | Divide into tins, smooth tops and bake | Immediate |

Achieving the Perfect Bake
Aim for a golden top and a springy touch to know your bake is perfect. Bake the two layers in the preheated oven for 20–25 minutes. They should turn golden and spring back when pressed in the middle.
Keep an eye on the timer and the tins. Every oven behaves differently. Check from 20 minutes to avoid overbaking and a dry cake.
When ready, the sponges will have pulled away slightly from the sides of the sandwich tins. That gap is a good sign the layers are fully cooked and will hold their filling.
If a layer sinks in the middle, it is often due to opening the oven door too early. Try to resist checking until at least 18–20 minutes have passed.
- 20–25 minutes in a preheated oven gives a reliable result.
- Golden colour, slight shrink from the tin and a springy centre show doneness.
- Monitoring saves your batter from drying out or collapsing.
| Sign | What to look for | Action |
|---|---|---|
| Colour | Even golden top | Check at 20 minutes |
| Feel | Springs back in the middle | Remove from oven |
| Edge | Pulls away from tins | Allow to cool in tins briefly |
Cooling and Preparing the Layers
Give the cakes a brief rest in their tins so they set up before you touch them.
After removing your cakes from the oven, leave them in the cool tins for 5 minutes. This short time lets the sponge relax and reduces the risk of tearing when you turn them out.
Carefully ease the layers from the tins and place each on a wire rack to cool completely. A wire rack stops trapped steam from making the batter soggy and keeps the crumb light.
Ensuring the cakes cool properly is a vital part of the baking process. When the sponges are cool to the touch and firm enough to handle, they are ready for jam and filling.
- Cool in the tins for 5 minutes to set
- Transfer to a wire rack so cakes cool evenly
- Wait until layers are cool and firm before assembling
“Taking the time to cool your layers ensures a neat, stable finish when you spread the jam and cream.”
Crafting the Ideal Filling
The right filling brings balance — sweet, tangy and light — to every slice. Choosing between a soft whipped cream or a rich buttercream will shape the final texture and taste of your cake.
Whipped Cream
Light and fresh: Whip 150ml double cream until soft peaks form. Use a gentle hand to keep air in the cream so the layer stays fluffy but stable.
Spread a thin layer of quality strawberry or raspberry jam first. The jam adds a fruity contrast that cuts through the sweetness of the cream.
Classic Buttercream
Rich and stable: Beat 100g softened butter with 200g icing sugar until pale and fluffy. Ensure the butter is soft enough to blend smoothly with the sugar.
This buttercream suits warmer days or for a firmer filling that holds shape when sliced.
- For a classic filling, whip 150ml double cream to soft peaks or make buttercream with 100g butter and 200g icing sugar.
- Many traditional recipes recommend high-quality strawberry or raspberry jam for a bright, fruity note.
- Beat the butter until light and fluffy before adding icing sugar for an even texture.
- The choice between whipped cream and buttercream depends on preference; both suit a mary berry style cake.
- A layer of jam plus cream or buttercream creates the iconic flavour profile for this tea-time favourite.
Assembling Your Victoria Sandwich
Lay out your cooled layers and prepare to join them into a neat sandwich that will shine at tea.
Spread a generous layer of jam across one sponge, keeping the jam a little back from the edge so it does not spill. On the other layer, spread your chosen cream or buttercream evenly to the same margin.
Carefully place the jam-covered layer onto your serving plate. Then sandwich the two cakes together, aligning the edges so the cake sits flat and looks professional.
- When you add the top layer, press very gently in the middle to distribute the filling without squashing the delicate crumb.
- Finish with a light dusting of icing sugar across the top for the classic look.
- If using butter, chill the cake briefly to set the filling before slicing.
| Step | Action | Why it matters |
|---|---|---|
| 1 | Spread jam on one sponge | Gives fruity contrast and keeps filling in place |
| 2 | Spread cream or buttercream on the other | Provides richness and structure to the middle |
| 3 | Sandwich and align layers | Ensures an even cake that slices neatly |
| 4 | Dust with icing sugar | Gives the traditional top and a sweet finish |

Pro Tips for a Fluffy Texture
A few simple habits in the kitchen will help you bake a consistently airy sponge every time. These small changes improve crumb, rise and flavour with little extra effort.
Room Temperature Ingredients
Always use room temperature butter and eggs. Softened butter blends evenly with caster sugar and helps the batter trap air.
Bring flour, butter and eggs to room temperature before you start. This helps the ingredients emulsify and makes a lighter cake.
Avoiding Overmixing
Beat for only about one minute. Mixing until just combined prevents the batter from becoming tough.
Fold in flour and baking powder gently. Overworking the batter develops gluten and ruins a soft crumb.
Oven Management
Preheat fully and resist opening the door for the first 20 minutes. Sudden temperature change can make layers sink.
Check near the end of the baking time. A golden top that springs back signals doneness — then cool as instructed before adding jam and cream.
| Tip | Why it matters | Quick action |
|---|---|---|
| Room temp ingredients | Better emulsification and lift | Remove from fridge 30–60 minutes before |
| Minimal mixing | Preserves a soft crumb | Beat ~1 minute, fold flour gently |
| Stable oven | Prevents sinking | Preheat fully; avoid door for 20 minutes |
Creative Variations and Flavour Twists
Experimenting with flavours and textures is the easiest way to personalise your afternoon cake.
For a bright twist, add finely grated lemon or orange zest to the batter. This citrus note lifts the light sponge and pairs beautifully with a cup of tea.
Make it more indulgent by swapping the jam for chocolate ganache, or add thin slices of fresh fruit between the layers. These changes turn a simple bake into a dessert-like treat.
If you want a moister crumb, replace a small portion of the butter with Greek yogurt. The result is a lighter, tangy texture that still holds up well in sandwich tins.
Try alternative preserves too. Lemon curd or mixed berry conserve offers a sharp contrast, and different recipes let you adapt the bake for summer parties or snug winter teas.
- Citrus zest: lemon or orange for freshness.
- Indulgent fill: chocolate ganache or fresh fruit with jam.
- Texture swap: part butter, part Greek yogurt for moisture.
- Jam alternatives: lemon curd or mixed berry conserve.
“Small tweaks make familiar bakes feel new and worthy of any gathering.”
Storage and Serving Suggestions
Good storage makes all the difference to texture and taste when serving later. Keep things simple and follow a few rules to preserve freshness and food safety.
Unfilled layers stay best at room temperature. Store them in an airtight container for up to 2 days to keep the crumb soft and the surface from drying out.
If the cake is filled with cream, it must be refrigerated. Place it in the fridge and plan to eat within 24 hours for safety and the best flavour.
Freezing and Thawing
Unfilled sponges freeze well for up to 2 months. Wrap each layer tightly in clingfilm and place in a sealed container or freezer bag.
Thaw completely at room temperature before you add jam or cream. Bringing the cake fully to room temperature helps the fillings spread evenly and prevents sogginess.
- For a warm slice, microwave a portion for 10 seconds to soften the crumb.
- Serve with a hot cup of English breakfast tea to complete the traditional experience.
“Store simply, chill wisely and reheat briefly for the best results.”
Conclusion
Mastering a few basics transforms a basic batter into a memorable sandwich cake for any occasion.
This mary berry recipe shows that simple steps—accurate measures, the all‑in‑one method and a steady oven—deliver excellent results. Use a wire rack and leave the layers in the cool tins briefly so the cakes cool evenly.
Choose a smear of jam and whipped cream or a stable buttercream for the middle. Keep ingredients at room temperature and avoid overmixing the batter to retain a light crumb.
With care and the right kit—scales, a mixer, greased tins and a wire rack—you can bake a classic victoria sponge cake that will impress at tea time. Enjoy your slice with a hot cuppa.
FAQ
What size and type of tins work best for this classic sponge?
Can I use a different number of eggs or alter quantities?
Do I need self‑raising flour or can I use plain flour and baking powder?
What is the best fat to use: butter, margarine or oil?
How do I check when the sponge is fully baked?
Should I use the all‑in‑one mixing method or cream the butter and sugar first?
How do I prevent the cake from sinking in the middle?
Can I add flavourings like vanilla or lemon zest?
What fillings work well between the layers?
How should I cool the sponges before filling and decorating?
Is it possible to freeze the sponge or completed sandwich cake?
How do I achieve an even, flat top for sandwiching?
What oven settings are best — fan or conventional?
How long can a filled sandwich stay at room temperature?
Any tips to keep the sponge light and moist?
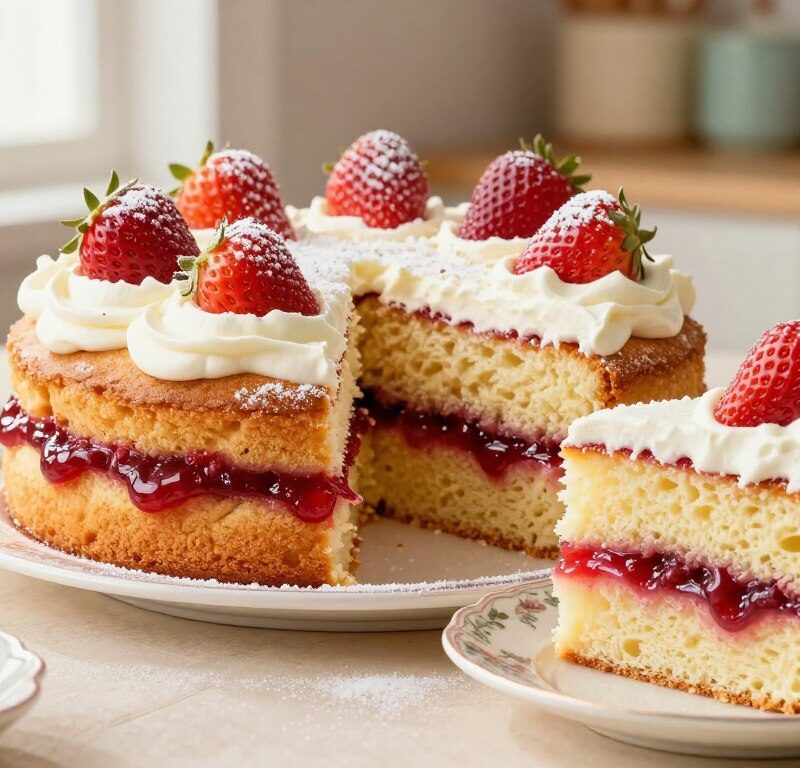
Mary Berry 3 Egg Victoria Sponge
This classic British cake is a smaller, elegant version of the traditional teatime favourite, featuring a light, fluffy sponge with a smear of jam and a layer of cream.
Ingredients
- 175g self-raising flour
- 175g caster sugar
- 175g unsalted butter, softened
- 3 large eggs
- 1½ tsp baking powder
- 1 tbsp milk
- 1 tsp vanilla extract
- 150ml double cream (for filling)
- Quality strawberry or raspberry jam (for filling)
- 100g softened butter (for buttercream, optional)
- 200g icing sugar (for buttercream, optional)
Method
- Preheat the oven to 180°C (160°C fan) and prepare two 18cm round sandwich tins by greasing and lining them with baking paper.
- In a mixing bowl, combine the softened butter, caster sugar, eggs, milk, and vanilla extract.
- Add the self-raising flour and baking powder to the bowl and beat with an electric mixer for about 1 minute until smooth and creamy.
- Divide the batter evenly between the prepared tins and smooth the tops with a spatula.
- Bake in the preheated oven for 20-25 minutes until golden and springy to the touch.
- Allow the cakes to cool in the tins for 5 minutes before transferring them to a wire rack to cool completely.
- Once cooled, spread a layer of jam on one sponge and a layer of whipped cream or buttercream on the other.
- Sandwich the two layers together, aligning the edges, and dust the top with icing sugar for a classic finish.