This classic dessert brings a touch of elegance to any British dinner party. The recipe is simple and kind to busy cooks, yet it delivers a professional finish that looks and tastes impressive.
The filling is rich and silky, with a zesty lemon twist that lifts the overall flavour. The crumbly biscuit base is fun to make, and children adore helping crush the biscuits.
Follow a few clear steps and the cheesecake will set beautifully in the fridge. You will get a smooth texture that slices neatly and pleases guests every time.
Key Takeaways
- This easy recipe suits home cooks of all levels.
- A zesty lemon note balances the rich, creamy filling.
- Kids can join in by crushing biscuits for the base.
- Chilling ensures a silky set and clean slices.
- The finished dessert looks elegant for dinner parties.
Why You Will Love This Mary Berry No Bake Cheesecake
This recipe is ideal for hosts who want a fuss-free, elegant dessert. The bright lemon edge keeps each mouthful feeling fresh, so it never sits heavy after a meal.
The method is simple enough for children to help with. There is no cooking or sharp chopping involved, so it makes a safe and fun family activity.
Give the pudding plenty of time to set — at least six hours in the fridge — and you can prepare it a day ahead. That extra rest lets the flavours meld and the texture firm up beautifully.
The combination of silky cream and crumb base creates a satisfyingly smooth texture. This light dessert is easy to assemble and reliably pleasing for guests.
Whether you need a quick pudding after a family dinner or a showstopping treat for a dinner party, this cheesecake delivers consistent results with minimal stress.
Essential Baking Equipment
A few essential tools will lift your results from homemade to confidently professional.
Prepare these items before you start to keep the process smooth and calm.
- 20cm loose-bottomed tin – vital for releasing the dessert without damaging the sides.
- Digital scales – measure ingredients precisely for a reliable finish.
- Freestanding mixer or electric hand mixer – whip double cream to a light, airy texture.
- Lemon juicer and zester – extract fresh juice and zest for the bright flavour.
- Wooden spoons and mixing bowls – simple, sturdy tools for combining the base and filling.
To achieve a classic standard in the kitchen, follow the tool list above. Using quality equipment makes assembling and removing the dessert easier and helps the filling set evenly.
Ingredients for the Perfect Base and Filling
Start by choosing pantry ingredients that will give your base a dependable crunch and your filling a creamy lift.
Choosing Quality Ingredients
175g of digestive biscuits creates a classic, sturdy biscuit base. Crush them finely, then mix with 40g demerara sugar and 75g melted butter to bind.
For the filling, measure precisely: 225g full-fat soft cheese, 150ml double cream and 150ml Greek yoghurt. Add the juice of 1 large lemon to cut the richness.

The Role of Full-Fat Dairy
Full-fat cream cheese supplies structure so the cheesecake sets without gelatin. Use it straight from the fridge for best results.
Whip the double cream until soft peaks form, then fold into the cheese and yoghurt mixture. Stir in 25g caster sugar and a dash of vanilla extract for balanced sweetness.
- Select top-quality biscuits for a base that slices cleanly.
- Full-fat soft cheese gives the filling its stability and silkiness.
- Whisk icing sugar into a bowl with the cheese to avoid lumps and achieve a smooth texture.
| Component | Quantity | Purpose |
|---|---|---|
| Digestive biscuits | 175g | Crunchy base that holds shape |
| Full-fat soft cheese | 225g | Structure and richness in filling |
| Double cream | 150ml | Lightens texture; adds creaminess |
| Greek yoghurt | 150ml | Balances richness; adds tang |
| Demerara & caster sugar | 40g (base) / 25g (filling) | Sweetness and texture control |
| Large lemon (juice) | Juice of 1 | Acidity to balance cream |
Preparing the Buttery Biscuit Base
To form a sturdy foundation, finely break 175g of digestive biscuits using a food processor or by bashing them with a rolling pin inside a sealed bag. Work until the crumbs are almost sandy; this helps the base bind evenly.
Tip the crumbs into a bowl and pour over 75g melted butter. Mix until every crumb is coated and the mixture looks glossy. Use a little extra melted butter if any dry patches remain.
- Press the crumb mix firmly into a 20cm loose-bottomed tin. Use the back of a metal spoon to level and compact the surface.
- Chill the tin in the fridge for at least 20 minutes so the chilled biscuit base firms up.
- A well-pressed biscuit base prevents the cheesecake from crumbling when sliced.
Once chilled, the biscuit base will hold its shape and make assembling the filling much easier. This simple care at the start gives a neat finish and a satisfying crunch under the creamy filling.
Creating the Creamy Cheesecake Mixture
Whisking the cheese and sugars until perfectly smooth is the step that defines your filling’s silkiness. Work in a large bowl so you have space to beat without splashes.
Folding in the Whipped Cream
In a large bowl, beat 225g of cream cheese with 25g caster sugar and 50g icing sugar until the mixture is completely smooth.
Use a separate bowl to whip 150ml of double cream until it reaches soft peaks. This step gives the filling its light, airy lift.
“Gentle folding keeps the air in — never overwork the mixture.”
Carefully fold the whipped cream into the cream cheese mixture, using a spatula and a figure-of-eight motion. Take your time to maintain volume and avoid a dense result.
- Gradually add the juice of 1 lemon, whisking to distribute acidity evenly through the filling.
- Spoon the creamy mixture over the chilled biscuit base in the tin.
- Smooth the top with the back of a spoon or spatula for a neat finish, then chill in the fridge to set.
Tips for Achieving the Perfect Texture
Small changes in chilling time and handling make all the difference to the final texture. Keep steps simple and move with care to preserve air in the cream-based filling.
Chill thoroughly: Pop the dessert in the fridge for at least 6 hours; overnight is best for a silky set.
- Speed up setting: If short on time, transfer to the freezer for 60 minutes to firm the centre.
- Slice neatly: Use a warm knife between cuts to prevent the biscuit base from dragging.
- Keep it light: Avoid over-mixing the filling; overworked batter loses air and becomes dense.
- Hold the chill: Keep the dessert refrigerated until the last moment — the cream softens quickly at room temperature.
“Gentle folding and patient chilling give the best, silkiest result.”
Follow these small rules and your cheesecake will have a stable base, airy mixture and a balanced cream texture that slices cleanly every time.
Creative Flavour Variations
Small additions can transform this classic into a fruity, chocolate or citrus showstopper. Below are easy swaps and toppings to try at home. Each change keeps the method simple while adding clear new character to the pud.
Adding Fresh Fruit
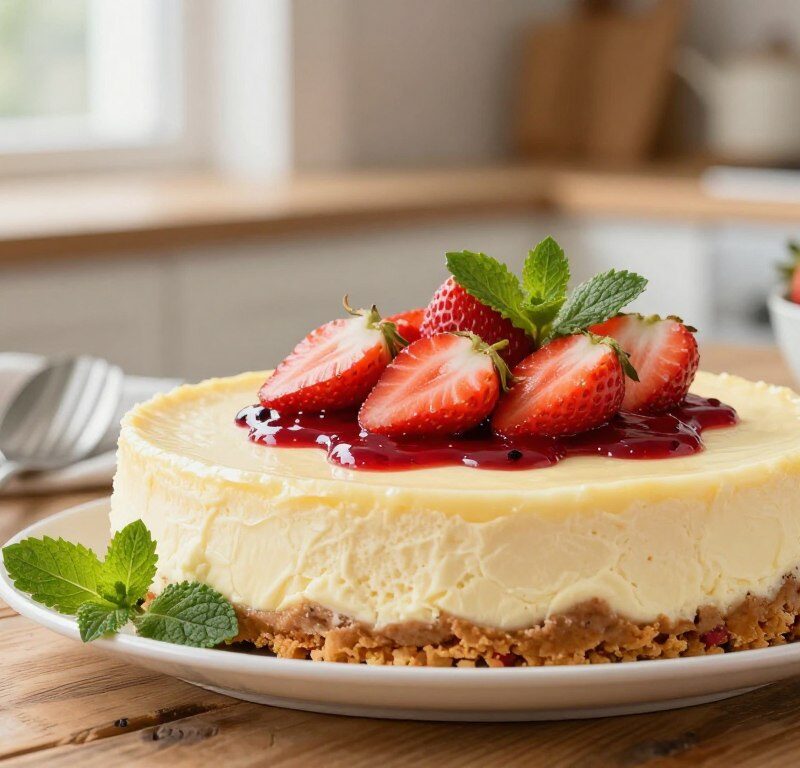
Fresh berries bring vibrant colour and a tart counterpoint to the creamy filling.
Try sliced strawberries or raspberries on the top, or fold chopped fruit into the filling for bursts of flavour. Pat fruit dry before using so extra juice does not stop the set.
Incorporating Chocolate
For chocolate lovers, fold a tablespoon or two of cocoa into the filling for subtle richness.
Alternatively, sprinkle dark chocolate curls across the top or pour a thin ganache for a decadent finish.
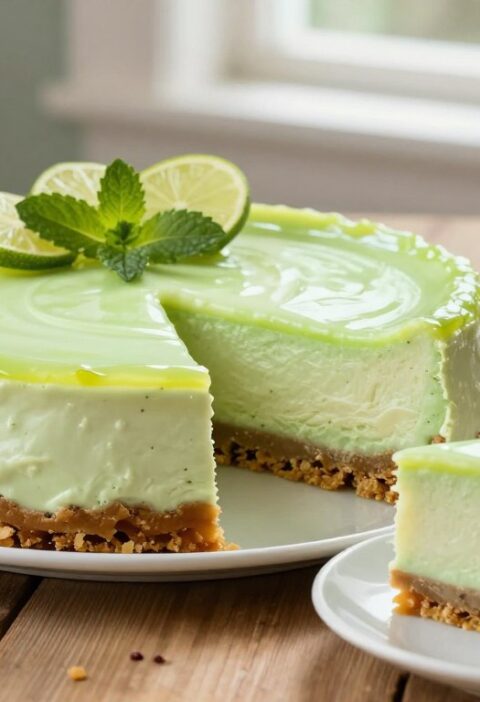
Zesty Citrus Twists
Swap or add citrus zest to lift the profile. A touch of lemon zest brightens the cream without changing the texture.
- Mix lime or orange zest for a different citrus note.
- Drizzle a warm berry coulis or fruit compote for special occasions.
- Remember: dry added fruit to keep the filling setting properly.
“A little creativity lets you match the pudding to any season or celebration.”
How to Serve Your Dessert
A small finishing move makes the presentation look professional. Gently run a thin, warm knife around the inside of the tin to loosen the sides before you release them.
Lift the ring and transfer the cheesecake to a pretty serving plate. For an extra touch, add a few dollops of whipped cream alongside the slices.
Scatter fresh berries or lightly dust the top with icing sugar. These simple decorations give a crisp, restaurant-style finish and brighten the plate.
Keep each slice well chilled in the fridge until the last moment; the cool temperature preserves the airy cream texture and helps the base slice cleanly.
- Run a knife around the ring, then remove the tin.
- Arrange slices neatly on a warmed plate for easy portioning.
- Pair the dessert with a cup of tea or coffee — a classic pairing that complements the light cream filling.
“Take your time with the final touches; they transform a good pudding into an impressive centrepiece.”
This serving ritual suits the mary berry recipe and ensures each slice shows off the silky cream and neat base.
Storing and Freezing Guidelines
Good storage habits ensure the dessert stays silky and ready to serve. After the cheesecake has been assembled, cover it tightly and place it in the fridge.
Store your cheesecake covered in the fridge and it will keep perfectly for up to 3 days after preparation. If you make the pudding a day ahead, it will have had time to set and will slice more cleanly.
While freezing is possible, it is best enjoyed fresh. You can freeze the dessert for up to 1 month, but thaw slowly in the fridge to preserve texture.
Always ensure the cheesecake is kept for at least 6 hours in the fridge before you attempt to remove it from the tin. This resting time helps the filling firm and keeps slices neat.
- Avoid leaving the dessert at room temperature for long periods; the cream-based filling softens and loses its airy structure.
- When serving, keep remaining slices chilled until the last moment to maintain a clean cut and silky mouthfeel.

“Chill patiently and cover well — small steps that protect flavour and texture.”
Troubleshooting Common Issues
Common faults—soft centres, crumbly bases and lumpy filling—are easy to diagnose with a few simple checks.
If the cheesecake feels too soft, confirm you used full-fat cream cheese and that you whip double cream to soft peaks. Whipping in a separate bowl helps keep the texture light.
A crumbling biscuit base usually needs a little more melted butter. Add a spoonful, press firmly into the tin and chill for at least 20 minutes so the biscuit base bonds properly.
If the filling is lumpy, warm the cream cheese to room temperature before you start to beat it in the mixing bowl. Beat smooth with a little icing sugar to remove any lumps.
To stop toppings from sliding, keep the dessert in the fridge for at least six hours or, preferably, overnight. Gentle folding when you fold whipped cream into the cheese mixture helps the filling set.
“Patience with chilling and careful folding are the quickest ways to rescue a soft or loose set.”
| Problem | Likely cause | Quick fix |
|---|---|---|
| Soft centre | Not enough full-fat cream cheese / under-whipped double cream | Use full-fat cheese; whip double cream to soft peaks; chill for at least 6 hours |
| Crumbly base | Too little melted butter in crumbs | Add more melted butter, press firmly into tin, chill 20–30 minutes |
| Lumpy filling | Cold cream cheese or insufficient beating | Bring cream cheese to room temperature; beat with icing sugar in a bowl until smooth |
| Topping slides | Insufficient chilling/time or wet fruit | Chill overnight; pat fruit dry; apply icing or coulis just before serving |
Conclusion
This timeless pudding pairs a buttery biscuit base with a light, zesty lemon filling that feels special yet simple to make.
By following this mary berry recipe and using full-fat ingredients you will get a silky set that slices cleanly. Give it plenty of chill time in the fridge for best texture.
Top with fresh fruit or enjoy it plain — either way it makes a dependable centrepiece for family dinners or small parties. We hope you enjoy creating and sharing this delicious treat.
FAQ
What size tin should I use for this recipe?
Can I use other biscuits instead of digestive biscuits?
Is it essential to use full-fat cream cheese and double cream?
How long does the cheesecake need to chill before serving?
Can I substitute icing sugar with caster sugar?
How do I fold whipped cream into the cheese mixture without losing air?
What causes a watery topping and how can I avoid it?
Can the cheesecake be frozen and how should I thaw it?
How can I add lemon or other citrus without curdling the mixture?
My biscuit base is too crumbly — what went wrong?
How long will the cheesecake keep in the fridge?
Can I make the dessert ahead for a party and how far in advance?
Is a food processor necessary for the base?
How do I get the filling smooth and lump-free?
Mary Berry No Bake Cheesecake
This classic dessert brings a touch of elegance to any British dinner party. The recipe is simple and kind to busy cooks, yet it delivers a professional finish that looks and tastes impressive.
Ingredients
- 175g digestive biscuits
- 40g demerara sugar
- 75g melted butter
- 225g full-fat soft cheese
- 150ml double cream
- 150ml Greek yoghurt
- Juice of 1 large lemon
- 25g caster sugar
- A dash of vanilla extract
Method
- Crush the digestive biscuits finely and mix with demerara sugar and melted butter.
- Press the crumb mixture into a 20cm loose-bottomed tin and chill in the fridge for at least 20 minutes.
- In a large bowl, beat the cream cheese with caster sugar and icing sugar until smooth.
- Whip the double cream until soft peaks form and gently fold it into the cream cheese mixture.
- Add the lemon juice and fold until evenly distributed.
- Spoon the creamy mixture over the chilled biscuit base and smooth the top.
- Chill in the fridge for at least 6 hours, preferably overnight, to set.
- Run a warm knife around the inside of the tin to loosen before removing and serving.