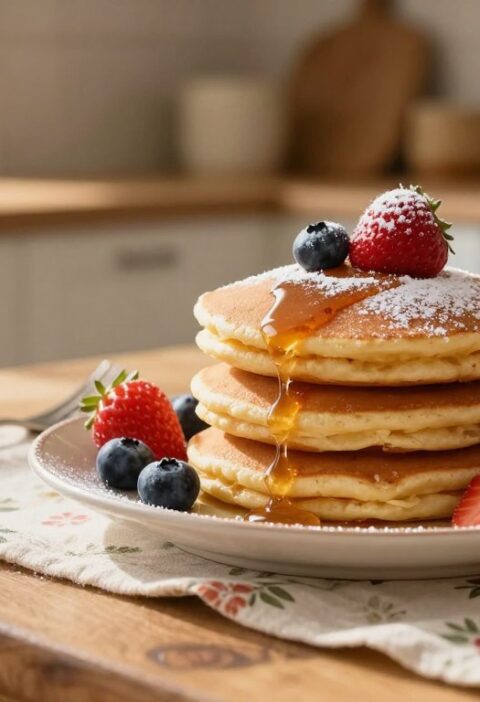
Mary Berry Sponge Fruit Flan is a light, elegant dessert that blends an airy sponge base with a creamy custard and fresh fruits.
The simple recipe uses 100g self-raising flour, 100g caster sugar and 100g unsalted butter, with two large eggs, a teaspoon of baking powder and a tablespoon of milk.
This classic British dish makes a delightful centrepiece for afternoon tea or a family celebration. The sponge soaks up custard gently, while berries and a glossy glaze add colour and a fresh finish.
Follow each step carefully to keep the base soft yet firm enough to hold cream or a cream cheese filling. Allow the base to cool completely before spreading the filling to prevent sogginess.
Key Takeaways
- The recipe creates a light sponge base that holds creamy fillings well.
- Use exact ingredient weights for the best texture and rise.
- Allow the base to cool completely before adding custard or whipped cream.
- A 20cm fluted tin gives the traditional shape and tidy edges.
- Fresh strawberries and seasonal berries provide natural sweetness and colour.
- Glaze the top for shine and to lock in juice from the fruits.
The Charm of a Classic Mary Berry Sponge Fruit Flan
This timeless flan combines an airy base, a rich custard or cream filling and a bright topping of seasonal fruits.
Light and visually stunning, the dessert suits spring and summer gatherings. The soft base is baked in a flan tin and holds a smooth cream or custard layer perfectly.
The recipe is make-ahead friendly; prepare the base in advance and assemble just before serving to save time. You can substitute custard for cream cheese to change the flavour and texture.
Customisation is easy: use different fruits or a delicate glaze to add shine and preserve juices. The word flan traces back to Latin for “flat cake”, which explains the pan shape chosen for this dessert.
| Feature | Benefit | Quick Tip |
|---|---|---|
| Base | Soft yet firm foundation | Cool fully before filling |
| Filling | Custard or cream cheese options | Chill for stability |
| Topping | Fresh strawberries and mixed fruits | Brush with glaze for shine |
Essential Equipment for Your Baking Success
Choosing the right tools sets you up for a reliable, attractive finished dessert every time. A small investment in proper kit saves time and improves results when making this classic British recipe.
Fluted tins and why they matter
Use a 20cm fluted flan tin with a raised base. The unique shape gives a neat divot when the cake turns out, which becomes the perfect well for your custard or cream filling.
Because this tin is hard to line with paper, try a dedicated cake release product to ensure easy removal. The raised centre also creates professional fluted edges that make the finished dessert look polished.
Mixing tools to streamline the bake
Good mixing gear keeps the sponge batter smooth and airy. An electric whisk helps incorporate air quickly, which is vital for a light base.
- An electric whisk for uniform, creamy batter.
- A sturdy bowl that fits the whisk comfortably.
- A cooling rack to stop the base going soggy.
- An offset spatula for spreading the filling evenly.
- A pastry brush for a thin, even glaze over strawberries and other fruits.
Every tool plays a role: from the tin that shapes the cake to the brush that adds shine, proper equipment reduces fuss and saves time while baking.
Selecting Quality Ingredients for the Perfect Base
Start by choosing fresh, well-sourced ingredients—each one shapes the texture and taste of the base.
Use 100g self-raising flour, 100g caster sugar, 100g unsalted butter, two large eggs, 1 tsp baking powder and 1 tbsp milk for the sponge base. If you only have plain flour, substitute 100g plain flour plus 1 tsp baking powder.
Bring eggs and butter to room temperature. This helps the butter emulsify with the eggs and gives a smoother, lighter batter in less time.
For the filling, choose 300ml of custard or mix cream cheese with sugar and a splash of lemon juice for a cheesecake-style alternative. High-quality vanilla extract and ripe strawberries lift the overall flavour.
| Ingredient | Purpose | Quick Tip |
|---|---|---|
| Flour | Structure for the base | Measure accurately for consistent rise |
| Butter & Eggs | Emulsion and tenderness | Use at room temperature |
| Sugar | Sweetness and fine crumb | Caster dissolves quickly for smooth batter |
| Fruits & Glaze | Topping and shine | Use seasonal fruits; finish with a light glaze |
Investing a little time to source the best ingredients saves time later and ensures a reliable, delicious flan every bake.
Preparing the Flan Tin for Easy Release
A well-prepared tin is the unsung hero of any successful flan bake. This simple step protects the base and saves a lot of disappointment when you turn the cake out.
Coating the tin matters because the fluted shape cannot be lined neatly with paper. Use a dedicated cake release product such as PME Release-a-Cake for reliable results. Apply a thin, even layer and brush it into every crevice so the sponge lifts cleanly.

Using Cake Release
Traditional butter and a dusting of flour still work. However, modern release sprays give a consistent non-stick finish that is ideal for intricate tins.
- Ensure the base is seated correctly before you pour batter; an uneven base ruins the rise.
- Brush release liquid into scallops and corners so the sponge pulls away after baking.
- Proper preparation prevents tearing and keeps the filling and cream ready for assembly.
Final step: take a moment to inspect the tin. A well-coated tin is the difference between a ruined dessert and a perfect fruit flan with a glossy glaze and neat edges.
Mastering the Sponge Mixture
Getting the sponge batter right is the crucial first step to a light, even base for your dessert.
In a large bowl, beat 100g butter with 100g sugar until pale and fluffy. Add the eggs one at a time, then fold in sifted 100g flour and 1 tsp baking powder.
Add 1 tbsp milk and a teaspoon vanilla for scent. An electric whisk helps create a smooth, airy mixture. Mix only until combined — overmixing makes the cake dense.
Spread the batter evenly into a prepared flan tin so it bakes at a steady rate. Tap the tin gently to lift big air bubbles.
Bake until the top is golden and springy to the touch. Let the base cool fully before adding any custard or cream filling.
“A light batter and careful mixing are the real secrets behind a perfect flan.”
- Tip: room-temperature eggs and butter emulsify better and give a finer crumb.
- Sift flour and baking powder to add air and ensure an even rise.
Baking the Base to Golden Perfection
Preheat the oven to 180°C (160°C fan) so the base bakes evenly and develops a golden top. This simple step sets the scene for a stable, springy result that will hold your filling without sinking.
Bake the sponge in a well-prepared flan tin for 20–25 minutes. The correct baking time is vital: check for a light brown colour and a gentle spring when you press the centre.
Avoid opening the oven door during the first 20 minutes. Sudden temperature changes can make the cake collapse and ruin the texture.
Look for these signs of doneness: the cake will pull away slightly from the tin edges and feel springy. The golden colour shows that the flour and sugar have caramelised, adding deeper flavour to the recipe.
- Preheat to oven 180c (160°C fan) for an even rise.
- Bake 20–25 minutes; resist opening the door early.
- Invert the base onto a cooling rack straight away to stop steaming and prevent sogginess.
Follow this step carefully and the base will be ready to accept custard, cream or a cream cheese filling and a glossy glaze with fresh fruits on top.
Cooling Techniques for a Stable Structure
Patience at the cooling stage protects your custard and cream from melting into the base.
Always leave the base to cool completely on a wire rack. This simple step keeps the tin well firm enough to hold the filling and toppings without sagging.
Cooling correctly stops the custard or cream from soaking in. If you add the filling while the base is warm, the dessert will turn soggy and uneven.
Do not refrigerate the cake while it is still hot. Instead, place the rack in a cool, airy spot if you are short of time. The raised centre must be cold before you pour in a heavy cream cheese or custard filling.
- Cool completely on a wire rack to keep a stable structure for your flan.
- Allow cool in a ventilated area so the exterior firms but moisture stays locked in.
- Use cooling time to prepare fruit and whip the cream, saving time later.
- Chill the assembled dessert for 30 minutes before serving for clean slices.
“A calm approach to cooling is the small time investment that makes a big difference to the final serving.”
Preparing the Creamy Filling
A silky filling lifts this dessert; choose one that balances sweetness and texture with the light base.

Custard Options
Use 300ml of chilled ready-made custard or make a homemade custard and allow it to cool and thicken slightly before assembly.
Ensure the custard is thick enough to hold shape when spooned into the centre of the base.
- Ready-made: quick and consistent for parties.
- Homemade: richer flavour; cool fully in a bowl before filling.
- Vanilla adds depth; a splash of vanilla extract lifts the cream gently.
Cream Cheese Alternatives
For a tangy cheese filling, beat full-fat cream cheese with caster sugar and a squeeze of lemon juice in a small bowl until smooth.
If too loose, chill for a few hours to firm up so it will hold creamy textures when sliced.
- Light option: fold Greek yogurt into vanilla cream for freshness.
- Whipped cream pairs well with berries and a hint of vanilla.
- Always spread evenly to the fluted rim for consistent flavour in every slice.
| Option | Key ingredients | Notes |
|---|---|---|
| Custard | 300ml custard, vanilla | Quick, smooth; must be cooled and thick |
| Cream cheese filling | Cream cheese, caster sugar, lemon juice | Firm after chilling; tangy and rich |
| Light alternative | Greek yogurt, whipped cream, vanilla | Refreshing; less sweet, good with seasonal fruit |
“A thick, well-chilled filling makes slicing neater and keeps the topping fresh.”
Assembling Your Dessert with Artistic Flair
Begin by smoothing the filling into a flat, even surface that will support decorative fruit. Use a small offset spatula and work from the centre to the rim so the layer is level and neat.
Arrange sliced fruits in concentric rows, starting at the centre and working outward. Mix strawberries, kiwi, raspberries and blueberries for a jewel-toned top that catches the eye.
Place each piece slightly overlapping the last to create a tidy pattern. This helps each slice of the flan show a pretty cross-section when served.
Add a few mint leaves as a final garnish. The green offers contrast and a fresh scent that lifts the whole dessert.
- Spread the filling evenly before you add fruit to avoid slippage.
- Work from centre out to keep balance and symmetry.
- Choose a mix of textures and colours for visual impact.
| Stage | Action | Tip |
|---|---|---|
| Filling | Smooth to a flat layer | Use an offset spatula for control |
| Topping | Arrange from centre outward | Overlap slices for stability |
| Garnish | Add mint leaves | Keep mint whole for neat look |
| Final | Glaze if desired | Apply thinly to avoid sogginess |
“A careful assembly is the final step that turns simple ingredients into a show-stopping dessert.”
Adding a Professional Glaze for Shine
Finishing with a thin, warm glaze is the easy step that creates a professional top. It takes only a few minutes and lifts the whole presentation.
Warm 2 tablespoons of apricot jam with 1 tablespoon of water until smooth. If you prefer a clearer finish, pass the mix through a sieve.
Use a small pastry brush to dab the glaze gently over the fruits. A light coat adds shine and acts as an edible glue to hold the topping in place.
Avoid over-applying. Too much glaze will make the pieces sticky and can overpower the delicate filling, cream or custard beneath.
- Substitute apple jelly or a drizzle of honey if you want a more neutral flavour.
- Strain for a clear, polished finish without any bits.
- Chill for 10–15 minutes after glazing to set the sheen before serving.
“A thin glaze brings out colour and keeps fruit fresh.”
Troubleshooting Common Baking Issues
When a bake goes wrong, simple checks often reveal the fix in a matter of minutes. This short guide helps you rescue the base, the filling and the topping without stress.
Preventing Sogginess
Cool completely the base before you add any filling or glaze. A warm tin will steam and soak the layer beneath the filling.
For extra protection, spread a thin layer of jam across the base. The jam acts as a moisture barrier and keeps the cream or custard tidy.
Fixing Dense Sponge
If the sponge feels heavy, you probably overmixed after adding flour or under-whisked the eggs. Mix only until combined and whisk eggs until light.
Check your oven temperature and bake the base the correct number of minutes; underbaking can also give a dense texture.
Managing Fruit Moisture
Pat berries dry with kitchen paper before arranging them. Avoid very wet fruit that releases juice onto the filling.
If your cream cheese filling seems loose, beat until it reaches soft peaks or chill for a short time. Serve the finished flan within a day and store covered in the fridge for up to 2 days.
Creative Variations to Try at Home
Give the classic a twist by swapping the vanilla sponge for a rich chocolate base and topping it with fresh berries for a decadent finish.
For a brighter note, add a thin layer of lemon curd under the filling. The tang cuts through the cream and balances the sugar in the topping.
Try tropical slices such as mango and pineapple for a summer version. Toasted nuts or coconut flakes add an attractive texture on the top.
Make a parve, dairy-free version by using plant-based butter in the sponge and vegan cream cheese for the filling. It keeps the look and taste while catering for dietary needs.
- Use a chocolate sponge for depth; pair with strawberries and raspberries.
- Hide lemon curd beneath custard for a zesty surprise.
- Swap berries for mango and pineapple; glaze with honey or apple jelly.
- Garnish with fresh mint leaves to add colour and aroma.
Small swaps in ingredients and glaze can turn a familiar bake into something uniquely yours.
Conclusion
Mastering small details lets you transform modest ingredients into a polished flan fit for any table.
Follow basic technique and careful timing to balance the light base, creamy filling and glossy fruit topping. Focus on cooling fully and using the right flan tin so your slices stay neat.
Try variations but keep the core steps the same: bake confidently, assemble with care and finish with a thin glaze. This recipe rewards practice and small adjustments.
Be mindful of daily values when serving, enjoy portions, and savour the process of baking a beautiful dessert to share with friends and family.
FAQ
What size flan tin should I use for this sponge fruit recipe?
Can I use a non‑stick tin instead of a fluted tin?
What is the best method to prevent a soggy base?
How do I stop the sponge becoming dense?
Which fruits work best for the topping?
Can I substitute custard with a cream cheese filling?
How do I make a shiny professional glaze?
What are quick fixes if the top of the base cracks while baking?
How long should I cool the base before adding filling?
Can I prepare elements of the dessert a day ahead?
Is there an egg‑free option for the sponge base?
How do I manage fruit moisture when using berries?
What temperature and time work best for baking the base?
Can I use ready‑made custard or jelly from a packet?
Mary Berry Sponge Fruit Flan
A light, elegant dessert that blends an airy sponge base with a creamy custard and fresh fruits, perfect for afternoon tea or family celebrations.
Ingredients
- 100g self-raising flour
- 100g caster sugar
- 100g unsalted butter
- 2 large eggs
- 1 tsp baking powder
- 1 tbsp milk
- 300ml custard or cream cheese
- Fresh strawberries and seasonal berries
- 2 tbsp apricot jam
- 1 tbsp water
Method
- Preheat the oven to 180°C (160°C fan).
- In a large bowl, beat the butter and sugar until pale and fluffy.
- Add the eggs one at a time, mixing well after each addition.
- Fold in the sifted flour and baking powder gently.
- Add the milk and mix until just combined.
- Spread the batter evenly into a prepared 20cm fluted flan tin.
- Bake for 20-25 minutes until golden and springy to the touch.
- Let the base cool completely on a wire rack.
- Prepare the filling by using chilled custard or mixing cream cheese with sugar and lemon juice.
- Spread the filling evenly over the cooled sponge base.
- Arrange the fresh fruits on top in concentric rows.
- Warm the apricot jam with water until smooth and brush it over the fruits for a glaze.
- Chill the assembled dessert for 30 minutes before serving.