The Mary Berry Potato Rosti is a classic, quick dish that takes about 25–30 minutes from start to finish. It brings simple ingredients together to make something distinct and comforting.
This version blends a crisp, golden exterior with a soft, tender centre. The technique draws on traditional Swiss roots and highlights how modest foods can taste refined.
Whether for a relaxed weekend brunch or a speedy weeknight supper, the method is reliable. Follow the steps and you will learn pan-frying skills that deliver consistent, professional results.
Enjoy a satisfying, rustic meal that is both easy to master and impressive to serve.
Key Takeaways
- Prep and cook time is around 25–30 minutes.
- Simple ingredients yield a crisp outside and soft inside.
- Inspired by Swiss tradition for a hearty, rustic result.
- Ideal for brunch or a quick, stylish supper.
- Following the steps builds reliable pan-frying confidence.
The Appeal of the Mary Berry Potato Rosti
A golden, crunchy crust gives this rosti the kind of texture that keeps people reaching for seconds. The contrast between a crisp exterior and a soft centre is its main draw.
Many home cooks call this a comfort food classic. It feels warming, simple and reliable for different meal times.
This Swiss-inspired hash works brilliantly for a casual weekend brunch. Serve with a perfectly fried egg and it becomes a standout plate.
- As a versatile side, it complements meats and eggs with ease.
- Simple ingredients keep the focus on traditional flavours and hearty satisfaction.
- Its dependable texture makes the rosti a smart choice for any menu.
In short, the mary berry approach turns humble produce into a reliably tasty dish that never goes out of style.
Essential Ingredients for Your Rosti
Good results begin with choosing the right potato variety and a well-sized pan.
Starchy potato varieties
Use 500 g of starchy potatoes such as Russet, King Edward or Maris Piper. These hold together and crisp best when you pan fry.
Grate potatoes at the last minute so the natural starch stays on the surface. That starch helps the mixture bind and form a golden crust when you pan fry the mixture.
Pantry staples
Gather simple ingredients before you start cooking.
- 2 tbsp butter and 2 tbsp vegetable oil for frying and browning.
- A tablespoon of oil for any initial bacon frying stage if using.
- Season salt and freshly ground pepper to taste; add salt sparingly then season again after cooking.
- A 20cm non-stick frying pan with a lid is ideal to cook evenly without sogginess.
- Use a large mixing bowl to combine grated potatoes with softened onions and other ingredients.
Fry onions for about 15 minutes until soft and tender before mixing. That step boosts flavour and keeps the final dish light and well-balanced.
Preparing the Potatoes for Maximum Crispiness
Start by handling the grated potatoes with care; drying them properly makes all the difference to the final crunch.
Removing Excess Moisture
Grate potatoes finely and transfer them to a clean kitchen towel. Gather the cloth and twist firmly to wring out as much liquid as possible.
Do not rinse or soak the potato strands. Water washes away the surface starch that helps the mixture bind and form a golden crust.
Once drained, press the dried grated potatoes into the pan so they form a compact base. This helps heat travel through the layer and prevents a soggy centre.
- Wring with a towel for the fastest, most effective drying.
- A light squeeze in a sieve works but may leave more liquid behind.
- Drying thoroughly is the single best step to ensure a crisp finish.
| Method | Time | Result |
|---|---|---|
| Kitchen towel | 30–60 seconds | Very dry; best for a crispy crust |
| Sieve/salad spinner | 60–90 seconds | Moderately dry; good if no towel |
| Paper towels | 90–120 seconds | Acceptable; slower and more wasteful |
Mastering the Mary Berry Potato Rosti Cooking Method
Start by setting a reliable medium heat; this simple step shapes the texture you will get.
Heating the Pan
Heat a non-stick frying pan over medium. Add a tablespoon each of butter and oil so the fat blends and browns evenly.
Shaping the Mixture
Put the seasoned mixture into a warm pan and press it down into an even layer. Compacting the grated potatoes helps the dish hold together while it cooks.
The Flipping Technique
Cook the first side for 10–12 minutes until the base is deep golden and crisp. Use a plate to invert the rosti, then slide it back into the pan.
- You may need add a little more oil before returning the rosti to the pan for the second side.
- Cook the second side for 8–10 minutes, keeping the heat steady to avoid burning.
- Season salt and pepper in the bowl before you add potato to the pan so the whole mixture is well flavoured.
“A calm pan and careful timing make the difference between a soft middle and a perfect golden crust.”
| Step | Action | Time |
|---|---|---|
| Heat | Warm non-stick pan with butter + oil | 1–2 minutes |
| First side | Press into an even layer; cook until golden | 10–12 minutes |
| Second side | Slide back into pan; crisp to finish | 8–10 minutes |
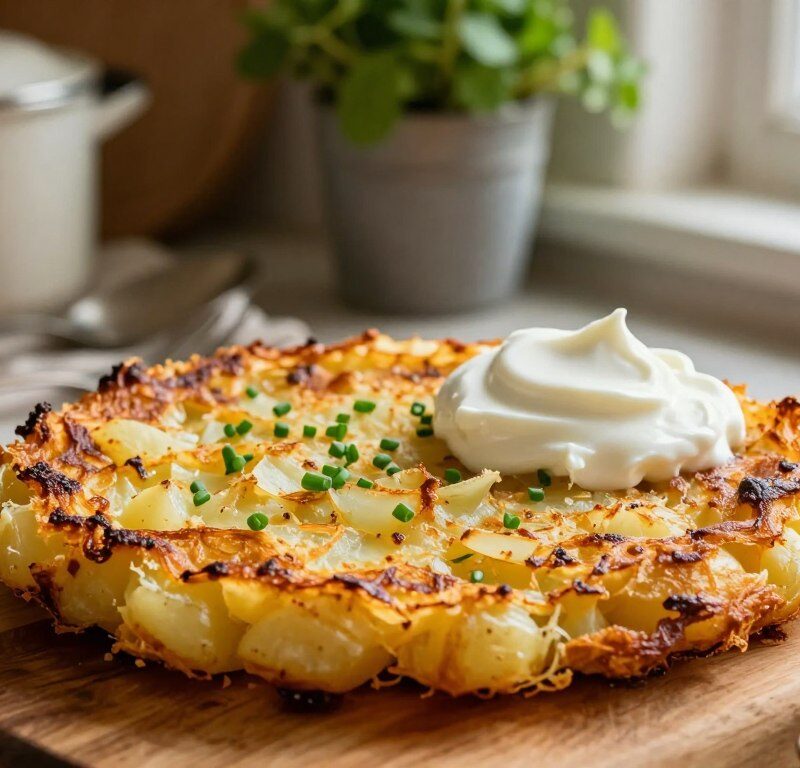
Achieving the Perfect Golden Crust
The crust defines success — a clean, deep golden_crisp edge is what lifts a simple rosti into something special.
Start with a warm pan and keep steady heat. Too hot, and the outside will darken before the centre cooks.
Use the right amount of oil so the base browns evenly. The fat creates a conductive layer that helps caramelise sugars and bind the strands together.
- Patience: let the mixture sizzle undisturbed so a firm crust can form.
- Temperature: monitor heat and reduce if the browning speeds up too fast.
- Finish: flip only once for a tidy, uniform colour.
“The crust is the defining feature of a good rosti, providing the necessary crunch that makes this dish so popular.”
Serving Suggestions for a Hearty Brunch
A crisp rosti paired with the right accompaniments turns a simple brunch into a memorable meal.

For a classic weekend brunch, place a fried egg on top of the hot rosti. The rich yolk adds savoury depth and makes the plate feel indulgent.
The rosti also shines as a side next to grilled meat such as steak or chicken. It gives the main a sturdy, comforting base and lifts the whole dish.
Try serving with poached eggs too; the runny yolk acts as a natural sauce and pairs beautifully with the crispy texture.
- Add a fresh salad as a side to cut the richness and brighten each bite.
- Serve immediately while hot to preserve the crisp crust — guests will notice the difference.
- Top with a spoonful of sour cream or scatter fresh herbs for a creamy, aromatic finish.
“Serve straight from the pan so the crisp stays and the flavours are at their best.”
Expert Tips for Avoiding a Soggy Rosti
A dry surface and gentle cooking make the difference between a golden crust and a steamed pile.
Remove excess liquid first. Wrap the grated potatoes in a clean towel and squeeze until almost dry. That step stops extra liquid from pooling in the layer and keeps the crust crisp.
Managing Heat Levels
Keep the pan on medium heat. Steady heat lets the centre cook through without burning the outside. If the base browns too fast, reduce the heat and give it a few more minutes.
Press the potato mixture into an even layer and do not overcrowd the frying pan. Space gives air to brown rather than steam the potatoes.
- If the mixture breaks when flipping, use a plate to turn it then slide it back into the pan to cook the second side.
- Watch the pan; you may need add a little more oil or fat if it looks dry so the rosti stays golden rather than greasy or soft.
“A calm pan, a firm press and a quick flip keep the texture perfect.”
Creative Variations and Flavour Additions
A few simple swaps let you tailor the flavour and texture to suit any meal.
Cheese — tuck 50 g of grated cheddar or Gruyère between two thin layers for a molten, savoury centre.
Heat — mix a pinch of chilli flakes or smoked paprika into the grated mix for a gentle warming kick.
Herbs — chopped parsley or chives lift the dish with a fresh, aromatic note. Stir them through just before frying.
Veg boost — add grated carrots or zucchini to increase fibre and colour. Squeeze excess moisture first so the crisp stays.
Garlic — a little minced garlic gives depth and makes the dish feel more substantial as a main or side.
- Combine two ideas — cheese plus herbs is a classic pairing.
- Keep additions light so the crisp texture remains the star.
“Small changes let you adapt the classic to what you have and who you are cooking for.”
Storing and Reheating Your Leftovers
Cool and store any leftovers promptly to keep texture and flavour intact.
Allow each portion to cool fully on a rack before packing. Store in an airtight container in the fridge for up to 2 days to preserve freshness and avoid excess liquid build-up.

When reheating, avoid the microwave as it makes the crust soft. Use a non-stick pan over medium heat for the best results.
Warm the slices gently with a little oil or fat in the pan. This restores the golden crust and crisps the interior without drying it out.
If you prefer the oven, heat to 180°C and warm on a tray for 10–12 minutes until hot and crisp. Do not stack hot slices, as trapped steam will lead to sogginess.
- Cool completely before storing to prevent condensation.
- Reheat in a non-stick frying pan for crispness, or use the oven for even warming.
- Use a small amount of oil or fat when frying to refresh the crust.
- Consume within 48 hours for best quality.
| Method | Heat/Temp | Time | Result |
|---|---|---|---|
| Non-stick pan | Medium heat | 3–5 minutes each side | Fast crisping; restored crunch |
| Oven | 180°C | 10–12 minutes | Evenly hot; good for multiple portions |
| Microwave | High (not recommended) | 1–2 minutes | Soft texture; loses crisp |
“A quick reheat in a pan with a little oil brings back the crisp you enjoyed the first time.”
Conclusion
This classic hash proves that simple technique and good timing make an everyday meal feel special. The mary berry approach uses few ingredients and a clear method to deliver consistent results, so the recipe is easy to follow.
Choose starchy potatoes and squeeze out excess moisture. A light seasoning of salt in the bowl, rather than later, helps the mixture bind and brown evenly.
Press the grated mix into the pan and cook undisturbed for a deep, golden_crisp finish. This rosti-style base creates the crunchy exterior and soft centre that define the dish.
Serve hot for brunch or as a hearty side. Experiment with cheese or herbs, but keep the core technique intact to enjoy this timeless food.
FAQ
What type of potato is best for this rosti?
How do I remove excess moisture from grated potatoes?
Do I need to add egg to the mixture?
What fat should I use for frying?
How hot should the pan be when I add the mixture?
When should I flip the rosti and how do I do it cleanly?
How long does it take to cook through without burning the outside?
How should I season the mixture?
Can I add extras like cheese or bacon?
What are the best serving suggestions for brunch?
How can I prevent a soggy rosti?
How should I store and reheat leftovers?
Can I make these in advance or freeze them?
Mary Berry Potato Rosti
A classic, quick dish that combines simple ingredients to create a distinct and comforting meal with a crisp, golden exterior and a soft, tender center.
Ingredients
- 500 g starchy potatoes (e.g., Russet, King Edward, or Maris Piper)
- 2 tbsp butter
- 2 tbsp vegetable oil
- Salt to taste
- Freshly ground pepper to taste
- 1 onion, finely chopped
Method
- Grate the potatoes finely and place them in a clean kitchen towel. Twist to wring out as much liquid as possible.
- In a non-stick frying pan, heat 1 tbsp of butter and 1 tbsp of vegetable oil over medium heat.
- Fry the chopped onion in the pan for about 15 minutes until soft and tender.
- In a large mixing bowl, combine the grated potatoes with the softened onions, and season with salt and pepper.
- Press the potato mixture into the warm pan to form an even layer.
- Cook the first side for 10–12 minutes until the base is deep golden and crisp.
- Use a plate to invert the rosti, then slide it back into the pan to cook the second side for 8–10 minutes.
- Serve immediately while hot, optionally topped with a fried egg or alongside grilled meats.