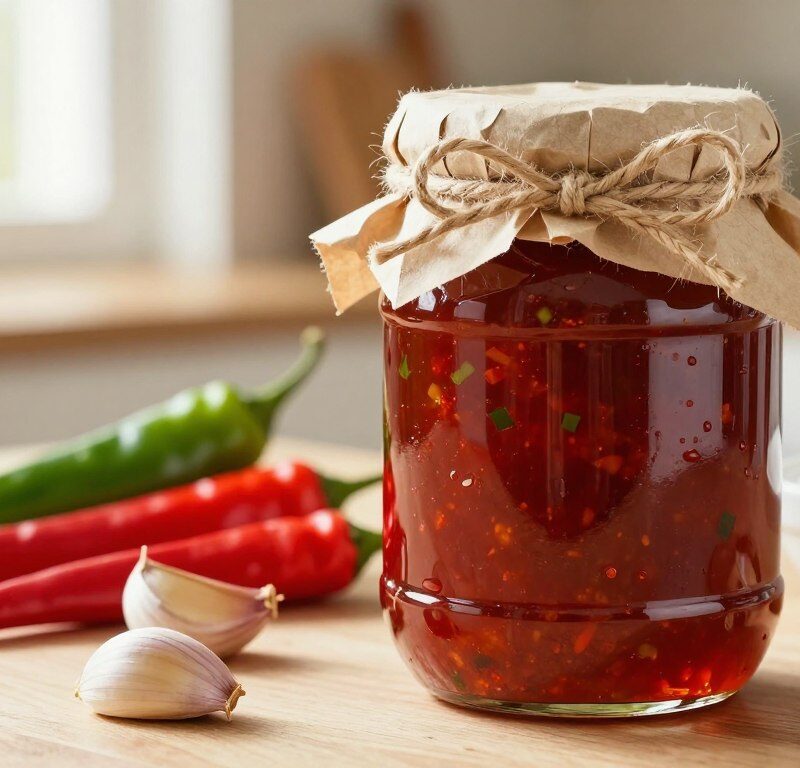
This glossy, homemade preserve brings a bright, spicy-sweet lift to your meals. It balances heat and sweetness so well that it transforms simple dishes into something special.
Made from fresh chillies, red peppers, garlic and ginger, the mixture is cooked down with sugar and vinegar until it becomes sticky and glossy. The result is a savoury conserve with a gentle kick that works as a dip, glaze or condiment.
Use it with cheese, roast meats, sandwiches or stir-fries for instant flavour. Jars of this preserve make lovely presents and keep for many months when stored in a cool, dark cupboard.
Key Takeaways
- Fiery yet sweet balance that enhances many dishes.
- Prepared from fresh peppers, garlic and ginger for depth.
- Sticky, glossy texture ideal as a dip or glaze.
- Versatile pairing with cheese, meat and everyday meals.
- Long shelf life and attractive as a homemade gift.
Why You Will Love This Mary Berry Chilli Jam Recipe
Cooked quickly with high-quality red peppers, this spicy preserve gives a reliable, balanced kick to everyday dishes.
The warming heat is gentle and pairs beautifully with sweet notes, so it never overwhelms guests. It lifts a simple cheese board, brightens cold meats and adds shine to grilled cuts.
Preparation takes very little time. A straightforward method produces a glossy finish that looks and tastes professional without complex technique. Both beginners and seasoned cooks get consistent results.
“A jar in the pantry means instant flavour for sausages, burgers or a shared baked Camembert.”
Versatile and long‑lasting, this jam is one of those reliable recipes that add instant interest to meals. Keep a jar handy and you’ll find countless ways to serve it with bread, cheese or roast plates.
Essential Ingredients for Your Homemade Preserve
Start with the freshest produce you can find to ensure bright colour and clean flavour in the finished preserve. Gather and measure everything before you begin; that saves time and keeps the cooking stage smooth.
Fresh Produce Selection
Chillies and bell peppers form the backbone of the flavour. Use 150g fresh red chillies (deseeded if you prefer milder heat) and 150g red bell peppers for sweetness and body.
Include 50g fresh ginger for warmth, 400g tinned chopped tomatoes for texture, and a level teaspoon of salt to balance tastes. Choose ripe, firm peppers and peeled ginger for best results.
Choosing the Right Sugar
Use 1kg caster sugar to help the jam set. If you want extra assurance, substitute jam sugar with added pectin.
| Type | Use | Notes |
|---|---|---|
| Caster sugar | Standard set | Fine, reliable; gives glossy finish |
| Jam sugar | Faster set | Contains pectin; useful if fruit is low in natural pectin |
| Brown sugar | Richer flavour | Add sparingly; alters colour and acidity |
Finish with 600ml white wine or cider vinegar for acidity. Optionally add a teaspoon of lime juice or smoked paprika to customise the flavour. Check ingredients once more—then cook without delay.
Necessary Kitchen Equipment
Good kit makes a big difference when preserving. A large stainless steel preserving pan or a wide-based saucepan helps the mixture cook evenly and reduce sticking.
Use a food processor or a handheld stick blender to turn chillies, peppers and ginger into a smooth paste. A smooth base gives an even texture and speeds the cooking stage.
Filling jars is easier with a funnel and a ladle. They keep edges clean and waste to a minimum. Make sure you have enough sterilised jars; this recipe usually yields about four 200ml containers.

- Large stainless steel preserving pan or wide-based saucepan
- Food processor or stick blender
- Funnel, ladle and a wooden spoon
- Jam thermometer (optional) and plenty of clean jars
- A good quality cider vinegar to balance acidity
A jam thermometer helps hit the right set, but you can test on a cold spoon if you prefer. Always check that equipment is clean and dry. This prevents infections and keeps your preserve shelf-stable.
For more preserving guidance and useful tips, see this short guide on homemade chutneys and preserves.
“Clear tools, steady heat and clean jars make the process safe and satisfying.”
Preparing Your Chillies and Peppers Safely
Handling hot peppers needs care; simple precautions stop discomfort and keep the kitchen safe.
Always wear rubber gloves when you start. Capsaicin in the fibrous tissue will irritate skin and eyes. Put on gloves before you cut and keep a bowl for discarded seeds.
Safety Precautions When Handling Heat
Slice peppers and chillies carefully on a stable board. Remove seeds and the pale ribs to control the level of heat.
Take extra care with very hot varieties such as Scotch bonnets or bird’s eye chillies. If you use these, consider eye protection and avoid touching your face.
- Place prepared peppers and ginger into a food processor to create a smooth base.
- Transfer the blended mix straight to your large pan to begin cooking.
- Serve this jam with cheese like cheddar or brie to balance the spice.
- Wash hands thoroughly after removing gloves to remove any traces of oil.
| Item | Why it helps | Tip |
|---|---|---|
| Rubber gloves | Protects skin from capsaicin | Use two pairs if you expect tears |
| Sharp knife | Clean cuts reduce slipping | Stabilise small peppers with a fork |
| Food processor | Creates even texture | Pulse to control chunk size |
“Taking a few minutes to prepare ingredients safely keeps the cooking time enjoyable and pain-free.”
The Cooking Process for a Perfect Set
Begin by pouring the blended pepper mix into a wide-based pan and stir in the sugar, vinegar and salt over low heat until the sugar dissolves. Bring the pot to the boil, then reduce to a steady simmer.
Achieving the Right Consistency
Simmer uncovered for 40–50 minutes, stirring often to prevent sticking. The mixture will reduce and thicken as water evaporates and the sugar concentrates.
Testing for the Set
Check the set by seeing if the mix coats the back of a spoon or by measuring 105°C (220°F) on a thermometer. If using jam sugar, rapid boiling for three or four minutes may be enough.
Cooling and Potting
Add a level teaspoon of lime juice in the final minute for brightness. Remove from the heat and let the jam rest for five minutes before filling.
Carefully ladle the hot preserve into sterilised jars, leaving a small headspace at the top. Seal while hot to form a vacuum; this helps jars stay fresh for up to a year.
“A good set and clean jars make the difference between a shelf-stable storecupboard staple and a wasted batch.”
Tips for Sterilising Your Jars
Sterilising jars just before filling reduces the chance of contamination. Clean, dry glass is essential for a long-lasting preserve.

Wash jars and lids in hot, soapy water and rinse well. Then choose a method that suits your time and kit.
- Microwave: Place washed jars in the microwave on full power for two minutes. Do not microwave metal lids.
- Dishwasher: Run jars through a hot cycle and leave them in the closed machine until you are ready to fill.
- Boil lids: Soak lids in boiling water for five minutes to sterilise seals.
- Extra jars: Sterilise more jars than you think you need; it saves a wasted batch if one breaks or leaks.
The sugar and vinegar in this preserve help preserve flavour, but clean jars are still vital.
“Once sterilised, ensure jars are bone dry before you add hot jam to avoid spoilage.”
Creative Serving Suggestions for Your Jam
A spoonful of this preserve turns plain snacks into memorable bites. It works especially well on a cheese board alongside creamy brie or sharp cheddar.
Use a tablespoon as a sticky glaze for grilled chicken, pork or sausages to add shine and flavour. Toasted sandwiches and burgers benefit from a thin spread for an immediate sweet‑spicy lift.
The vibrant colour from the peppers and chillies makes small bowls of the conserve eye‑catching at parties. It also serves as a quick dip for crackers and pâté.
Add a little to stir‑fries or roasted veg for instant depth when you need a fast flavour boost. At about 55 calories per serving, it is a guilt‑free way to lift everyday recipes.
- Pair with soft or hard cheese for striking contrasts.
- Glaze meats with a tablespoon for caramelised finish.
- Serve in small jars or bowls to make sharing easy.
“Small additions make big differences — keep a jar handy and experiment.”
| Use | Pairing | Portion |
|---|---|---|
| Cheese board | Brie, cheddar | 1–2 teaspoons per serving |
| Grill glaze | Chicken, pork, sausages | 1 tablespoon before serving |
| Dip / sharing | Crackers, pâté | Small bowl per 6–8 guests |
Customising Your Chilli Jam Flavour Profile
A few simple swaps change the character of this preserve from bright and tangy to deep and smoky. Add smoked paprika for a warm, smoky note that suits grilled meats and charred vegetables.
If you prefer a milder result, choose sweet cherry peppers instead of hot cayenne and always wear gloves when you handle fresh chillies. For an extra-hot batch, include Scotch bonnet chillies but clearly label jars.
Taste your peppers before you add them so you can judge the final heat level. A tablespoon of lime juice or some zest brightens the mix and balances the sugar and vinegar.
- If the set is loose, add pectin or cook longer in the pan to reduce time.
- Try cider vinegar to change acidity and depth; a level teaspoon of salt sharpens flavour.
- Use a teaspoon or a tablespoon measures for consistent results at each step.
“This step lets you create unique jams that reflect your taste and kitchen creativity.”
Conclusion
A well-made jar of chilli jam brings instant character to a cheese board, a burger or a simple roast. It is a small effort that rewards you all season.
Follow the clear steps in this recipe and you will end up with a glossy, balanced preserve that lifts many recipes. The process is straightforward and satisfying.
Store sealed jars in a cool, dark place and they will keep for up to a year. Label each jar with the date so you can enjoy the best flavour first.
Whether you gift a jar to a friend or keep it at home, this chutney-style treat is sure to be a hit. Thank you for following the guide — we hope you enjoy selecting chillies and crafting your own batch.
FAQ
How long does this chilli jam keep once opened?
Can I use different types of peppers instead of bell peppers?
Do I need pectin to get the jam to set?
What vinegar is best for balance and acidity?
How do I test if the jam has set properly?
Are there simple ways to reduce the heat in the finished preserve?
How should I sterilise jars and lids safely?
Can I freeze this preserve instead of bottling?
What are good pairings for this sweet-spicy preserve?
Do I need to wear gloves when handling hot chillies?
Can I reduce the sugar for a lower-sugar version?
How long does it take to cook the jam to the right consistency?
Mary Berry Chilli Jam Recipe
This glossy, homemade preserve brings a bright, spicy-sweet lift to your meals. It balances heat and sweetness so well that it transforms simple dishes into something special.
Ingredients
- 150g fresh red chillies, deseeded if preferred
- 150g red bell peppers
- 50g fresh ginger, peeled
- 400g tinned chopped tomatoes
- 1 teaspoon salt
- 1kg caster sugar
- 600ml white wine or cider vinegar
- 1 teaspoon lime juice (optional)
- 1 teaspoon smoked paprika (optional)
Method
- Prepare the chillies and peppers by wearing rubber gloves and removing seeds and pale ribs to control heat.
- Place the prepared chillies, red bell peppers, and ginger into a food processor and blend into a smooth paste.
- Transfer the blended mixture to a large stainless steel preserving pan.
- Stir in the sugar, vinegar, and salt over low heat until the sugar dissolves.
- Bring the mixture to a boil, then reduce to a steady simmer.
- Simmer uncovered for 40–50 minutes, stirring often to prevent sticking.
- Check the set by seeing if the mix coats the back of a spoon or by measuring 105°C (220°F) on a thermometer.
- In the final minute, add lime juice for brightness.
- Remove from heat and let the jam rest for five minutes before filling sterilised jars.
- Ladle the hot preserve into sterilised jars, leaving a small headspace at the top, and seal while hot.