Ready in around 35 minutes, this classic British frozen delight yields six generous servings for family or guests.
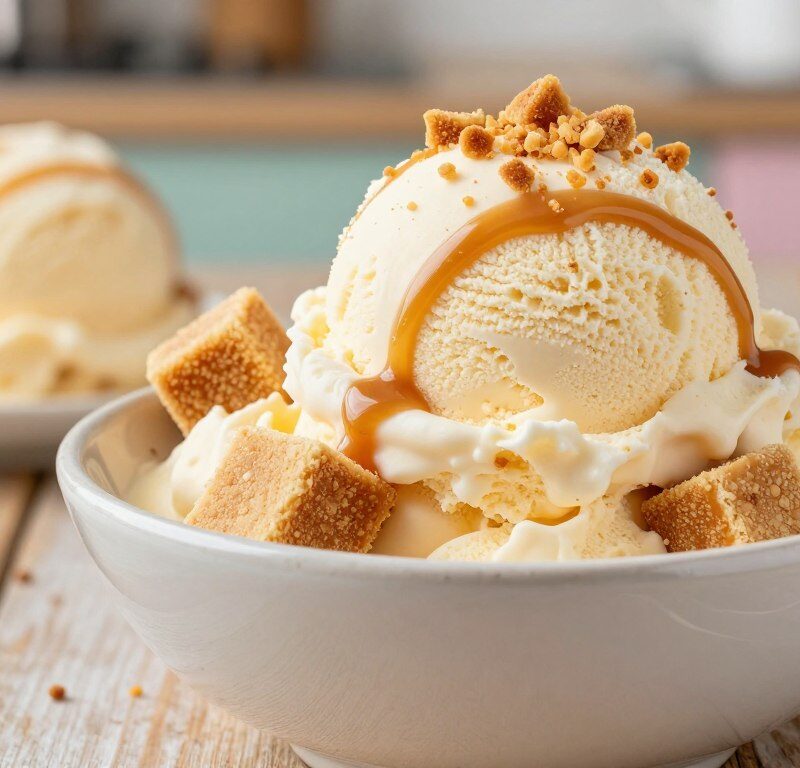
This recipe blends smooth vanilla ice cream with shards of golden, caramelised honeycomb to create a satisfying contrast of textures. The process is straightforward and ideal for home cooks. You will not need advanced pastry skills or fancy equipment.
The result is a refined yet comforting dessert that suits summer gatherings and cosy dinners alike. Each spoonful pairs velvety richness with a light, bitter edge from the toffee shards, making it feel both indulgent and balanced.
With minimal active preparation and dependable techniques, this recipe delivers professional results at home and ensures your homemade treat becomes the highlight of the evening.
Key Takeaways
- Yields six servings and takes about 35 minutes of prep before freezing.
- Combines creamy vanilla ice cream with crunchy caramelised toffee pieces.
- Accessible techniques make it suitable for home cooks.
- Balances rich, buttery flavours with a hint of bitter caramel.
- Ideal for both summer parties and relaxed family meals.
Why You Will Love Mary Berry Cinder Toffee Ice Cream
This dessert pairs a lush frozen base with crunchy caramel shards to give every spoonful a bright snap.
The texture contrast is the main draw. The creamy ice cream melts while the toffee shards break with a clean, warm crack.
The method is straightforward. You do not need specialist pastry skills to create a professional result at home.
Many home cooks comment that this recipe is ideal for make-ahead entertaining. Prepare it in advance and save time on the day.
The flavour is rich and buttery, with a deep caramel note that feels both nostalgic and elegant for modern dinner parties.
“A reliable crowd-pleaser that tastes far superior to shop-bought alternatives.”
- Flexible base so you can add chocolate, nuts or seasonal spices.
- Familiar ingredients make it widely appealing to guests.
Essential Ingredients for Your Homemade Dessert
Start with quality dairy and precise measures to build a stable, velvety dessert. Gather your ingredients before you begin; timing is critical once the sugar starts to melt.
Double Cream and Milk
Use 600 ml of double cream and 250 ml of full‑fat milk. These two items form the base that gives the finished dish a rich mouthfeel and smooth body.
Sweeteners and Flavourings
For the honeycomb, measure 200 g of granulated sugar and 3 tbsp of golden syrup. Add 1.5 tsp of bicarbonate of soda when the sugar reaches the right colour to achieve the airy structure.
- 2 tsp of vanilla extract to lift the flavour.
- 100g of ready honeycomb to fold through at the end.
- When whisking custard, beat caster sugar and egg yolks in a large mixing bowl until pale.
Tip: Use high‑quality caster sugar so the granules melt quickly and you avoid graininess. Always measure everything — a digital scale and measuring spoons (tsp, tbsp) make this straightforward.
| Ingredient | Amount | Purpose |
|---|---|---|
| Double cream | 600 ml | Rich base and smooth texture |
| Full‑fat milk | 250 ml | Balances density for scoopability |
| Granulated sugar | 200 g | Sweetens and caramelises for honeycomb |
| Golden syrup | 3 tbsp | Promotes even toffee colour and shine |
| Vanilla extract | 2 tsp | Aromatic, classic flavour lift |
For a quick primer on complementary desserts, see a simple lemon posset recipe for contrast: lemon posset.
Necessary Kitchen Equipment
Good equipment makes a tricky sugar stage much more manageable for home cooks.
Use a heavy-based saucepan for even heat distribution. This prevents hotspots and reduces the risk of the sugar burning during caramelisation.
Choose a wooden spoon or a heatproof spatula to stir gently. A wooden spoon stays cool to the touch and gives you precise control while the sugar cooks.
Prepare a baking tray lined with parchment so the hot toffee can spread and set quickly into crisp shards.
- A large mixing bowl is needed to fold the cooled pieces into the base; many home cooks comment that a chilled bowl helps speed this step.
- You will need an ice cream maker or a suitable freezer-safe container to set the mixture until firm and scoopable.
- Check your freezer temperature before you begin; a steady setting prevents large ice crystals and keeps texture smooth.
- Keep a reliable container for the freezer to protect the dessert from other flavours as it hardens overnight.
- Always ensure all equipment is clean and dry; any moisture can ruin the toffee’s crisp structure.
| Tool | Why it matters | Tip |
|---|---|---|
| Heavy-based saucepan | Even heating for caramel | Use a medium size to control temperature |
| Wooden spoon | Precision stirring, stays cool | Stir gently to avoid sugar crystallising |
| Freezer-safe container | Stores and protects the dessert | Choose an airtight, flat container |
| Chilled mixing bowl | Easier folding and cooler base | Place in fridge 30 minutes before use |
Mastering the Perfect Cinder Toffee
A deep, even golden hue tells you the sugar has reached the perfect stage for aeration. This is the visual cue that separates crisp honeycomb from a bitter burn. Work steadily and keep tools at the ready; the key stages move quickly.
Achieving the Golden Colour
Heat the sugar and golden syrup gently in a heavy-based saucepan until the mixture turns a deep, rich golden. This usually takes about 10 minutes of steady heat, with occasional gentle stirring to keep the cook even.
Adding the Bicarbonate of Soda
Once the sugar has melted and reached the right shade, remove the pan from the heat. Stir in 1.5 tsp of bicarbonate of soda quickly with a wooden spoon. The mixture will froth up massively, so use a large enough saucepan to contain the rise.
Cooling and Setting
Pour the hot mass straight onto a lined tray and do not spread it; spreading will collapse the delicate bubbles. Allow it to cool at room temperature for at least 30 minutes, or pop it in the fridge for 15 minutes to speed the setting time.
- Keep watch on colour: a few seconds can change the flavour from sweet to bitter.
- Use the right size pan: give the foam room to expand safely.
- Break when cold: once crisp, break into shards to fold through your ice for the best crunch.
Preparing the Creamy Ice Cream Base
Begin by combining your dairy and flavourings so the base is silky and uniform before it chills.
In a large bowl, whisk 600 ml of double cream with the milk and 2 tsp vanilla until the mixture is smooth. This gives a consistent starting point for freezing.
Chill the mixture thoroughly; a cold base freezes evenly and avoids grainy texture. Many home cooks comment that using a high-quality double cream lifts richness and mouthfeel.
- If you have an ice cream maker, pour the chilled mixture into the machine and churn per the manufacturer’s instructions.
- Without a machine, whip the cream to soft peaks, fold in cooled milk mixture, then partially freeze before adding honeycomb.
- Add the honeycomb only when the base is partly frozen so the pieces stay distinct and crunchy.
Proper preparation of the base is the secret to a professional-grade dessert that remains smooth after storage.
Combining the Components for the Best Texture
A careful last-minute mix keeps the shards crunchy and the frozen base silky. Work quickly once the churned base is ready so the honeycomb stays brittle and the texture contrast remains clear.

Folding in the Honeycomb
Use a large, flexible silicone spatula to gently fold crushed toffee through the churned ice cream base. Fold with sweeping motions to avoid knocking air from the mix.
Distribute the honeycomb evenly in the tub so each scoop balances smooth cream and crisp shards. Then transfer the mix into a freezer-safe container and smooth the surface to reduce ice crystal formation.
- Place the container at the back of the freezer where the temperature is most stable.
- Fold the honeycomb in at the last moment; moisture will soften it if added too early.
- If you have no machine, stir the mix every 30–40 minutes during the initial freeze to keep a fine texture.
The result is a satisfying contrast between cold, velvety ice and brittle toffee that snaps cleanly. This simple care at the finish preserves the signature crunch and makes every serving memorable.
Expert Tips for Success
Precision at the final stage protects texture and lifts the overall flavour of the dessert.
If the sugar turns dark brown, the result will taste bitter. Watch the colour closely and remove the pan from the heat as soon as it goes golden.
- Control heat: many home cooks comment that a thermometer helps reach the right temperature without risking a bitter outcome.
- Add shards last: always fold the toffee in at the final stage so the pieces stay crisp and distinct.
- Use fresh ingredients: quality double cream and vanilla directly improve the flavour of the frozen dessert.
- Scoopability tip: if the mixture is too hard, let the tub sit at room temperature for 5–10 minutes before serving.
- Storage: keep the finished dessert in an airtight container to stop moisture from softening the toffee.
- Work quickly: the toffee sets almost immediately—pour it onto the tray fast to avoid hardening in the saucepan.
- Shard size: crush into bite-sized pieces so every scoop balances smooth cream with crunchy shards.
These small steps will help you perfect the recipe and protect the crunchy contrast that makes this treat memorable.
Creative Variations to Customise Your Treat
A few simple swaps turn the recipe into a personalised showstopper. Small additions change texture, aroma and the overall eating experience.
Start with balance: keep the base stable and add extras at the final fold so shards remain crisp.
Adding Chocolate or Nuts
For a decadent twist, swirl in melted dark chocolate or fold 100g of chocolate chips through the partly frozen mix.
To add crunch, fold in toasted almonds or hazelnuts. These pair well with the honeycomb and bring a nutty depth.
Spiced Variations
Add warmth with a pinch of cinnamon or ground ginger in the milk before you chill. For a bold coffee note, dissolve 1 tbsp of instant coffee into warm milk first.
You can replace some caster sugar with light brown sugar for a richer caramel flavour. Or add a pinch of sea salt to the syrup and sugar when making the shards for a popular salted caramel twist.
“Small, considered swaps make this dessert feel new every time.”
| Variation | What to add | When to add |
|---|---|---|
| Chocolate boost | 100g chocolate chips or melted dark chocolate | Fold in at final churn stage |
| Nutty crunch | Toasted almonds or hazelnuts | Fold in with shards to keep texture |
| Spiced base | Cinnamon, ginger or 1 tbsp instant coffee | Add to warm milk before mixing |
| Salted caramel | Pinch sea salt in syrup and sugar | Add during caramel stage |
Serving Suggestions for a Perfect Finish
Choose accompaniments that add brightness, texture and a contrasting temperature to lift each spoonful.
Fresh berries work brilliantly. Their acidity cuts through the rich cream and highlights the caramel shards.
A warm drizzle of chocolate sauce or a light syrup brings depth without overwhelming the delicate flavour. Offer the sauce warm so guests enjoy a pleasant contrast of heat and cold.
Classic shortbread fingers add a buttery snap. Soft poached pears offer a gentle fruit note that pairs well with the crunchy shards.

- For a dinner-party flourish, pour a shot of strong espresso over a scoop for an affogato-style treat.
- Take the dessert out of the freezer 5–10 minutes before serving to reach ideal scoopability and avoid a rock-hard texture.
- Serve in chilled bowls to slow melting and keep the presentation neat for longer.
Presentation matters: selecting the right sides and serving at the right time turns this homemade dessert into a restaurant-quality finish your guests will remember.
Storage and Preservation Advice
Good storage is as important as the recipe itself for keeping that crisp, buttery shard in every scoop. Store your finished dessert promptly to protect texture and flavour.
Maintaining the Crunch
Place the tub in an airtight container at the back of the freezer to keep a steady temperature and stop flavour transfer. Press a sheet of parchment directly onto the surface to block moisture and limit ice crystals.
Always check the lid is sealed tightly before you return the tub to cold storage. Avoid the door where temperatures fluctuate and can cause thawing and refreezing.
- To keep the honeycomb crisp: store in an airtight container so it does not absorb moisture or freezer odours.
- Press parchment onto the surface to prevent ice formation and preserve the shard’s snap.
- Place the container in the back of the freezer for up to two weeks at best quality.
- If you have leftover toffee, keep it separate at room temperature in an airtight box away from humidity.
- Follow these tips and your ice tub will remain fresh, crunchy and ready to serve.
Conclusion
Simple storecupboard ingredients can produce a dessert that tastes far more special than its parts suggest. This ice cream recipe proves that careful timing and a few staples turn into something memorable for guests.
The balance of smooth cream and crisp, caramel shards is what makes each spoonful rewarding. Watch your sugar and syrup closely during the caramel stage to keep the flavour clean and bright.
At roughly 320 kcal per serving, this recipe stays accessible for home cooks of all skill levels. Once you master the toffee technique, it becomes a reliable favourite for weekend projects and small dinner parties.
Thank you for following the guide — we look forward to your comment below and to hearing how your homemade treat turned out.
FAQ
What ingredients do I need to make this classic honeycomb ice cream at home?
Can I make the honeycomb (toffee) ahead of time?
How do I achieve the perfect golden colour without burning the syrup?
What’s the best way to fold honeycomb into the creamy base to keep it crunchy?
Do I need an ice-cream machine to make this recipe?
How long should the ice cream freeze before serving?
How can I maintain the honeycomb’s crunch in the freezer?
Can I substitute the syrup or sugar with alternatives for dietary needs?
What flavour variations work well with this recipe?
How should I store leftovers and how long will they keep?
Mary Berry Cinder Toffee Ice Cream
A classic British frozen delight that blends smooth vanilla ice cream with shards of golden, caramelised honeycomb, creating a satisfying contrast of textures.
Ingredients
- 600 ml double cream
- 250 ml full-fat milk
- 200 g granulated sugar
- 3 tbsp golden syrup
- 1.5 tsp bicarbonate of soda
- 2 tsp vanilla extract
- 100 g ready honeycomb
Method
- In a large bowl, whisk together the double cream, full-fat milk, and vanilla extract until smooth.
- In a heavy-based saucepan, gently heat the granulated sugar and golden syrup until it turns a deep golden color, about 10 minutes.
- Remove the pan from heat and quickly stir in the bicarbonate of soda, allowing the mixture to froth up.
- Pour the hot toffee onto a lined baking tray and let it cool at room temperature for at least 30 minutes.
- Once cooled, break the honeycomb into shards.
- Chill the cream mixture thoroughly before pouring it into an ice cream maker and churning according to the manufacturer's instructions.
- If you do not have an ice cream maker, whip the cream to soft peaks, fold in the chilled milk mixture, and partially freeze it before adding the honeycomb.
- Fold the honeycomb shards into the churned ice cream base just before transferring it to a freezer-safe container.
- Smooth the surface of the ice cream and freeze until firm, ideally overnight.
- Serve the ice cream in chilled bowls, optionally with fresh berries or a drizzle of chocolate sauce.