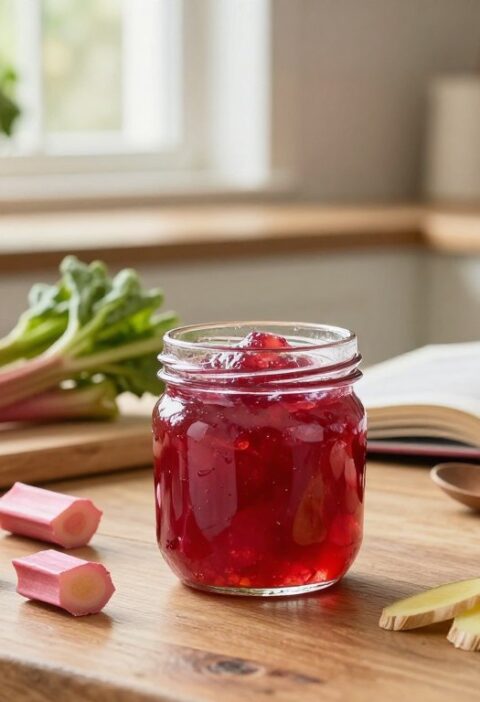
This classic preserve is a quick, rewarding way to enjoy seasonal produce at home. The method takes around 25–30 minutes of hands-on time, with a short list of ingredients and simple steps that feel approachable to any home cook.
The jars need at least 24 hours of resting for the full tangy and crisp flavours to develop. In that time the vinegar and spices work on the veg to create a bright, refreshing bite that lifts many meals.
The process is straightforward and helps reduce kitchen waste. With minimal effort you can make a professional-quality batch that rivals shop-bought options and keeps well for sharing or enjoying across the week.
Key Takeaways
- Preparation takes roughly 25–30 minutes of active time.
- Allow at least 24 hours of resting for best flavour.
- Simple steps make this an accessible home preserving project.
- Results are tangy, crisp and great with many dishes.
- A small time investment yields professional-quality jars.
The Appeal of Mary Berry Pickled Vegetables Recipe
Homemade jars bring a bright, crisp lift to lunches and supper plates. These mary berry preserves are known for a tangy yet gently sweet balance that suits many dishes.
Ideal with cheese, salad or sandwiches, the pickles cut through rich flavours and refresh the palate. The recipes keep the veg firm, so the prized texture stays crunchy rather than softening over time.
Home cooks value this preserve for more than taste. It helps use surplus vegetables from the garden and reduces waste.
- Brightens simple meals
- Pairs well with cheese boards
- Keeps a dependable crunch
| Use | Benefit | Best Match |
|---|---|---|
| Sandwich topping | Adds acidity and crunch | Hearty cold cuts |
| Salad garnish | Boosts freshness | Leafy greens |
| Cheese board | Balances rich textures | Strong cheddar or stilton |
“A simple jar can lift an everyday meal into something special.”
Understanding the Science of Pickling
Pickling relies on chemistry as much as cooking, and knowing the basics makes every batch safer and tastier.
The Role of Vinegar and Salt
Vinegar acts as the primary preservative in the pickling liquid. Its acidity stops harmful bacteria from thriving and gives pickles their sharp, tangy taste.
Salt draws excess moisture from the produce. This osmotic action firms the texture and helps retain a satisfying crunch during storage.
The combination of vinegar and salt creates a balanced base that lets spices and mustard seeds infuse deep flavours. Small adjustments to concentration change both safety and mouthfeel.
Control acidity and salt precisely to keep jars safe and the texture crisp.
“Acidity is the guard; salt is the sculptor—together they make preservation reliable and delicious.”
| Component | Primary Effect | Simple Tip |
|---|---|---|
| Vinegar | Preserves and adds acidity | Use vinegar at food-grade strength for safety |
| Salt | Draws moisture; keeps crunch | Measure by weight, not guesswork |
| Spices & mustard | Add depth and subtle heat | Toast seeds briefly to boost aroma |
Essential Ingredients for Your Pantry
A well-stocked pantry makes successful preserving far easier and more reliable. Keep measured staples ready so you can work cleanly and quickly.
Selecting Fresh Produce
Using fresh produce is critical. Choose crisp, firm carrots (200g) and cucumbers (200g). Slice them evenly so flavour and brine absorb at the same rate.
High-quality veg give the best crunch and taste. Aim for similar thickness when cutting. This ensures consistent texture across every jar.
Choosing Your Spices
For the pickling liquid use 250ml white vinegar and 150ml water. Add 2 tbsp granulated sugar to balance the acid and 1 tsp salt for seasoning.
- 1 tsp mustard seeds
- ½ tsp black peppercorns
- 1 bay leaf
Pro tip: Toast mustard seeds briefly to release aroma. Mary Berry recommends selecting top-quality ingredients to keep jars safe and delicious.
Necessary Kitchen Equipment
Good kit makes preserving simpler and more enjoyable in any kitchen.
A large saucepan is essential to heat the pickling liquid evenly and to help sugar dissolve fully. A sturdy pan cuts down on burning and makes reheating safe.
Use a sharp knife and a mixing bowl to prepare and combine the sliced produce. Uniform pieces ensure even brine absorption and consistent texture in every jar.
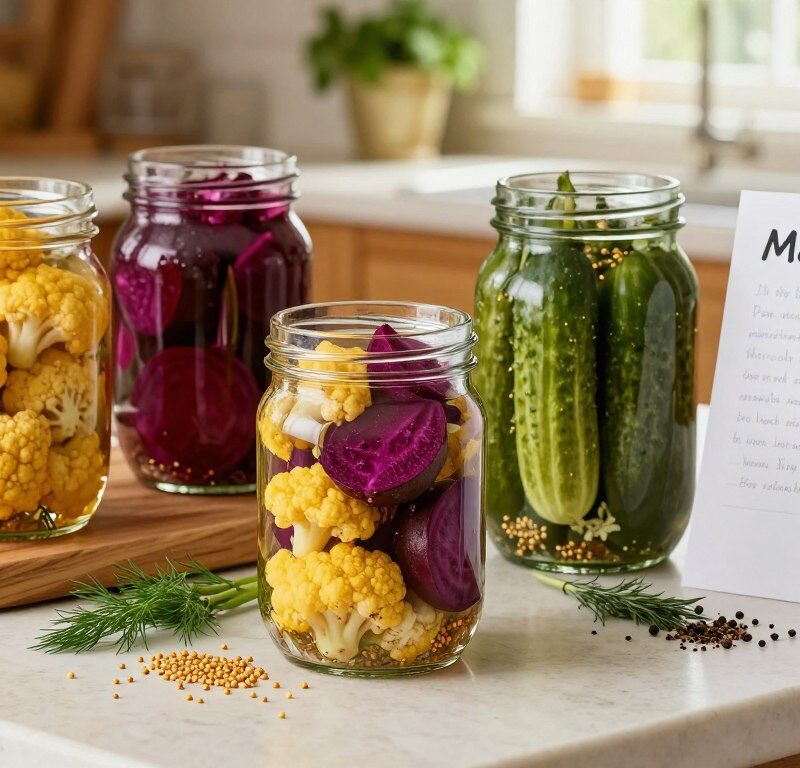
Sterilised glass jars are vital for safe storage. Clean, airtight jars stop contamination and keep flavours fresh for weeks.
Mary Berry suggests a ladle for careful transfer of hot liquid into each jar. Measuring cups or a kitchen scale keep the vinegar-to-sugar ratio accurate every time.
- Large saucepan for even heating
- Mixing bowl and sharp knife for prep
- Sterilised jars and airtight storage
- Ladle and measuring tools for precision
| Item | Purpose | Tip |
|---|---|---|
| Saucepan | Heat brine evenly | Choose a heavy-based pan |
| Bowl & knife | Prep and slice produce | Keep pieces uniform |
| Jars | Safe storage | Sterilise before use; seal tightly |
Preparing Fresh Vegetables for the Jar
Take ten minutes to prep: clean, trim and slice so every jar tastes consistent.
Wash carrots, cucumbers and onions thoroughly. Remove any blemishes and dry them before cutting.
Slice the produce thinly so the pickling liquid can penetrate quickly during the resting time. Aim for uniform pieces to ensure even flavour absorption and a steady crunch in every bite.

Spend a little extra time on consistent sizing. Even slices not only look better but also pickle at the same rate, so texture stays crisp.
Pack the vegetables tightly into sterilised jars. Tight packing reduces air pockets and helps keep everything submerged under the brine.
Proper preparation is the foundation of a great preserve. Clean, even slices and careful packing set you up for successful pickling and excellent texture.
Creating the Perfect Pickling Liquid
Make the pickling liquid in a large saucepan so flavours infuse evenly and safely.
In the pan combine 250ml white vinegar, 150ml water, the sugar, salt, mustard seeds, peppercorns and a bay leaf.
Heat gently until the sugar has completely dissolved and the ingredients feel well-integrated.
Mary Berry advises bringing the mix to a gentle boil to wake the spices and draw out aroma. Keep an eye on the heat so you do not boil too long and upset the acid–sweet balance.
The liquid must be hot when poured over the veg. Hot brine softens edges slightly while keeping the core crisp.
This liquid is the heart of the jars: it provides acidity, seasoning and the classic pickling character. Use it immediately to fill sterilised jars so the vegetables are fully covered.
“Achieving the perfect pickling liquid is a small skill that grows with practice.”
The Importance of Sterilising Your Jars
Sterilising jars is a non-negotiable safety step before filling them with brine and produce.
Wash glass thoroughly in hot, soapy water, then rinse well. Place the clean containers upside down on a tray and heat them in a low oven until fully dry.
Check lids carefully. Make sure seals are spotless and free of rust so they form a tight, secure closure after filling.
Never skip sterilisation: even a small contaminant can spoil a whole batch. Handle sterilised jars with care and avoid touching the inside surfaces.
- Wash in hot, soapy water and rinse well
- Dry in an oven to remove all moisture
- Inspect lids for rust or damage before use
“Clean, heat-treated jars are the foundation of safe, long-lasting preserves.”
Proper jar maintenance shows experience and gives peace of mind. As Mary Berry advises, clean, sterilised containers help keep preserves fresh for weeks and reduce the risk of spoilage.
Combining Vegetables and Brine
Start by packing the cut veg into clean jars, leaving a little room at the top for the liquid.
Press the slices in gently so they fit snugly without being crushed. This helps the pickling liquid flow between pieces and reach every surface.
Carefully pour the hot pickling liquid over the contents until the vegetables are fully submerged. Full coverage prevents exposure to air, which can cause spoilage or discolouration.
Leave a small headspace before sealing; this allows for expansion and helps create a vacuum as the contents cool. Tap each jar on the counter to release trapped air bubbles.
Seal the jars while the liquid is still hot. Cooling produces a vacuum seal that improves shelf life and keeps the preserve bright and tangy.
Wipe the outside of each jar clean of any spills before storing. Removed residue can attract pests or bacteria, so a quick wipe keeps your pantry tidy and safe.
| Step | Action | Why it matters |
|---|---|---|
| Packing | Place slices tightly in jars | Ensures even brine circulation |
| Pouring | Cover with hot liquid | Prevents air exposure and spoilage |
| Sealing | Leave headspace; seal while hot | Creates vacuum; improves shelf life |
“This combination of fresh vegetables and hot brine transforms simple produce into a long-lasting pantry staple.”
The Role of Resting Time in Flavour Development
A patient pause after filling lets the ingredients marry into a deeper, balanced taste. Allow the jars to cool, then refrigerate for at least 24 hours so the flavours can develop fully.
During this resting time the sliced vegetables absorb vinegar and spices. The result is a richer, more layered profile than you get straight from the pan.
Skipping this period often gives a flat finish. Mary Berry notes that insufficient resting usually means the jars lack depth and harmony.
As the acidity mellows, the sharp edge of the brine softens. Over the first day you will notice brighter colour, firmer texture and stronger aroma.
Plan ahead: give yourself the necessary time so pickles are at their best before serving guests.
| Stage | Action | Effect |
|---|---|---|
| Cooling | Let jars reach room temperature | Prevents condensation and spoilage |
| Refrigeration | Chill for 24 hours or more | Flavours meld; acidity softens |
| Extended rest | Wait 3–7 days for deeper taste | Vegetables become more vibrant and crisp |
“Patience is a virtue when it comes to home preserving.”
Troubleshooting Common Pickling Issues
A few common faults — soft slices, overly sharp brine or uneven flavour — are easy to diagnose and correct.
Below are quick checks to help you save a batch and learn for next time.
Preventing Soft Texture
Choose firm produce: overripe or bruised veg lose structure and become vegetables soft during pickling.
Slice items evenly so the brine reaches every piece at the same rate. Uneven cuts cause inconsistent texture.
Pour the hot liquid at the right temperature. Too-cool brine can fail to set the cell walls; too-hot for very soft produce can speed breakdown.

Achieving Balanced Acidity
If the jar tastes too sharp, tweak the vinegar to water ratio next time or add a touch more sugar to mellow the edge.
Adjust spices to suit your palate. A little extra mustard or toasted seeds can round the profile without changing preservation.
Always allow proper resting time: at least 24 hours in the fridge so flavours settle and the acidity becomes balanced.
“Small adjustments to temperature, cut size and the brine mix often fix most issues.”
| Problem | Likely Cause | Quick Fix |
|---|---|---|
| Soft texture | Overripe produce or uneven slices | Use firmer veg; slice uniformly |
| Too sharp | High vinegar ratio | Add small extra sugar; reduce vinegar next time |
| Uneven flavour | Spice distribution or short time | Adjust mustard/seeds; allow full resting time |
Creative Variations and Spice Infusions
Experimenting with chillies, herbs and seeds rewards you with new flavour profiles. Try sliced chillies for heat or whole garlic cloves for extra depth.
Mix in extra vegetables such as beans, cabbage or bell peppers to boost nutrition and texture. Mary Berry often encourages home cooks to adapt the core ingredients to what they have in the pantry.
For a sweeter twist, increase the sugar slightly or swap in honey for a milder result. A single tbsp of a different spice can change a batch completely.
Swap mustard seeds for coriander seeds if you want a citrusy, floral note. Fresh dill or thyme also works well and adds bright aroma to the brine.
Try small batches and note each change. These simple experiments make recipes uniquely yours and keep preserving fun and creative.
“A small tweak can turn a familiar jar into something unexpectedly delicious.”
Serving Suggestions for Your Homemade Pickles
A jar of home pickles can transform a sandwich or cheese board with a single spoonful.
Serve with cheese: place slices alongside a sharp cheddar to cut through the richness. The tangy bite brightens each mouthful and pairs well with mature dairy.
Use in sandwiches for crunch and lift. Add a few slices to lunchtime fillings to turn a simple sandwich into something special, as mary berry often recommends.
They work brilliantly on burgers and wraps too, adding a sharp bite that complements grilled meats. Chop the pickles finely and stir them into a fresh salad for a burst of acidity and texture.
- Let jars sit at room temperature for 10–15 minutes before serving if you prefer fuller aroma.
- Use as a side for cold meats, pies and traditional picnic fare.
- Experiment with different pairings to find favourites for your gatherings.
“Small jars of pickles can lift everyday plates into memorable meals.”
Exploring the Traditional Piccalilli Method
The art of piccalilli centres on a thick, mustard-rich sauce that coats crisp pieces of cauliflower and beans.
Start by simmering 600ml of white wine vinegar with 150g caster sugar in a saucepan until the sugar dissolves. Keep this hot while you prepare the vegetables.
The Mustard Sauce Base
Make the mustard paste by mixing 75g plain flour with 75g mustard powder, 2 tsp turmeric and 1 tsp ground ginger. Blend the dry paste with a little cold water in a bowl so it stays smooth.
Thickening Techniques
Whisk the cold paste into the hot vinegar slowly. Stir over a gentle heat until the sauce thickens to a glossy paste. Add the cooked veg so each piece is well coated.
Maturation Periods
Cook 1 medium cauliflower, 2 large onions and 200g green beans until tender-crisp (10–15 minutes), then remove heat and cool slightly. Pack into sterilised jars, seal tightly and store in a cool, dark place.
“Allow at least two weeks for the flavours to deepen; patience rewards bold, traditional flavour.”
| Stage | What to do | Why it matters |
|---|---|---|
| Make sauce | Blend paste with cold water, stir into hot vinegar | Prevents lumps; gives smooth texture |
| Cook veg | 10–15 minutes until tender-crisp | Keeps texture; avoids vegetables softening |
| Mature | At least 2 weeks in cool, dark storage | Flavours deepen; preserve keeps for weeks |
Tips for Long Term Storage and Safety
Keep a simple routine for storage so your preserves stay fresh and safe. Store your jars in a cool, dark place. This helps flavours mature and slows spoilage.
During the jar preparation, apply proper heat treatment to jars and lids. This initial step is your best defence against contamination.
Once opened, always refrigerate the jar and aim to use the contents within 4–6 weeks. Use clean utensils every time you remove a portion to avoid introducing bacteria.
Ensure vegetables stay fully submerged in the pickling liquid. If the liquid level drops, top up with a little vinegar-water mix to protect the contents.
| Action | Why it matters | Simple tip |
|---|---|---|
| Cool, dark store | Keeps flavour and colour | Choose a pantry or cellar |
| Check seals | Prevents air and mould | Inspect lids and liquid level |
| Discard if off | Protects health | Throw away jars with mould or bad smell |
“Good care after sealing lets you enjoy jars with confidence all year.”
Nutritional Benefits of Home Preserving
Making preserves at home puts you in charge of sugar and seasoning, so you eat more mindfully.
Use fresh produce and you keep more vitamins and minerals than in many mass-produced jars. Fresh veg also supply varied fibre, which supports digestion and helps you feel full for longer.
The pickling process can increase the bioavailability of some nutrients. That means your body may absorb certain vitamins and minerals more easily after preserving.
It is simple to cut back on sugar when you make your own. Reduce sugar levels to suit your diet without affecting the core safety of the jar.
These preserves are low in fat and low in calories, so they add bright flavour without heavy calories. Home preserving is also cost-effective and ensures higher-quality ingredients in your pantry.
“Taking charge of what goes into the jar is a small change with big health benefits.”
Conclusion
A final pause and careful store of your jars turns a quick preserve into a pantry staple you will reach for again. Follow the mary berry notes on timing and use thinly sliced veg to get consistent crunch and flavour.
This simple recipe balances tang and sweetness so a single spoonful can lift sandwiches, salads and cheese boards. The method suits beginners and seasoned cooks alike.
Keep jars cool, let flavours develop and use clean utensils to maintain safety. Enjoy the pride of home-made jars and share these pickles with friends and family.
FAQ
How long do jars need to be sterilised before use?
What vinegar strength is best for safe preserving?
Can I use tap water in the pickling liquid?
How thinly should vegetables be sliced?
How long before jars can be eaten?
Why do some pickles turn soft and how can I prevent it?
How much salt and sugar should I use?
Can I add whole spices or a spice blend to the jars?
Is refrigeration required after opening?
Can I follow the method to make a piccalilli-style preserve?
How do I achieve balanced acidity without overpowering flavour?
What equipment is essential for small-batch preserving?
How can I store pickles long term safely?
Are there ways to reduce salt but keep safety?
Mary Berry Pickled Vegetables Recipe
This classic preserve is a quick, rewarding way to enjoy seasonal produce at home. The method takes around 25–30 minutes of hands-on time, with a short list of ingredients and simple steps that feel approachable to any home cook.
Ingredients
- 200g carrots, sliced
- 200g cucumbers, sliced
- 250ml white vinegar
- 150ml water
- 2 tbsp granulated sugar
- 1 tsp salt
- 1 tsp mustard seeds
- ½ tsp black peppercorns
- 1 bay leaf
Method
- Wash and prepare the vegetables by cleaning, trimming, and slicing them thinly.
- Pack the sliced vegetables tightly into sterilised jars.
- In a large saucepan, combine the white vinegar, water, sugar, salt, mustard seeds, black peppercorns, and bay leaf.
- Heat the mixture gently until the sugar has completely dissolved and the ingredients are well integrated.
- Bring the mixture to a gentle boil to wake the spices and draw out aroma.
- Pour the hot pickling liquid over the packed vegetables in the jars until they are fully submerged.
- Leave a small headspace before sealing the jars to allow for expansion.
- Seal the jars while the liquid is still hot to create a vacuum seal.
- Let the jars cool to room temperature, then refrigerate for at least 24 hours before serving.