Classic, light and surprisingly simple — these airy treats are made by whisking egg whites until stiff and slowly adding sugar until glossy peaks form. The recipe uses just two main ingredients, yet yields an elegant dessert that suits afternoon tea or a smart supper.
Home bakers love the crisp shell and soft, marshmallowy centre this method achieves. With a few reliable techniques you can make meringues that melt on the tongue and look professionally made. This introduction outlines what to expect and why these confections are a staple in British kitchens.
Key Takeaways
- Simple ingredients — egg whites and sugar — produce an impressive dessert.
- Correct whisking and slow sugar addition create glossy, stable peaks.
- Achieves a crisp exterior with a soft, marshmallowy centre.
- Perfect for pavlova, with cream, or as a delicate tea-time sweet.
- Easy to master with clear, step-by-step technique for home cooks.
The Timeless Appeal of Mary Berry Meringues
Light as air and endlessly adaptable, this recipe has become a kitchen favourite across Britain. The method is straightforward: whisk egg whites until stiff, then add sugar slowly until glossy peaks form. The result is a crisp shell with a soft centre that feels elegant but is easy to make.
Why they endure:
- Versatility — serve plain or transform into a summer berry pavlova for a real showstopper dessert.
- Year-round appeal — home cooks use this recipe as the base for seasonal fruit and cream creations.
- Easy upgrades — a drizzle of chocolate or a side of fresh strawberries lifts the plate instantly.
- Zesty options — pair crisp meringues with lemon curd or a cloud of whipped cream for contrast.
- Reliable technique — slow baking in a low-temperature oven keeps the fragile structure intact.
These treats feature in many traditional British recipes and suit family gatherings and festive celebrations. They remain a favourite for cooks of all ages.
Essential Ingredients for Success
Selecting the right eggs is the first step to consistent results. Use 4 large egg whites brought to room temperature. Room-warm whites whisk more quickly and reach stable peaks.
Measure carefully: weigh 225g caster sugar. Add it slowly so the sugar dissolves and the meringue turns glossy.
What to have ready
- Ensure the bowl is spotless and free of grease; even a trace stops the whites from whipping.
- Stabilise with ½ tsp cornflour and 1 tsp vinegar for a reliable pavlova base.
- Preheat the oven to 140°C (120°C fan) / 275°F and allow an hour for gentle baking.
- Line a baking tray with parchment paper to prevent sticking.
Consider a little lemon or chocolate for flavour, or top with fresh berries and cream to turn simple ingredients into a show-stopping dessert.
Preparing Your Kitchen and Equipment
Good preparation is the unsung hero of every successful pavlova or crisp meringue dessert. Set aside clear bench space and gather everything before you start. This saves baking time and keeps you focused when the whites need constant attention.
Cleanliness Standards
Make sure the bowl and the whisk are scrupulously clean. Any trace of fat or egg yolk will stop the egg whites from reaching full volume.
Use a large glass or metal bowl; these are easiest to clean and hide no grease. Wipe tools with a paper towel and a little vinegar if you suspect residue.
Choosing Your Mixer
Choose an electric hand mixer for speed, or a stand mixer for hands-free convenience. Both give the consistent power needed to turn whites into stiff, glossy peaks.
Line the tray with parchment paper before piping to prevent sticking during the long, slow oven time. Organise bowls of sugar and stabilisers close at hand so you can add sugar steadily without interruption.

- Tip: Keep a separate bowl for any yolk checks — even one drop ruins the mix.
- Tip: Preheat the oven and have your lined tray ready so you can move quickly once the whites are whipped.
Mastering the Whisking Technique
Begin with room-temperature egg whites in a spotless bowl. Use a steady medium speed and watch for soft, glossy peaks.
Expect this stage to take about five to seven minutes. A reliable mixer makes it easier to reach the right volume for your pavlova base.
Tip: stop as soon as the mixture holds shape but still shines. Over-whisking dries the mix and creates a grainy meringue.
- Beat on medium speed until soft peaks form.
- Monitor the bowl and whisk closely during this time.
- Keep the bowl and tools completely clean to avoid collapse.
When the whites are thick and hold their shape, you’re ready for the next step. This careful approach traps air and gives light, airy meringues that bake evenly on lined paper in a low oven. Finish with cream or fruit for a classic finish.
Incorporating Sugar and Stabilisers
Add sugar slowly so the egg whites stay glossy and the peaks hold. With the mixer running, add caster sugar one tablespoon at a time. This helps the sugar dissolve fully and prevents a grainy meringue.
Once sugar is incorporated, stop the mixer. Fold in 1 tsp cornflour and 1 tsp vinegar (or a little lemon juice) using a spatula. Gently folding keeps air in the mixture and maintains the light texture needed for a pavlova or crisp meringues.
Ensure all ingredients are at room temperature before you begin. This makes sugar integration quicker and steadier, cutting the whisking time to a few minutes and giving glossy, stiff peaks.
You can fold in a little lemon zest or grated chocolate for flavour. Use a lined tray and parchment paper to pipe or spoon the mixture before the long, low oven bake.
| Step | Measure | Purpose |
|---|---|---|
| Add caster sugar | 1 tbsp at a time | Ensures full dissolution and glossy peaks |
| Stabilise | 1 tsp cornflour + 1 tsp vinegar | Gives chewy centre and crisp shell |
| Fold flavours | Small amount chocolate or lemon zest | Customises the recipe without deflating whites |
| Prepare for baking | Tray + parchment paper | Holds shape during long oven time |
Shaping and Baking Your Meringues
Spoon or pipe the mixture onto the lined tray, shaping individual meringues or a pavlova base as you prefer. Add a small dab of mix under the paper to stop it sliding.
Bake at a low temperature for 1 hour so the shell becomes crisp while the centre stays soft and marshmallowy. Use the fan setting carefully for even heat, but avoid strong drafts.
When the hour is done, turn the oven off and leave the meringues inside to cool completely. This slow cooling prevents cracks and helps them lift cleanly from the paper.
“Low and slow gives a pale shell and a stable centre — patience rewards you.”
| Action | Detail | Why it matters |
|---|---|---|
| Shape on tray | Spoon or pipe onto parchment | Controls size and form for baking |
| Bake time | 1 hour at low temperature | Crisp shell, soft centre |
| Cool | Leave in oven after turning off | Prevents cracks and sticking |
| Stabiliser | Cornflour + vinegar (tsp amounts in recipe) | Maintains structure during long baking |
- Build up edges to form a pavlova well to hold cream and fresh fruit on top.
- Monitor the oven fan to keep a steady temperature and pale colour.
- Allow several hours to cool fully if needed; patience gives the best shell.
Troubleshooting Common Baking Issues
Understanding why things go wrong makes it easier to bake consistent shells every time. Below are clear fixes for three frequent problems so you can get reliably light pavlova and crisp meringue on the tray.
Preventing Cracks
Cool slowly. If your meringues crack, turn the oven off and leave them inside with the door slightly open next time. This gradual drop in temperature helps the shell stay intact and prevents sudden shrinkage.
Achieving the Perfect Texture
Grainy mix? Make sure you add sugar slowly with the mixer running so it dissolves fully into the egg whites. Whisk until firm, stiff peaks form — this gives the right volume for a pavlova or individual meringues.
Always use a clean bowl and whisk; a trace of yolk will stop the whites from reaching full lift and ruin the texture.
Managing Humidity
If shells feel sticky, the culprit is often moisture in the air. Bake on a drier day or extend the low baking time slightly to remove excess humidity.
Use the fan setting for even heat, keep your tray on the middle shelf and line the paper securely to avoid damp spots around the base.
- Cracked shells: cool gradually in the oven.
- Grainy texture: add sugar slowly and whisk thoroughly.
- Sticky shells: reduce humidity or bake longer.
- Shape issues: check stiff peaks and a clean bowl before you start.
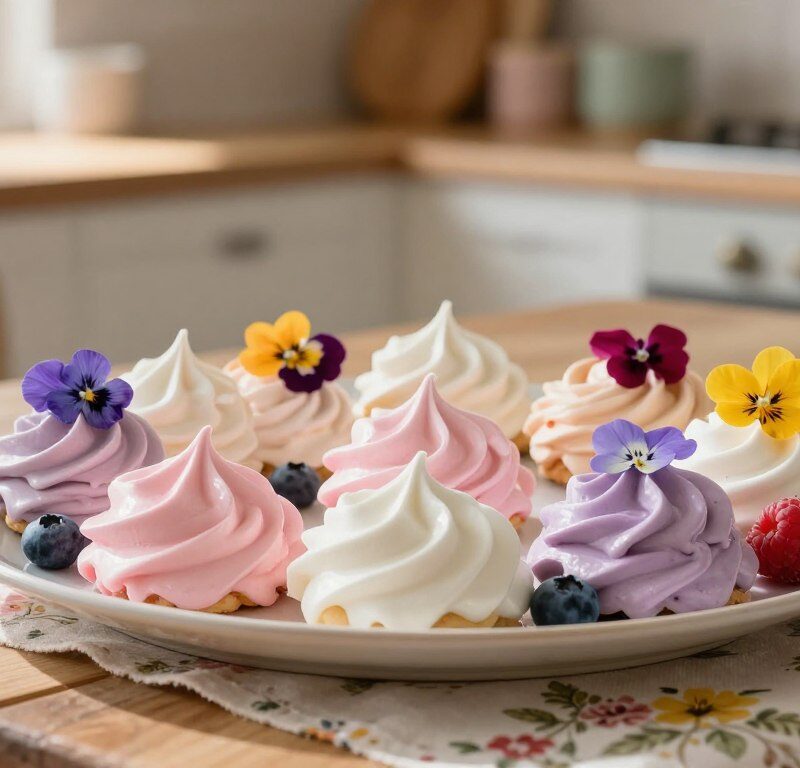
Creative Serving Suggestions and Toppings
Finish each crisp shell with toppings that balance texture and flavour to make a simple dessert feel special.
Serve plain for a light nibble, or add a generous spoonful of whipped cream and a scatter of fresh berries for a classic look.
For a pavlova, spread thick cream over the base and pile seasonal fruit such as strawberries and raspberries on top. The contrast of airy meringue and dense cream is delightful.
- Drizzle melted chocolate for a more decadent option, or offer tangy lemon curd on the side to cut through the sugar.
- Try crumbling shells over ice cream to add crunch to other favourite recipes.
- Experiment with tropical fruit or chopped nuts for a modern twist at BBQs or dinner parties.
“Always add your cream and fruit shortly before serving so the shell stays crisp.”
Tip: keep toppings close at hand and assemble just before you present the plate to guests to preserve the best texture and flavour.
Storage and Refreshing Tips
Good storage habits mean you can bake ahead without losing quality. Store unfilled meringues in an airtight container in a cool, dry place and they will keep well for up to one month. For a pavlova base, keep it separate from any cream or fruit until serving.
If you have added whipped cream and fruit, eat the dessert within a day or two. Moisture from the cream will soften the crisp shell, so avoid long waits after assembly.
Unfilled bases freeze well. Pack them in a sealed box and thaw at room temperature when you need them. This is handy for occasions when you want a quick dessert without extra prep time.

To refresh crispness, warm the meringue in a cool oven set to 120°C (250°F) for about 10 minutes. Leave the oven door closed and allow them to rest for an hour after switching the oven off so they settle evenly.
- Store unfilled shells airtight and dry.
- Freeze unfilled bases for up to one month.
- Refresh at 120°C for 10 minutes before serving.
- Assemble with whipped cream and cream fruit shortly before serving to keep texture fresh.
Conclusion
Mastering this classic recipe gives you a reliable dessert for everyday or special occasions.
Focus on clean whites and the gradual addition of sugar to create a glossy meringue with a crisp shell and soft centre. Slow baking and the careful use of cornflour and vinegar add stability.
These shells are wonderfully versatile. Turn them into a pavlova with whipped cream, pile on fresh fruit and strawberries, or drizzle chocolate and lemon curd for contrast.
Store unfilled shells airtight and refresh gently in a low oven before you top them. We hope this guide boosts your confidence in baking and helps these recipes become a favourite on your dessert table.
FAQ
How do I choose the best eggs for classic meringues?
How long should I whisk egg whites to reach soft peaks?
When and how should I add sugar for a glossy finish?
Can I use cornflour or vinegar to stabilise the meringue?
What oven temperature and baking time give the best results?
How do I prevent my meringues from cracking?
What causes chewy or sticky meringues, and how do I fix it?
Can I pipe different shapes and how should I prepare the tray?
How should I store finished meringues and how long do they keep?
What are simple topping ideas for a pavlova or meringue nest?
Can I make meringue bases ahead of time for later assembly?
Is it possible to rescue over-whisked egg whites?
Mary Berry Meringues
Classic, light and surprisingly simple — these airy treats are made by whisking egg whites until stiff and slowly adding sugar until glossy peaks form. The recipe uses just two main ingredients, yet yields an elegant dessert that suits afternoon tea or a smart supper.
Ingredients
- 4 large egg whites, room temperature
- 225g caster sugar
- 1/2 tsp cornflour
- 1 tsp vinegar
Method
- Preheat the oven to 140°C (120°C fan) / 275°F.
- Ensure the bowl and whisk are clean and free of grease.
- Whisk the egg whites in a large glass or metal bowl until soft peaks form.
- Gradually add the caster sugar, one tablespoon at a time, while continuing to whisk until glossy peaks form.
- Fold in the cornflour and vinegar gently using a spatula.
- Spoon or pipe the mixture onto a lined baking tray, shaping individual meringues or a pavlova base.
- Bake in the preheated oven for 1 hour.
- Turn off the oven and leave the meringues inside to cool completely.