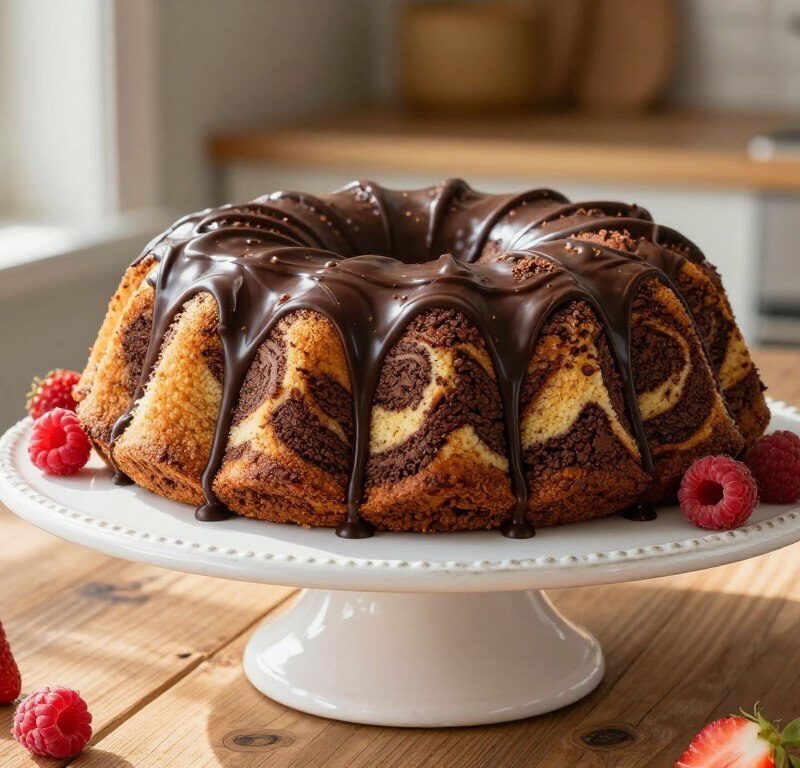
This timeless treat blends a light vanilla sponge with a rich chocolate batter to create a striking swirl on every slice.
The recipe is made for home bakers who value simplicity and reliable results. It reflects a love of straightforward baking and classic technique.
With a gentle swirl of two batters you achieve the beautiful marble pattern. Finish with a dusting of icing sugar or a silky glaze for extra indulgence.
This version aims to help you make Mary Berry style bakes that are moist, buttery and perfectly balanced in sweetness. It suits afternoon tea or a family gathering with ease.
Key Takeaways
- The recipe pairs vanilla and chocolate batters for a show-stopping swirl.
- It prioritises simple, dependable steps for home baking.
- Finish options include a light dusting of icing sugar or a chocolate glaze.
- Even novice bakers can achieve moist, buttery results.
- Ideal for afternoon tea and casual celebrations across the UK.
The Timeless Appeal of Mary Berry Marble Cake
Few bakes summon family memories like a classic swirled sponge shared at the kitchen table.
This recipe often reminds people of afternoons spent with grandparents or parents, teaching the simple joys of baking.
The chocolate vanilla contrast creates a striking look and a comforting flavour that suits many moments.
“A slice can make birthdays, afternoon tea or an after-school treat feel special.”
Its versatility is clear: it works for a large gathering or a quiet cuppa for two. The easy method turns pantry staples into a refined dessert that feels both homey and celebratory.
- Evokes nostalgic family time.
- Blends chocolate vanilla for broad appeal.
- Fits any occasion from birthday to tea.
| Feature | Why it matters | Best use |
|---|---|---|
| Simple method | Reliable results for home bakers | Everyday treat |
| Chocolate vanilla lift | Balanced flavour and look | Afternoon tea or parties |
| Adaptable recipe | Easy to personalise | Family favourites |
Essential Ingredients for Your Sponge
Start with quality staples—good flour and proper butter will shape your final texture. Collect everything in advance and bring chilled dairy and eggs to room temperature. This helps ingredients combine evenly in the mixing bowl.
Dry components
Measure 225g of self-raising flour and 225g of caster sugar. Add ½ tsp of baking powder for extra lift. For the chocolate swirl, stir in 2 tbsp of cocoa powder.
Wet components
Use 225g softened unsalted butter, 4 large eggs and 2 tbsp of milk. Add 1 tsp of vanilla extract to the main batter for aroma.
- Combine all ingredients in a large mixing bowl at room temperature.
- Reserve a portion of batter and mix in the cocoa for the chocolate strand.
- High-quality components mean a moister, truer-tasting marble cake and a faithful mary berry-style result.
| Type | Example | Amount |
|---|---|---|
| Dry | Self-raising flour, caster sugar, cocoa powder | 225g, 225g, 2 tbsp |
| Wet | Butter, eggs, milk, vanilla extract | 225g, 4, 2 tbsp, 1 tsp |
Preparing Your Kitchen and Equipment
A tidy prep area and the right tin make all the difference to the final loaf.
Use a 20cm round or a loaf tin for best results. Grease the tin and line the base with baking paper to prevent sticking.
Have a reliable electric hand whisk or stand mixer ready. This speeds mixing and helps you achieve an even, airy batter for the marble cake.
- Before you start to make mary berry style bakes, ensure your 20cm round or loaf tin is properly greased and lined.
- Gather all ingredients, including softened butter, so you can add them without delays.
- Prepare a clean workspace and the right utensils to help the loaf release easily and keep its shape.
- Good preparation lets you focus on the baking steps and finish with a professional-looking berry marble loaf.
Tip: Check oven shelves and measuring tools before you begin. Little checks now save time and reduce stress during baking.
Mastering the Creaming Method
Start with softened butter and caster sugar, whipping them until they turn pale and airy.

The creaming method is the foundation of a light sponge. Beat butter and sugar in a large bowl until the mix holds air and looks pale.
Achieving a Fluffy Texture
Add the 4 large eggs one at a time. Mix each egg fully before adding the next to keep the batter stable.
Divide the batter into two separate bowls. Stir vanilla extract into one for a classic vanilla strand.
- Mix cocoa powder with a splash of milk into the second bowl for the chocolate swirl.
- Use room temperature ingredients to prevent curdling and to keep the texture smooth.
- Work gently but confidently to retain the air you built during creaming.
| Step | Action | Why it matters |
|---|---|---|
| Cream | Beat butter and caster sugar until pale | Introduces air for a light crumb |
| Eggs | Add eggs one at a time, blend fully | Maintains emulsion and stability |
| Divide | Separate into two bowls for flavours | Creates distinct vanilla and chocolate strands |
| Finish | Fold in dry ingredients gently | Preserves aeration and yields tender cake |
Tip: This careful approach to baking helps you produce a fluffy crumb worthy of a mary berry-style berry marble loaf.
Achieving the Perfect Marble Effect
Getting a sharp marble effect begins at the moment you drop the first dollop of batter into the lined tin.
Spoon alternating dollops vanilla chocolate into your prepared 20cm tin or loaf tin. Aim for even-sized spoonfuls so the pattern spreads uniformly when baked.
Use a skewer or a knife to make gentle swirls. You can swirl the two batters together in a bowl or directly inside the tin for different looks.
Be careful not to overmix the mixture. Overworking will blur the contrast and create one flat tone instead of distinct swirls.
The contrast between the chocolate and vanilla batters gives this marble cake its signature look and flavour. Work with slow, confident motions to keep the lines defined.
Tip: Layer dollops in concentric rings or alternating rows for repeatable patterns. Each loaf or tin yields a unique berry marble result that always looks bakery-quality.
| Action | Why it matters | Result |
|---|---|---|
| Alternate spooning | Even distribution of batters | Balanced slices with clear swirls |
| Gentle swirling | Preserves contrast | Sharp marble effect after baking |
| Avoid overmixing | Prevents colour blending | Distinct chocolate vanilla pattern |
Baking to Golden Perfection
Careful timing and steady oven heat turn a soft batter into a golden loaf with clear swirls.
Preheat the oven to 180°C (160°C fan). Place the tin on the centre shelf so heat distributes evenly. This helps the dollops vanilla chocolate mixture keep its distinct bands and prevents surface cracking.
Testing for Doneness
Bake for 40–45 minutes. Insert a skewer into the centre; it should come out clean or with a few soft crumbs. The sponge will spring back lightly when touched, showing it is cooked through.
“Allowing the loaf to rest briefly in the tin gives the sponge time to set and eases removal.”
- Let the loaf cool in the tin for 10 minutes.
- Turn out onto a wire rack and allow to cool completely.
- Use a loaf tin for neat slices and a round tin for wider wedges.
| Step | Temp / Time | Tip |
|---|---|---|
| Preheat | 180°C / 160°C fan | Centre shelf for even rise |
| Bake | 40–45 minutes | Skewer should come out clean |
| Rest | Cool in tin 10 minutes | Then cool completely on a rack |
Adding a Glossy Chocolate Glaze
A glossy finish turns a simple loaf into a polished centrepiece for any tea table.
For the glaze: gently melt 100g dark chocolate with 2 tbsp double cream and 1 tsp butter. Stir until smooth and glossy.
Important: ensure the loaf has had time to cool completely before you pour the glaze. This prevents the icing from sliding off and keeps the swirls intact.
- Pour the warm glaze over the top and use a palette knife to spread it evenly.
- Let the icing drip slightly down the sides for an attractive finish.
- For contrast, add a thin drizzle of white chocolate once the dark glaze has set.
- Use a pinch of cocoa powder or sifted icing sugar if you want a slightly less intense shine.
| Ingredient | Amount | Effect |
|---|---|---|
| Dark chocolate | 100g | Deep chocolate flavour and glossy surface |
| Double cream | 2 tbsp | Smooths the glaze and adds shine |
| Butter | 1 tsp | Gives a silky finish and richness |
This simple glaze lifts your mary berry-style marble cake into something special. A neat finish, a little cocoa or icing sugar dust, and you have a dessert that looks and tastes like a treat from a high street patisserie.
Troubleshooting Common Baking Issues
A few simple checks will save you from common faults like dryness or blurred swirls. Read these quick fixes before you reach for the tin so you can correct problems while the loaf is still warm.

Preventing Dry Sponge
If your cake turns out dry, test it 5 minutes before the stated baking time. Ovens vary; a skewer should come out with a few moist crumbs, not completely dry.
Also check your measurements. Use the correct amount of self-raising flour and baking powder and add a splash of milk if the batter seems stiff.
Fixing Disappearing Swirls
Swirls vanish when the batter is overmixed. Use gentle folding actions, not vigorous stirring, to preserve the contrast between vanilla and chocolate.
Layer spoonfuls in the bowl or tin and swirl once with a skewer. That keeps the marble pattern sharp after baking in a standard oven or fan setting.
Correcting Uneven Texture
Uneven crumb often comes from cold butter or an under-beaten creamed mixture. Ensure butter is fully softened before creaming with sugar in a large bowl.
Use a 20cm tin for even heat distribution. Check the oven temperature and avoid opening the door frequently during the final 10 minutes.
- Quick tip: mary berry marble style bakes respond well to small adjustments—timing, temperature and gentle handling make all the difference.
Creative Variations to Try
Little twists to the base recipe can transform a plain loaf into something bright and unexpected. These swaps keep the simple method but refresh texture and flavour.
Citrus and mocha: fold orange zest and a teaspoon of orange extract into the vanilla batter for a lively lift. For a grown-up twist, add a pinch of espresso powder to the chocolate portion for a mocha note that lifts the chocolate.
Texture and colour: replace some self-raising flour with wholemeal flour for more fibre. For kids, stir food colouring into the vanilla mixture to create rainbow swirls rather than the usual marble effect.
Finish and extras: swap the dark chocolate glaze for a light dusting of icing sugar or a drizzle of melted white chocolate for contrast. You can also fold in white chocolate chips or chopped nuts for extra bite.
- Use a touch more milk if the batter feels stiff.
- Add 1 tsp vanilla extract or 2 tbsp cocoa powder where needed.
- Adjust caster sugar to taste for sweeter or lighter slices.
Tip: mary berry marble fans often keep the basic technique and vary only flavours. That way the dollops vanilla chocolate retain a clear marble effect while you experiment.
Serving Suggestions for Afternoon Tea
A well-planned spread of sides lifts a loaf from everyday baking to a proper treat. Keep the presentation simple so the swirl and texture stay the star.
Ideal Accompaniments
Cream or ice cream: A dollop of freshly whipped cream or a scoop of vanilla ice cream makes a classic, comforting pairing.
Fruit: Fresh berries or sliced citrus add bright colour and a tart contrast to rich slices.
Warm drinks: A good cup of tea or coffee complements both chocolate and vanilla strands and suits any afternoon occasion.
- For extra indulgence: offer warm chocolate sauce on the side to boost the chocolate note.
- Serve in neat slices from the tin for easy sharing at family gatherings.
- Keep styling minimal so the mary berry marble loaf remains the visual focus.
| Pairing | Why it works | Best for |
|---|---|---|
| Whipped cream / ice cream | Balances richness | Comforting dessert |
| Fresh berries | Adds acidity and colour | Afternoon tea |
| Warm chocolate sauce | Enhances chocolate flavour | Special occasion |
Storing and Freezing Your Cake
How you store your loaf affects texture and flavour long after baking.
To keep your marble cake fresh, place it in an airtight container and keep at room temperature for up to 4 days. Ensure the loaf has cooled fully in the tin for 10 minutes before turning out to avoid condensation.
If you have added a cream-based icing, refrigerate the slice to keep the topping stable and safe to eat. For plain, unfrosted slices, wrap well and freeze for up to 2 months.
To serve, defrost on the countertop at room temperature or warm gently in the oven for a few minutes. This revives texture and brings out the chocolate and butter notes in each slice.
| Storage | Conditions | Best for |
|---|---|---|
| Room temperature | Airtight container, up to 4 days | Everyday serving |
| Refrigeration | After cream-based icing, cover loosely | Short-term safety |
| Freezing | Unfrosted, well wrapped, up to 2 months | Advance prep |
Tip: Label packages with date and key ingredients like flour or cocoa powder if you freeze several bakes. Proper storage helps you enjoy your Mary Berry loaf with the same moist crumb and clear swirls days later.
Nutritional Information
Each serving contains approximately 390 kcal, making it a satisfying afternoon treat.
The recipe supplies about 6 g of protein and 45 g of carbohydrates per slice. These values give a quick energy boost for tea time.
Expect roughly 20 g of fat and 28 g of sugar per portion. The loaf also provides 2 g of fibre, a small but useful contribution to the day.
Practical notes: baking takes about 45 minutes and the loaf tastes best at room temperature.
- Use these figures to portion slices sensibly.
- Adjust serving size if you are watching sugar or fat intake.
| Nutrient | Amount per slice | Why it matters |
|---|---|---|
| Calories | ~390 kcal | Satisfies hunger and provides energy |
| Protein | 6 g | Supports muscle repair |
| Carbohydrates | 45 g | Immediate energy for the afternoon |
| Fat | 20 g | Adds richness and mouthfeel |
| Sugar | 28 g | Sweetness; moderate intake advised |
| Fibre | 2 g | Aids digestion |
| Bake time | 45 minutes | Practical planning for tea |
| Serving note | – | Best served at room temperature |
Conclusion
This classic swirled loaf remains a beloved favourite because it is easy to follow and delivers a reliably moist result. The recipe uses simple pantry staples and straightforward steps so home cooks can succeed every time.
Master the creaming method and gentle folding for the best texture. Keep motions slow when you swirl the batters and trust your oven for an even bake. These small actions reward you with neat slices and a tender crumb.
Use quality ingredients and follow the steps carefully; the result is a strong, reliable loaf.
If this guide inspired you to make mary berry style bakes, enjoy experimenting with glazes or a splash of orange zest. Happy baking and enjoy sharing your homemade treat with family and friends.
FAQ
What size and type of tin is best for a classic loaf with a clear marble effect?
Which flour should I use: self-raising or plain with baking powder?
How do I make a good chocolate swirl without overmixing the batter?
Can I replace butter with margarine or oil?
What are the best egg and sugar practices for a light sponge?
How long should I cool the cake in the tin before turning out?
What oven temperature and timing should I use for a fan oven?
How can I make a glossy chocolate glaze that sets firm but not brittle?
Why did my swirls disappear during baking and how can I stop that?
How do I prevent a dry sponge and keep it moist for days?
Can I freeze slices or a whole loaf and how should I thaw them?
Are there simple flavour variations beyond chocolate and vanilla?
How should I store leftovers to preserve texture and flavour?
What measures help correct an uneven bake or domed top?
Mary Berry Marble Cake
This timeless treat blends a light vanilla sponge with a rich chocolate batter to create a striking swirl on every slice. Ideal for afternoon tea or family gatherings, it reflects a love of straightforward baking and classic technique.
Ingredients
- 225g self-raising flour
- 225g caster sugar
- ½ tsp baking powder
- 2 tbsp cocoa powder
- 225g softened unsalted butter
- 4 large eggs
- 2 tbsp milk
- 1 tsp vanilla extract
- 100g dark chocolate
- 2 tbsp double cream
- 1 tsp butter
Method
- Preheat the oven to 180°C (160°C fan) and grease a 20cm round or loaf tin, lining the base with baking paper.
- In a large mixing bowl, cream together the softened butter and caster sugar until pale and airy.
- Add the eggs one at a time, mixing well after each addition.
- Divide the batter into two bowls. Stir in the vanilla extract into one bowl and mix the cocoa powder with a splash of milk into the other bowl for the chocolate batter.
- Spoon alternating dollops of the vanilla and chocolate batters into the prepared tin.
- Use a skewer or knife to gently swirl the batters together, being careful not to overmix.
- Bake in the preheated oven for 40–45 minutes, or until a skewer inserted into the center comes out clean.
- Allow the cake to cool in the tin for 10 minutes before turning it out onto a wire rack to cool completely.
- For the glaze, melt the dark chocolate with double cream and butter until smooth and glossy. Pour over the cooled cake and let it set.