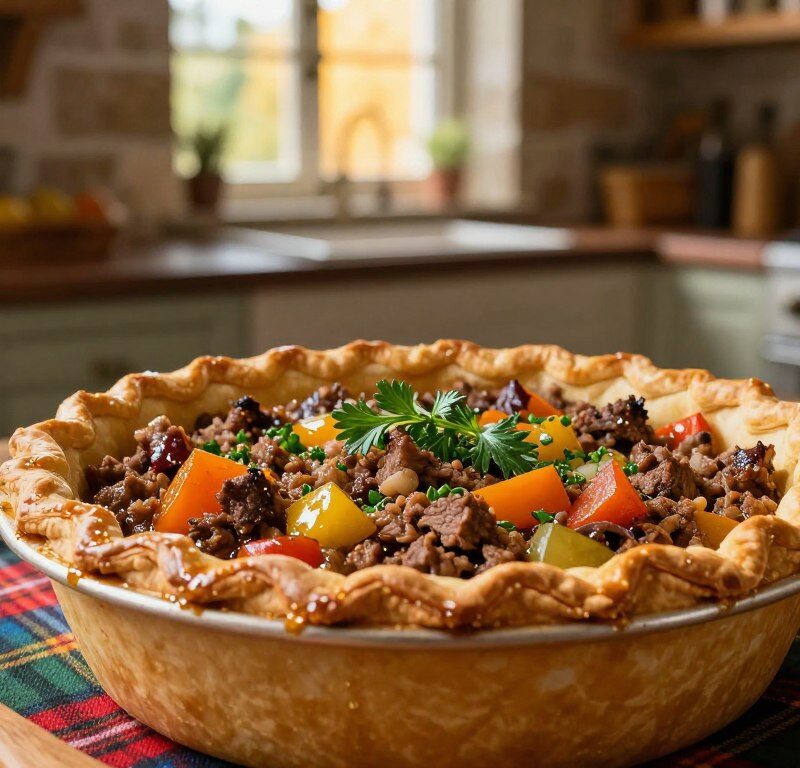
This classic British dish brings comfort and warmth to the winter table. The Mary Berry Highland Pie mixes rich, slow-cooked fillings with a golden, flaky pastry to create a hearty, satisfying meal.
Expect deep, savoury flavours from game meat and a glossy gravy that ties every element together. The recipe teaches simple, professional techniques so you can achieve restaurant-quality results at home.
Whether you cook for a special occasion or a cosy family supper, this highland pie stands out as a crowd-pleasing centrepiece. Follow the steps and you will master the art of slow-cooking and pastry finishing.
Key Takeaways
- Authentic British comfort food with rustic flavours.
- Combines game meat and a rich, savoury gravy.
- Focuses on slow-cooked filling and flaky pastry skills.
- Designed to serve as a hearty centrepiece for gatherings.
- Clear steps help you achieve restaurant-style results at home.
The Appeal of a Classic Mary Berry Highland Pie
The true charm of a mary berry highland lies in how simple ingredients transform into something special. Slow cooking builds deep, complex flavours that feel both rustic and refined.
This dish creates a perfect cozy atmosphere for family dinners and relaxed get-togethers. The mix of tender meat and a rich, savoury sauce comforts everyone at the table.
Home cooks favour this berry highland pie because it uses affordable pantry staples yet delivers an indulgent result. It is a staple of British comfort food and presents beautifully for guests.
“A well-made highland pie brings warmth, flavour and a sense of tradition to any evening.”
| Feature | Why it Matters | Result |
|---|---|---|
| Slow cooking | Develops deep, layered flavours | Tender filling with glossy sauce |
| Simple ingredients | Accessible and budget-friendly | Special, homemade finish |
| Rustic presentation | Feels comforting and authentic | Perfect for family meals |
Essential Ingredients for Your Highland Pie
The right mix of meat, vegetables and pantry staples sets the stage for a memorable rustic bake. Gather everything before you start to make cooking calm and efficient.
Meat and vegetable selection
1.4kg game meat is the heart of this recipe — choose pheasant, partridge or venison and cut into 4cm cubes for even cooking.
Add 3 large onions and a few sticks of celery to build a sweet, aromatic base. Quarter 10 pickled walnuts from a jar and fold them into the mix for tang and texture.
Pantry staples
Keep 60g plain flour ready to thicken the gravy, plus 300ml red wine to deepen flavour. Use 1.2 litres of beef stock or game stock as the liquid base.
Seasoning and fat: 2 tbsp Worcestershire sauce, 1 tbsp tomato puree and 2 tbsp olive oil help to round the savoury notes. Finish with 2 cloves garlic, finely chopped, to lift the filling.
- Quick checklist: 1.4kg meat, onions, celery, pickled walnuts, flour, wine, stock, tomato puree, Worcestershire, olive oil, garlic.
Preparing the Rich Meat Filling
To develop a glossy, rich gravy you must brown the meat well and take your time with the base.
Preheat the oven to 160°C. Heat oil in a large, deep pan and brown the 1.4kg of game meat in batches so each piece gains a deep, caramelised crust.
Remove browned pieces with a slotted spoon and set aside. Let meat rest slightly — this keeps the juices locked in before the long cook.
Return the pan to the heat and add onions and garlic. Cook for a few minutes then stir in the flour to build the backbone of the gravy.
Gradually pour in red wine and beef stock, stirring to keep the mixture smooth and lump-free. Add Worcestershire sauce, tomato puree and pickled walnuts to layer flavour.
Return the meat to the pan, cover and transfer the dish to the oven for 2 hours. Slow, steady heat will render connective tissue and yield a tender filling with a rich gravy.

| Step | Why | Result |
|---|---|---|
| Brown meat in batches | Develops caramelisation | Deep flavour and sealed juices |
| Build aromatic base | Onions, garlic and flour thicken | Stable, glossy gravy |
| Slow oven cook | Gentle breakdown of fibres | Tender, succulent filling |
Mastering the Pastry Crust
The crust is where technique meets reward — flaky, golden and sturdy. This short guide shows how to make a pastry that seals in the rich gravy and lifts the meat filling.
Achieving the Perfect Flaky Texture
Start by mixing 200g self-raising flour with 100g shredded suet and a pinch of salt. Gradually add 150ml water and use a fork to bring the mixture into a soft dough ball.
Important: let the meat mixture cool adding pastry to the dish only once it has cooled. This stops the butter in the crust from melting prematurely and keeps the pastry flaky.
Roll out the pastry to fit a 1.7 litre ovenproof pie dish so it covers the top and seals the rim. Press the pastry firmly against the sides to trap the gravy inside.
Use a sharp knife to trim excess pastry for a neat finish. Brush the top with beaten egg to achieve that rich, golden crust during baking.
- Tip: trim and crimp the edge to ensure a tight seal.
- Timing: allow a few minutes to set after sealing before placing in the oven.
Assembling and Baking the Pie
With the filling rested, it’s time to fill the dish and seal the pastry for the oven.
Increase the oven to 200°C so the pastry browns crisp during the final 35 minutes. Carefully spoon the cooled meat mixture into your pie dish, spreading vegetables and pickled walnuts evenly through the rich gravy.
Brush the rim of the dish with beaten egg before adding the pastry top. This helps create a professional seal when adding pastry.
Use a sharp knife to cut a small hole in the top to let steam escape. Place the finished dish in the preheated oven and bake until the top is golden and the filling bubbles hot.
If you have any leftover pastry, cut shapes to decorate the top then press them gently in place. After baking, let the pie rest for a few minutes to let meat juices settle before serving.
| Action | Reason | Timing |
|---|---|---|
| Fill dish with cooled mixture | Prevents soggy pastry | Immediately before adding pastry |
| Brush rim with egg | Creates tight seal | Before adding pastry top |
| Bake at 200°C | Golden, crisp top and bubbling filling | 35 minutes |
Pro Tips for a Perfect Finish
A tidy finish and a few pro moves ensure the top looks as good as the filling tastes. These final steps stop steam, protect the pastry and keep the dish crisp.

Preventing a Soggy Bottom
Use a pie funnel or a small cup in the centre of the dish to let excess steam escape. This simple trick helps the base stay crisp during baking.
You can prepare the casserole base up to 2 days ahead to deepen flavour. If you assemble the dish ahead, chill it in the fridge for up to 12 hours before it goes in the oven.
Sealing the Edges
Wet the rim with a little water before adding pastry to form a tight seal. Crimp the edge with a fork for a neat finish and to keep the meat and gravy contained.
Creating Steam Vents
Use a sharp knife to cut small vents in the top so steam can escape. Bake at a high temperature for the last few minutes to set the golden crust and avoid a soggy top.
Tip: always let meat mixture cool before adding pastry — cool adding pastry prevents the fat from melting and keeps the crust flaky.
Serving Suggestions for a Hearty Meal
Plate this hearty bake with bright seasonal vegetables to balance the rich, slow-cooked meat and gravy. Serve the mary berry highland as the centrepiece and add roasted carrots or steamed green beans for colour and texture.
For comfort on the side, ladle extra gravy over creamy mashed potatoes or offer crusty bread to mop up the sauce. A small drizzle of wine in the pan juices brightens the flavour if you warm leftovers for a few minutes.
To keep things simple yet elegant, include a fresh side salad to cut through the richness. Peas with mint add a classic, refreshing touch that complements the onions and stock notes in the filling.
- Make sure portions are generous — this dish feeds a hungry group with minimal fuss.
- Let the pie rest a few minutes after baking so the top sets and slices hold their shape.
- Serve piping hot for the perfect cozy finish.
Storing and Reheating Your Leftovers
Store your leftovers smartly to preserve texture and depth of flavour for another meal.
Fridge storage: Place cooled portions in an airtight container and refrigerate. Consume within 2 days to keep the dish safe and tasty.
Freezing for Future Meals
Unbaked options work best: You can freeze the assembled, unbaked pie for up to 1 month if well wrapped to avoid freezer burn.
Make sure the meat mixture is completely cool before you fit the pastry lid. This step helps the top keep its texture when you bake it later.
Reheating tips
Defrost thoroughly in the fridge before baking to ensure even heat through the centre.
To reheat a whole dish, preheat the oven to 180°C and warm for about 20 minutes, or until the centre is piping hot and the pastry is crisp.
For single portions, a microwave for 2–3 minutes will do, though the oven gives a better crust. If the top browns too fast, cover loosely with foil.
- Quick checklist: cool before storing, fridge ≤ 2 days, freeze unbaked ≤ 1 month, defrost fully, oven 180°C ~20 minutes.
Conclusion
Few dishes pair a deep, savoury filling with a crisp, golden crust so satisfyingly. This mary berry highland recipe rewards slow cooking and careful pastry work to give a comforting, show-stopping result.
Use good ingredients and a splash of red wine to lift the gravy. Chill the filling before adding the pastry top to keep the crust flaky and the sauce glossy.
Whether for a family supper or a special gathering, the berry highland bake will impress with its rich, layered flavour. Enjoy your homemade highland pie and savour every bite of this classic British dish.
FAQ
What cut of beef works best for this recipe?
Can I substitute red wine in the filling?
How much tomato puree should I add?
How do I prevent a soggy bottom?
What’s the best way to seal the edges of the pastry?
How should I create steam vents in the pastry top?
Can I add vegetables to the filling?
How long does the filling need to cook for tender meat?
What oven temperature and time give a golden crust?
Can the pie be frozen and how should I reheat it?
Are pickled walnuts a good accompaniment?
What pantry staples should I keep for this recipe?
Mary Berry Highland Pie
This classic British dish brings comfort and warmth to the winter table. The Mary Berry Highland Pie mixes rich, slow-cooked fillings with a golden, flaky pastry to create a hearty, satisfying meal.
Ingredients
- 1.4kg game meat (pheasant, partridge, or venison), cut into 4cm cubes
- 3 large onions, chopped
- a few sticks of celery, chopped
- 10 pickled walnuts, quartered
- 60g plain flour
- 300ml red wine
- 1.2 litres beef stock or game stock
- 2 tbsp Worcestershire sauce
- 1 tbsp tomato puree
- 2 tbsp olive oil
- 2 cloves garlic, finely chopped
- 200g self-raising flour
- 100g shredded suet
- pinch of salt
- 150ml water
- beaten egg for brushing
Method
- Preheat the oven to 160°C.
- Heat olive oil in a large, deep pan and brown the game meat in batches until caramelised.
- Remove the browned meat and set aside to rest.
- In the same pan, add chopped onions and garlic, cooking for a few minutes.
- Stir in the plain flour to thicken the gravy.
- Gradually pour in the red wine and beef stock, stirring until smooth.
- Add Worcestershire sauce, tomato puree, and pickled walnuts to the mixture.
- Return the browned meat to the pan, cover, and transfer to the oven for 2 hours.
- In a bowl, mix self-raising flour, shredded suet, and salt. Gradually add water to form a soft dough.
- Let the meat mixture cool before adding the pastry.
- Roll out the pastry to fit a 1.7 litre ovenproof pie dish, covering the top and sealing the rim.
- Brush the pastry with beaten egg and cut a small hole in the top for steam to escape.
- Increase the oven temperature to 200°C and bake for 35 minutes until the top is golden and the filling is bubbling.
- Let the pie rest for a few minutes before serving.