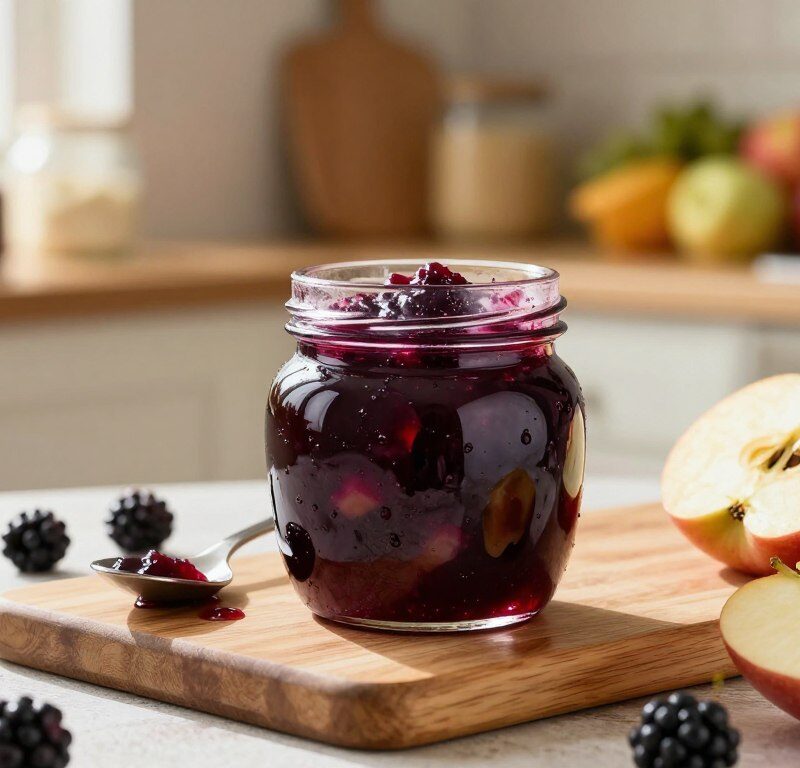
This classic British preserve brings the best of seasonal fruit to your breakfast table. Made using traditional stovetop methods, the recipe is simple and delivers a glossy, professional finish.
Ready in around 35–40 minutes, it is an efficient project that fills the kitchen with bright, fruity aromas. The balance of bold berry notes and gentle apple tartness creates a rich flavour that suits both morning toast and afternoon tea.
Whether you are new to home cooking or confident in the kitchen, the clear instructions help you preserve fruit with consistent results. Enjoy a vibrant, deep purple spread that often outshines many store-bought options.
Key Takeaways
- The preserve is a beloved British classic made with fresh fruit.
- Preparation time is approximately 35–40 minutes from start to finish.
- The stovetop recipe delivers a glossy, professional result.
- Perfect for warm buttered toast or afternoon tea.
- Suitable for beginners and experienced cooks alike.
Why You Will Love This Mary Berry Blackberry And Apple Jam
This preserve pairs the rich sweetness of ripe dark fruit with the crisp tang of cooking apples for a deeply satisfying spread. The contrast gives each spoonful real depth.
Natural pectin in the apples helps the mixture reach a perfect set without complicated additives. That makes this one of the most reliable jam jelly recipes for home cooks.
Making a classic blackberry jam at home also means you control every ingredient. Use ripe fruit and the right sugar level to build a cleaner, fresher flavour than many shop jars offer.
The vibrant colour and balanced sweetness make this preserve a striking entry in your collection of homemade fruit recipes. It suits toast, baking and gift jars alike.
Accessible and rewarding, the method uses simple steps and common pantry items. It’s ideal for anyone exploring traditional British preserve-making.
| Feature | Benefit | Best Use |
|---|---|---|
| Natural pectin | Reliable set without commercial gelling agents | Jam jelly and preserves |
| Balanced sweet-tart flavour | Versatile on toast and in baking | Breakfast, fillings, gifts |
| Fresh ingredients | Superior flavour and colour | Homemade recipes collection |
- Deep fruit notes with apple acidity for balance.
- Simple, beginner-friendly recipe steps.
- Great for seasonal produce and gifts.
The Essential Ingredients For Your Preserve
Begin by gathering ripe, firm fruit and the right cooking apples to guarantee a reliable set.
Fresh Blackberries
500 g of fresh blackberries gives the preserve its deep colour and bold flavour. Choose ripe, firm berries for the best taste and to avoid excess moisture.
Cooking Apples
500 g of cooking apples, such as bramley apples, supply natural pectin. This helps the jam jelly set without added gelling agents.
- 800 g granulated sugar balances acidity and helps reach setting point.
- 100 ml water softens the apples during the initial cook.
- Juice of 1 lemon boosts flavour and supports pectin activity.
“Good preserves start with good fruit — select quality ingredients and the rest falls into place.”
| Ingredient | Amount | Role |
|---|---|---|
| Fresh blackberries | 500 g | Colour and tart-sweet flavour |
| Cooking apples (Bramley) | 500 g | Natural pectin for setting |
| Granulated sugar | 800 g | Sweetness and preservation |
| Lemon juice | 1 lemon | Acidity and pectin activation |
| Water | 100 ml | Helps soften apples |
Selecting The Best Fruit For The Perfect Set
Choosing ripe, firm fruit is the single most important step to secure a reliable set for your preserve.
Pick crisp apples and plump blackberries for the best results. The apples supply natural pectin, which helps the jam set without extra additives.
Handle berries gently. Remove stems and any debris, and discard soft or mouldy pieces to keep flavour clean.
The wrinkle test is easier when you start with top-quality produce. A good fruit selection leads to a firmer jam set and a glossy jam jelly finish.
“Fresh, unblemished apples and firm berries give you consistent texture and fewer failed batches.”
| What to look for | Why it matters | Action |
|---|---|---|
| Firm blackberries | Lower moisture; stronger flavour | Choose plump, intact berries |
| Crisp cooking apples | High natural pectin for setting | Avoid bruised or soft fruit |
| Clean fruit | Better shelf life and taste | Rinse gently and remove stems |
Using the right fruit means you can skip commercial gelling agents. Inspect apples for bruises and pick blemish-free produce for a long-lasting preserve.
Preparing Your Kitchen And Equipment
Set up your workspace before you start so every step in making jam feels calm and organised.
Essential Tools
A large, heavy-bottomed pan gives steady heat and helps the liquid evaporate evenly. This reduces the risk of burning and helps the mixture reach setting point.
A sturdy wooden spoon is vital for stirring. Use it to keep the fruit moving so nothing sticks to the base of the pan.

Prepare several clean jam jars and matching jars lids. Wash them in hot, soapy water first and then sterilise for safe, long-term storage.
- Have a ladle and a small plate ready for testing the set.
- Lay out scales, a citrus juicer and a thermometer within easy reach.
- Proper preparation keeps the cooking steady and makes the whole process run smoothly.
| Tool | Why it matters | Tip |
|---|---|---|
| Heavy-bottomed pan | Even heat distribution | Choose stainless steel or enamel |
| Wooden spoon | Prevents sticking and scratching | Sturdy, long-handled |
| Jam jars & lids | Safe storage and sealing | Wash, then sterilise while warm |
“Proper preparation of your equipment is the first step in making jam successfully.”
Step By Step Guide To Making Mary Berry Blackberry And Apple Jam
Follow a clear, step‑by‑step method to turn ripe fruit into a glossy, well-set preserve. This short guide breaks the process into three simple stages so you can make jam with confidence.
Preparing the Fruit
Start by washing 500 g of blackberries and peeling, coring and chopping 500 g of apples into small, even pieces.
Handle the fruit gently and remove any soft or damaged parts to keep flavour clean.
Cooking the Base
Place the apples with 100 ml of water in a pan and cook until they soften, usually about 5 to 10 minutes.
Once soft, add the blackberries and cook gently until the fruit breaks down into a thick, even base.
Use a potato masher to smooth the blackberries apples mixture before you add sugar.
Adding Sugar
Stir in the sugar and lemon juice, and mix until the crystals dissolve completely.
Bring the mixture to a rolling boil, then boil rapidly for 10–15 minutes to reach the setting point for your blackberry apple jam.
Skim any foam, then ladle into warm jars and seal while hot.
| Stage | Action | Timing |
|---|---|---|
| Prepare fruit | Wash 500 g blackberries; peel & chop 500 g apples | 10 minutes |
| Cook base | Apples + 100 ml water, then add blackberries and mash | 5–10 minutes |
| Add sugar | Dissolve sugar, bring to rolling boil and boil rapidly | 10–15 minutes |
| Jar & seal | Fill warm jars, seal and cool | 15 minutes (cooling begins) |
Understanding The Science Of The Setting Point
Knowing how pectin, acid and heat interact will lift your homemade preserves from good to great.
The setting point relies on three ingredients working together: natural pectin from the apples, the right amount of sugar and the lemon’s acid. When you boil the fruit, pectin molecules link and trap liquid, so the mixture will set.
If you skip the natural pectin from apples, the result often stays thin and syrupy rather than becoming a spreadable jam jelly. Balance is key: too little sugar prevents a proper set; too much risks masking fresh fruit flavour.
- Pectin network: forms during boiling and thickens the mixture.
- Temperature control: monitor the boil to reach the setting point without burning delicate berries.
- Sugar’s role: it helps dehydrate the fruit and preserve the jam set.
Understanding this chemistry separates a professional-grade preserve from a simple fruit sauce. With the right balance you get a glossy, well-set jar every time.
How To Test Your Jam For The Perfect Consistency
A chilled-plate check is the easiest way to confirm a perfect set at home. It is quick, reliable and protects the fruit flavour from overcooking.
The Wrinkle Test
Prepare a small plate by chilling it in the freezer for a few minutes. Take a teaspoon of the hot mixture from the pan and drop it onto the cold surface.
Leave the spoonful for a minute or two. Use your finger to push the edge gently; if the surface wrinkles, the jam set has been reached and the jar is jam ready.
If it stays liquid, return the pan to a vigorous boil for another two minutes, then repeat the test. Always remove the pan from the heat while you test to avoid burning the sugar and spoiling the jam jelly texture.
- The wrinkle test protects the glossy colour from darkening during overcooking.
- Blackberries with apples should form a firm spoonable set when ready.
- If unsure, test again after a short boil rather than prolonging cooking in one go.
“A short, chilled-plate test beats guessing — it tells you the exact moment to stop the boil.”
Sterilising Your Jars For Long Term Storage
A reliable seal starts with hot, spotless jars and clean lids before you even ladle in the preserve.
Preheat your oven to 140°C and place clean glass jars inside for 20 minutes. This simple step ensures the glass is sterile and reduces the risk of contamination.
Keep the jars in the oven until you are ready to fill them so they stay hot. Hot jars help prevent cracking when the warm jam is poured in.
- To keep your jam fresh for up to 1 year, sterilise jam jars in the oven at 140°C for 20 minutes.
- Place clean lids in a bowl of boiling water to sanitise them before sealing.
- Once the jars are hot, carefully ladle the preserve in, leaving a small gap at the top before fitting jars lids.
- Store filled jars in a cool, dark place to maintain colour and flavour.
| Step | Temperature/Time | Why |
|---|---|---|
| Oven sterilise | 140°C — 20 minutes | Removes bacteria, keeps glass hot |
| Boil lids | Boiling water — a few minutes | Sanitises metal lids quickly |
| Storage | Cool, dark place | Extends shelf life safely |
“Never skip sterilisation — a short routine now protects months of careful work.”
Creative Ways To Use Your Homemade Jam
A jar of homemade preserve opens dozens of simple, tasty possibilities for breakfast and baking. Keep a small pot in the fridge and reach for it whenever you want to lift plain dishes with fresh fruit flavour.
Breakfast Ideas
Spread it on warm, buttered toast or English muffins for an instant, comforting start to the day.
Stir a spoonful into porridge or natural yoghurt for added sweetness and texture. It also makes a lovely topping for pancakes or scones.
Baking Fillings
Use the preserve as a filling for Victoria sponge, tarts or thumbprint biscuits to add a bright, fruity note.
Try a thin layer between pastry folds or dolloped into puff pastry for elegant afternoon treats. These recipes benefit from the jam’s balanced sweetness and colour.
- Spread generously on toast for a quick breakfast.
- Swirl into yoghurt or porridge as a fruit boost.
- Fill cakes, pastries and cookies for classic bakes.
- Pair with soft cheese for a sweet‑ savoury contrast.
| Use | Benefit | Best paired with |
|---|---|---|
| Toast & muffins | Quick, comforting breakfast | Buttered toast, crumpets |
| Yoghurt & porridge | Boosts flavour and texture | Natural yoghurt, oats |
| Cake & pastry fillings | Bright, fruity centre | Victoria sponge, puff pastry |
| Cheese board | Sweet counterpoint to rich cheeses | Brie, goat cheese |
“Experimenting with different ways to use jam will help you appreciate the depth of flavour that fresh fruit brings to your kitchen.”
Troubleshooting Common Jam Making Issues
Simple checks and little fixes will get your preserve to a spoonable set without ruining the flavour.
If the mixture is too runny: you probably did not reach the setting point. Return the pan to a lively boil for a few minutes and repeat the chilled-plate wrinkle test.
If large fruit pieces remain: use a potato masher in the pan to smooth the texture. This helps the pectin work evenly and gives a more uniform jam jelly.
- Always add sugar only after the fruit has softened; adding it too soon can stop pectin activating.
- If the set is weak, a little extra lemon juice will increase acidity and help pectin.
- Use warm, sterilised jars when filling to preserve texture and avoid cracking.
- Skipping the wrinkle test is a common mistake — always test to confirm jam ready consistency before potting.
| Problem | Likely cause | Fix |
|---|---|---|
| Too runny | Not at setting point | Boil longer; repeat test |
| Chunky texture | Large fruit pieces | Mash in the pan |
| Weak set | Low acidity or pectin | Add lemon juice; check sugar ratio |
| Jar issues | Cold jars or lids | Sterilise jars and warm before filling |
“Troubleshooting is part of making jam; small tweaks often save a batch.”
Delicious Variations To Customise Your Recipe
A few simple additions will let you tailor flavour and aroma to your taste. These tweaks take the basic blackberry apple jam in new directions without adding fuss.
Spiced Additions
Warm spices work beautifully with dark fruit and cooking apples.
- Add a teaspoon of ground cinnamon or two lightly crushed cloves while the fruit simmers for a cosy note.
- Stir in fresh lemon zest after you add blackberries to brighten the tartness of the apple.
- A splash of vanilla extract once the pot is off the heat gives a rich, dessert-style finish.
- For gentle heat, grate a little fresh ginger into the pan; it pairs well with sugar and fruit.
Other Flavour Ideas
Try mixing other berries or subtle extracts to create a new favourite.
| Variation | What to add | Best use |
|---|---|---|
| Mixed berry | Combine blackberries with raspberries or blueberries | Bright spreads and tart fillings |
| Citrus lift | Lemon zest and a touch more juice | Balances sweetness from sugar and cooking apples |
| Spiced vanilla | Cinnamon + vanilla after cooking | Serving with ice cream or baked goods |
Experiment freely. Small changes make each jar unique and help you adapt the recipe to the season and your taste.
“A simple tweak can transform a classic preserve into a signature flavour.”
Tips For Storing And Serving Your Preserve
Store sealed jars in a cool, dark place such as a pantry or cupboard to protect colour and flavour. Unopened jam jars will keep well for up to one year if stored correctly.
Once opened, keep the jar refrigerated and always use a clean spoon when serving. This simple habit prevents contamination and helps the preserve last for several weeks.
If the preserve becomes very firm after chilling, loosen the jar by standing it in a bowl of warm water for a few minutes. The gentle heat softens the set without altering taste.

- Ensure lids are tightly closed after every use to stop other fridge flavours getting in.
- Label each jar with the date made so you can rotate stock and use the oldest jars first.
- The heat from sterilisation creates a vacuum seal — this is essential for long-term storage.
| Storage | Where | How long |
|---|---|---|
| Sealed jars | Cool, dark place | Up to 1 year |
| Opened jars | Refrigerator | Several weeks |
| Thickened jam | Bowl of warm water | Few minutes |
“A clean spoon and proper lids keep your work tasting fresh for longer.”
Conclusion
Good preserves start with simple steps, steady heat and a little patience at the end. ,
Making your own preserve made from fresh fruit is a rewarding way to lock in flavour for the whole year. It uses basic sugar and natural pectin to create a reliable storecupboard favourite.
This blackberry apple jam recipe reaches a glossy set in a few vigorous minutes. The balance of sugar, lemon and cooked fruit gives a true jam jelly and a clean, bright apple jam note.
There are many ways to use jam — spread on toast, fold into bakes or spoon over yoghurt. Try it with warm scones or savoury cheese to show how versatile berries and preserves can be.
Thank you for following the recipe. We hope this guide inspires more home preserves and that your jars bring joy through the months ahead.
FAQ
What is the best ratio of fruit to sugar for this blackberry and apple preserve?
Can I make this recipe without added pectin?
How do I perform the wrinkle test to check if the jam is set?
What type of apples work best for a firm set?
How should I sterilise jars to store jam safely?
How long will homemade jam keep once sealed?
My jam didn’t set — can I fix it?
Can I freeze this preserve instead of jarring it?
Are there ways to reduce sugar without losing flavour or safety?
What are creative ways to use this preserve besides toast?
How much cooking time do I need to allow to reach the setting point?
Can I include spices or additional fruits in this recipe?
Mary Berry Blackberry And Apple Jam
This classic British preserve brings the best of seasonal fruit to your breakfast table. Made using traditional stovetop methods, the recipe is simple and delivers a glossy, professional finish.
Ingredients
- 500 g fresh blackberries
- 500 g cooking apples (Bramley)
- 800 g granulated sugar
- 1 lemon (juice)
- 100 ml water
Method
- Wash 500 g of blackberries and peel, core, and chop 500 g of apples into small, even pieces.
- Place the apples with 100 ml of water in a pan and cook until they soften, usually about 5 to 10 minutes.
- Once soft, add the blackberries and cook gently until the fruit breaks down into a thick, even base.
- Use a potato masher to smooth the blackberry and apple mixture before adding sugar.
- Stir in the sugar and lemon juice, and mix until the crystals dissolve completely.
- Bring the mixture to a rolling boil, then boil rapidly for 10–15 minutes to reach the setting point.
- Skim any foam, then ladle into warm jars and seal while hot.