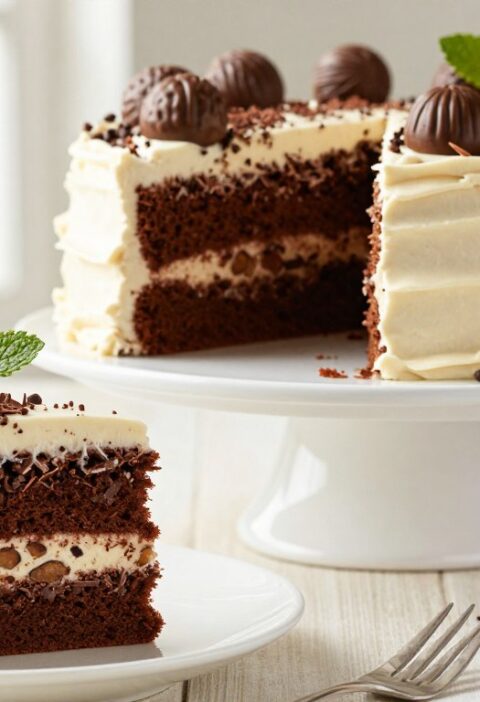
This classic British bake is a beloved centrepiece for parties and afternoon tea. It serves ten people and offers about 520 kcal per portion, making it easy to plan for guests.
The light, tender crumb is what many home bakers aim for. Using a proper 10-inch round tin helps achieve the even rise that defines this sponge.
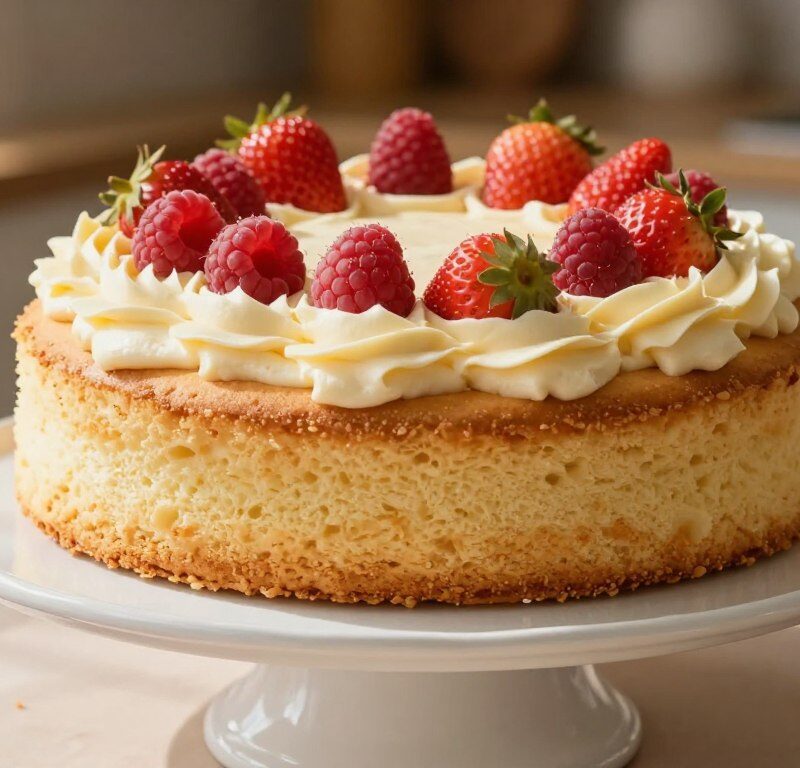
Split layers, a slick of jam and a cloud of cream or buttercream make the filling delightful. A dusting of icing sugar on the top finishes the look and lifts presentation.
Simple attention to fat ratios, lined tins and timing will give consistently fluffy results. This recipe remains a reliable favourite among British kitchens for celebrations, birthdays and casual gatherings.
Key Takeaways
- Serves ten with roughly 520 kcal per serving.
- Use a 10-inch round tin for an even rise.
- Jam plus cream or buttercream makes a classic filling.
- Line tins and mind fat ratios for a light crumb.
- Finish with a dusting of icing sugar for a neat top.
Why the Mary Berry 10 Inch Sponge Cake is a Classic
When you need a show-stopping centrepiece, this larger Victoria sponge delivers on both volume and texture.
This scaled-up recipe takes the familiar 8-inch method and adapts it to serve 12–14 people. The adjustment preserves the light, golden crumb by keeping precise ingredient ratios. That balance is the secret behind a true Victoria sponge that rises evenly and stays airy.
Versatility is another strength. Use buttercream, jam or fresh whipped cream to finish the layers for afternoon tea. Each filling gives a different character while the sponge remains the reliable base.
For best results, bake the batter in two 10-inch round tins. Even baking prevents the middle from sinking and helps achieve a neat, celebratory presentation for weddings, birthdays and other special occasions across the UK.
- Scaled to serve larger gatherings without losing texture.
- Precise ratios keep the crumb light and golden.
- Pairs well with jam, buttercream or cream for tea.
- Two tins ensure even rise and a clean finish for big events.
Essential Ingredients for Your Sponge
Start with well-measured, room-temperature ingredients to make a reliable sponge every time.
Dry Ingredients
- 225g self-raising flour — the base of the batter.
- 225g caster sugar for sweetness and structure.
- 2 tsp baking powder and 1/4 tsp salt to ensure an even rise.
Wet Ingredients
- 225g softened unsalted butter and 4 large eggs at room temperature.
- 2 tbsp whole milk to loosen the batter and keep the crumb tender.
For the filling, gather 200ml double cream, 100g strawberry jam and 2 tbsp icing sugar. Use fresh eggs and good vanilla extract to lift flavour.
Tip: Make sure all ingredients are warm before you mix. This prevents the batter from curdling and helps the cake bake evenly.
Preparing Your Kitchen and Tins
Good preparation saves time and delivers a professional finish.
Start by organising your worktop so everything is to hand before you turn on the oven. Preheat the oven to 180°C (160°C fan) before you begin mixing. This helps the sponge rise evenly from the moment it goes in.
Lining Your Tins
Grease a 10-inch round tin thoroughly with butter and press a circle of baking parchment into the base. For larger bakes, prepare two 10-inch tins and line both bases. Proper lining takes about five minutes but prevents sticking and gives clean edges to your cakes.

- Preheat oven to 180°C (160°C fan).
- Grease tin with butter and line base with parchment.
- Allow about 5 minutes to prepare each tin for baking.
| Task | Why it matters | Time |
|---|---|---|
| Preheat oven | Stable temperature for proper rise | 10–15 minutes |
| Grease and line tin | Easy release and neat edges | 3–5 minutes |
| Prepare two tins (if needed) | Even baking for layered cakes | 5–8 minutes |
Mastering the All-in-One Mixing Method
The all-in-one method speeds up mixing by combining butter, caster sugar, eggs and flour in a single bowl. Beat these ingredients together for 2–3 minutes until the batter is smooth and pale.
Use an electric hand mixer to fold air into the mixture. This trapped air is vital for a light victoria sponge and helps larger cakes rise without becoming dense.
Add the eggs one at a time. If the batter begins to curdle, stir in a spoonful of self-raising flour to stabilise the mixture quickly.
Finish by folding in vanilla extract and 1–2 tbsp milk so the batter pours easily into prepared tins. This simple technique, endorsed by mary berry, keeps the crumb tender and even.
- Beat butter and sugar together for 2–3 minutes.
- Use an electric hand mixer to incorporate air.
- Add eggs slowly; add flour if curdling occurs.
- Stir in milk and vanilla last for the right consistency.
Baking Your Sponge to Perfection
Place the filled tin in the centre of a preheated oven so the sponge bakes evenly and develops a pale golden top.
Bake for 25–30 minutes at 180°C (160°C fan). The top should be lightly golden and spring back when pressed gently. Start checking at 25 minutes to avoid drying the crumb.
Insert a skewer into the middle of the cake. If it comes out clean, the sponge is ready to cool. If not, return it to the oven and check again after a few more minutes.
Smooth the batter evenly in the tin before baking. An even surface promotes a uniform rise and a neat, professional finish when you layer the cakes.
- Use the right oven temperature and place the tin centrally for even baking.
- Rely on the skewer test to confirm the middle is cooked through.
- Remember: baking powder and eggs give lift, so avoid overmixing the mixture.
Cooling and Preparing the Cake Layers
Allowing the sponge to rest briefly in its tin gives the crumb time to set and reduces the chance of breakage.
Leave the sponge in the tin for 10 minutes after removing it from the oven. This short pause helps the structure firm so the layer keeps its shape when you tip it out.
Carefully turn the cakes out onto a wire rack to cool completely. Placing them on a rack lets air circulate under and around each layer, which prevents a soggy base caused by trapped steam.
Cooling the sponge thoroughly is critical before adding any cream or jam. If the layers are warm the filling can slide and the final cake will not sit level.
Once the layers are cool, they are ready to be filled. Use the rack to check even temperature, then stack and spread buttercream or whipped cream on a stable foundation.

Creating the Perfect Buttercream and Jam Filling
Good fillings are about texture as much as flavour: soft peaks of cream and a smooth butter and sugar mixture create contrast. Follow simple steps to make a filling that holds shape yet tastes light.
Whipping the cream
Chill a clean bowl and beat 200ml double cream until soft peaks form. Use an electric hand mixer for speed and a light, airy result.
Spreading the filling
Spread the strawberry jam generously over one half of the layer, then spoon or pipe the whipped cream on top. This classic combo balances sweetness and moisture.
For a firmer filling, beat 125g softened butter with 150g icing sugar and a splash of milk in a clean bowl. Beat until smooth and spreadable to make a silky buttercream.
| Component | Quantity / Note | Purpose |
|---|---|---|
| Double cream | 200ml — soft peaks | Light, airy filling |
| Strawberry jam | Generous spread on one half | Bright flavour, keeps layers moist |
| Butter & icing sugar | 125g butter + 150g icing sugar + splash milk | Smooth buttercream for structure |
Assemble by placing the second sponge on top and dust the top with a light sprinkling of icing sugar. Chill briefly if using buttercream to help the filling set before slicing.
Expert Tips for a Light and Fluffy Texture
Small changes in technique make a big difference to the final bake.
Soften butter, don’t melt it. Softened butter creams with sugar to trap air. This trapped air gives the batter lift and a tender crumb.
Use room temperature eggs. They blend smoothly into the mixture and reduce the risk of curdling. If curdling occurs, fold in a spoonful of flour to stabilise the batter.
Fold flour gently. Overmixing develops gluten and makes the sponge tough. Use a light hand and stop as soon as the flour disappears into the batter.
“Check the bake from 25 minutes onwards; overbaking dries the crumb and ruins the texture.”
- Avoid opening the oven door early — it can cause the middle to sink.
- Monitor oven temperature and place tins centrally for even heat.
- Cool cakes on a wire rack to prevent a soggy base and keep layers level.
Final tip: Mind the fat-to-flour ratio and resist overworking the batter. With these steps you’ll get a reliably light, moist cake every time.
Creative Variations and Flavour Twists
Small flavour swaps turn a familiar bake into a show-stopping treat for tea.
Citrus Additions
Add lemon zest to the batter for a bright lift. A teaspoon of finely grated zest works well with the self-raising flour and caster sugar already in the recipe.
Tip: Stir zest into the bowl with the butter and sugar so the oils disperse evenly.
Nutty Textures
Fold in chopped almonds or hazelnuts for crunch. You can also swap a little flour for ground almonds to deepen the flavour without changing the batter too much.
Fruit Variations
Replace the usual jam with raspberry jam or fresh berries for tartness. For dairy-free fills use margarine and whipped coconut cream instead of butter and double cream.
“Try almond extract in place of vanilla for a subtle, nutty aroma that pairs perfectly with afternoon tea.”
| Variation | What to add | Effect |
|---|---|---|
| Citrus | Lemon zest (1 tsp) | Bright, fresh flavour |
| Nuts | Chopped almonds or ground almonds (50g) | Crunch and depth |
| Fruit | Raspberry jam or fresh berries | Tart contrast to sweet filling |
| Dairy-free | Margarine + whipped coconut cream | Suitable for lactose-free diets |
Conclusion
A few final reminders will help you turn a good bake into a great one for afternoon tea.
Follow the all-in-one method and precise measures to get a consistent victoria sponge with an even rise. Let the layers cool completely on a wire rack before you spread jam and cream; this keeps the filling stable and the middle from sliding.
Dust the top with icing sugar, chill briefly if needed, and slice with a warm knife for neat pieces. Store leftover cakes in an airtight container at room temperature for up to three days to keep the sponge moist.
Enjoy the recipe and the confidence that careful baking, the right tin and a light hand will deliver a celebratory result every time.
FAQ
What size tin do I need for this traditional Victoria sponge?
Can I use self-raising flour instead of plain flour and baking powder?
What is the best method to cream butter and sugar by hand?
How do I know when the sponge is fully baked?
What temperature and baking time should I use?
How should I cool the cakes to avoid a soggy bottom?
Can I substitute the buttercream for whipped cream?
How much jam and buttercream should I use between the layers?
Any tips for a perfectly level cake top?
How long will the assembled cake keep, and how should I store it?
Can I add flavour variations like citrus or nuts?
Is it possible to make this recipe into cupcakes or a traybake?
How can I prevent the cake from sticking to the tin sides?
What is the best way to achieve a light and airy sponge texture?
Mary Berry 10 Inch Sponge Cake
This classic British bake is a beloved centrepiece for parties and afternoon tea, featuring a light, tender crumb and delightful fillings.
Ingredients
- 225g self-raising flour
- 225g caster sugar
- 2 tsp baking powder
- 1/4 tsp salt
- 225g softened unsalted butter
- 4 large eggs at room temperature
- 2 tbsp whole milk
- 200ml double cream
- 100g strawberry jam
- 2 tbsp icing sugar
Method
- Preheat the oven to 180°C (160°C fan).
- Grease two 10-inch round tins with butter and line the bases with baking parchment.
- In a large bowl, combine the softened butter, caster sugar, eggs, and self-raising flour using the all-in-one method. Beat for 2–3 minutes until smooth and pale.
- Add the baking powder, salt, and milk, and mix until well combined.
- Divide the batter evenly between the prepared tins and smooth the tops.
- Bake in the preheated oven for 25–30 minutes, or until the tops are lightly golden and spring back when pressed.
- Remove from the oven and let the cakes cool in the tins for 10 minutes before transferring to a wire rack to cool completely.
- Once cooled, spread strawberry jam on one layer, followed by whipped double cream.
- Place the second sponge on top and dust with icing sugar before serving.