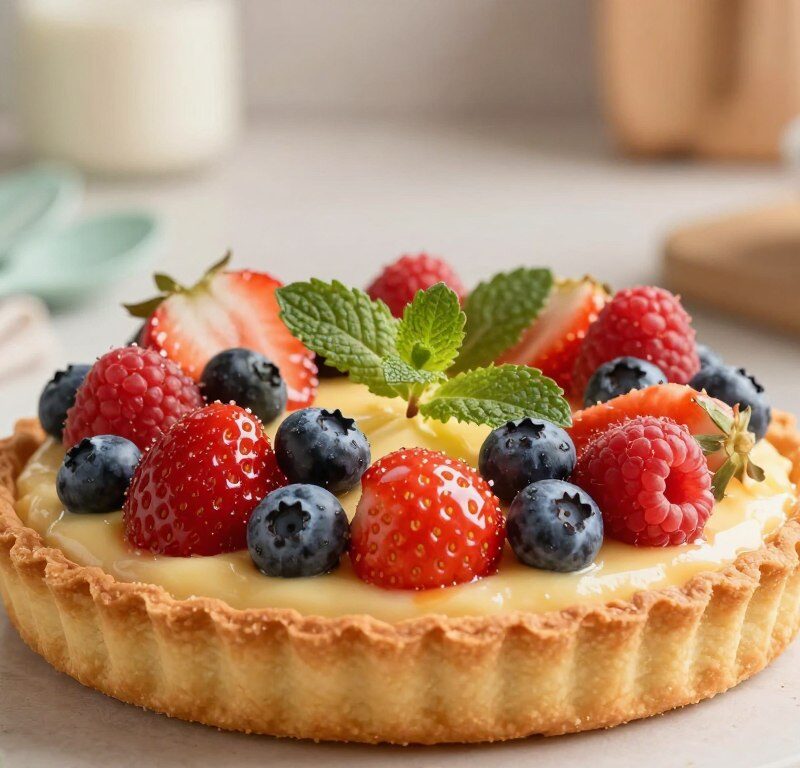
This classic British dessert pairs a crisp, buttery pastry shell with a smooth vanilla-infused crème filling. It is an elegant choice for afternoon tea, celebrations or any occasion that calls for a refined sweet.
The recipe is surprisingly approachable for home cooks. With clear techniques and a little patience, you can achieve restaurant-quality results and learn valuable baking skills.
This tart acts as a versatile base that complements fresh fruit or a light chocolate drizzle. Allow a modest amount of time and you will enjoy a luxurious, silky custard in every slice.
Key Takeaways
- Signature flavour: A vanilla crème centre inside a crisp pastry creates a luxurious dessert.
- Accessible technique: The step-by-step recipe suits both novice and experienced bakers.
- Versatile finish: Pair with fruit or chocolate to vary presentation and taste.
- Manageable time: The project fits into a sensible cooking schedule.
- Professional result: Follow essential techniques to achieve a smooth, restaurant-quality custard.
The Elegance of a Mary Berry Creme Patissiere Tart
Elegant desserts are often simpler than they look. The secret lies in precise technique and quality ingredients. A neat shell, an even bake and a smooth filling create a professional finish every time.
Using real vanilla gives the custard depth and aroma that lifts the whole recipe. This is a hallmark of mary berry’s approach and it makes the difference in flavour.
The tart is ideal for dinner parties because you can prepare it ahead to reduce stress. The buttery pastry pairs with the silky crème to give a rich yet light texture that guests always praise.
Customising is easy. Add fresh berries or fine chocolate curls to match your celebration and theme.
“Precision and simple ingredients produce the most memorable desserts.”
- Traditional methods with few ingredients yield elegant results.
- The contrast of crisp pastry and smooth custard is timeless.
- Mastering such recipes boosts confidence in the kitchen.
| Feature | Why it matters | Quick tip |
|---|---|---|
| Real vanilla | Depth of aroma | Use seeds from a pod |
| Make-ahead | Less stress on the day | Chill overnight |
| Finish | Visual impact | Decorate just before serving |
Essential Ingredients for Your Tart
A reliable set of pantry staples makes all the difference when building a crisp pastry and silky custard. Gather measured ingredients before you start to keep the process smooth and calm.
Pastry Components
Core dry mix: 200g plain flour forms the base of a tender, crumbly pastry. Add 100g cold unsalted butter and rub until the mix resembles coarse crumbs.
Stir in 2 tbsp icing sugar for a gentle sweetness. Having everything weighed saves time and prevents overworking the dough.
Custard Essentials
For the crème filling you will need 500ml whole milk and one tsp vanilla extract to give classic flavour. Use 4 egg yolks as the primary thickener.
Mix 100g caster sugar with 40g cornflour to stabilise the custard. Finish with 25g butter for a glossy, rich texture.
- Tip: Measure everything first — this step is common to the best recipes.
- Note: A little cream can be added to enrich the filling if you prefer a silkier mouthfeel.
| Ingredient | Amount | Role |
|---|---|---|
| Plain flour | 200g | Pastry structure |
| Whole milk | 500ml | Custard body |
| Egg yolks | 4 | Thickening & colour |
| Caster sugar | 100g | Sweetness |
Preparing the Perfect Shortcrust Pastry
Begin with a cool, light touch: rub 100g cold unsalted butter into 200g plain flour with 2 tbsp icing sugar until the mixture looks like fine crumbs.
Add one egg yolk and 2–3 tbsp cold water and work briefly until the dough starts to bind. The mixture should form a smooth, cohesive ball before chilling.
Chill for 20 minutes. This rest keeps the butter firm and helps the pastry hold its shape during baking.
Roll the dough on a lightly floured surface and use it to line a tart tin with a removable base. Ensure the pastry is slightly larger than the tin so the sides can be pressed in evenly.
- Handle the dough as little as possible to keep it crisp.
- Carefully add egg yolk and water — too much liquid makes the dough tough.
- Reduce oven temperature slightly for a fan oven to avoid over-browning.
| Step | Action | Reason |
|---|---|---|
| Rub in | 100g butter into 200g flour + 2 tbsp icing sugar | Creates crumbly texture |
| Bind | Add 1 egg yolk + 2–3 tbsp cold water | Forms a smooth ball of dough |
| Chill | 20 minutes | Prevents shrinkage and keeps butter cold |
| Shape | Roll and line a removable-base tin | Clean edges and easy release |
Mastering the Art of Blind Baking
A well-executed blind bake gives you a reliably crisp base and neat edges that hold up to a moist filling. Read through the steps before you begin and have parchment and baking beans ready.
Achieving a Crisp Base
Prepare the shell: line the tin with paper, press the pastry in and prick the base with a fork to stop puffing. This simple step creates a flat, even surface.
Fill the lined shell with baking beans and bake at 180°C for 12–15 minutes. Remove the paper and beans, then return the shell to the oven for a final 5–8 minutes. This two-stage baking ensures the base is fully cooked and crisp.
- Use parchment paper and baking beans to weigh the pastry and prevent it shrinking from the edges.
- After the initial bake, take out the beans and paper so the base can brown evenly.
- Once golden, set aside on a wire rack to cool completely before filling.

| Action | Time | Why |
|---|---|---|
| Initial bake with paper & beans | 12–15 minutes | Prevents puffing and sets the base |
| Finish baking without beans | 5–8 minutes | Ensures a crisp, dry base ready for filling |
| Cool on a wire rack | Until room temperature | Stops steam softening the pastry |
Creating a Silky Creme Patissiere
Begin with gently warmed milk; this small step prevents curdling and builds flavour. Warm 500ml of whole milk with vanilla extract in a saucepan until it is just simmering, then remove from the heat.
In a clean bowl whisk 4 egg yolks with 100g caster sugar and 40g cornflour until the mixture is smooth and pale. Temper the eggs by adding the warm milk slowly while whisking constantly.
Return the combined mixture to the saucepan and whisk over medium heat. Keep stirring for several minutes until the crème thickens and becomes glossy.
Avoiding Curdling
Constant whisking is essential. Pour the hot milk in slowly and do not stop stirring. If small lumps form, strain the custard through a fine sieve while still hot to restore a smooth surface.
Achieving the Right Thickness
When the custard coats the back of a spoon it is ready. Stir in 25g butter off the heat for a glossy finish. Transfer to a bowl, press cling film directly onto the top and set aside to cool in the fridge before filling the pastry shell.
| Stage | Action | Why it matters |
|---|---|---|
| Warm milk | 500ml with vanilla extract in saucepan | Infuses flavour and prevents eggs cooking too fast |
| Whisk mix | 4 yolks, 100g caster sugar, 40g cornflour in a bowl | Creates a smooth base for tempering |
| Cook | Return to saucepan; whisk over medium heat | Activates cornflour and thickens the crème |
| Finish & cool | Add 25g butter; press cling film; chill in fridge | Gives shine, prevents skin and sets for assembly |
Tempering Eggs for a Smooth Custard
Gentle tempering bridges cold egg yolks and hot milk so the custard stays silky and lump-free.
Whisk 4 egg yolks with 100g caster sugar and 40g cornflour to form a pale, stable base. This mixture is the backbone of a reliable crème.
Avoiding Curdling
Slowly pour a little warm milk into the yolk mixture while whisking constantly. This step raises temperature gently and stops the egg from scrambling.
Keep the heat low when you return the combined mix to the saucepan and stir until it thickens. Use a heavy-bottomed saucepan for even heat distribution.
Achieving the Right Thickness
Cook for another 1–2 minutes if the custard seems too runny; this allows the cornflour to activate fully.
The goal is a thick, smooth crème that coats the back of a spoon and holds its shape when you add it to the baked shell.
| Step | Action | Result |
|---|---|---|
| Whisk | 4 yolks + 100g caster sugar + 40g cornflour | Stable egg base |
| Temper | Add warm milk slowly while whisking | No curdling, even heat |
| Cook | Low heat in saucepan; stir until thick | Glossy, spoon-coating crème |
Assembling Your Dessert
With a firm base and chilled filling, putting the dessert together is quick and precise.
Once the pastry shell is completely cool, pour the chilled crème into the base from a bowl or a jug. Smooth the top evenly with a palette knife so the surface is flat and neat.
Use a large spoon or a piping bag to distribute the mixture accurately. This avoids air pockets and keeps the texture even across the top.
Assemble as close to serving time as possible. That way the pastry stays crisp and the filling tastes freshest. If components are made ahead, the final assembly should take no more than ten minutes.
- Ensure the base is firm so it supports the weight of the custard without going soggy.
- Level the top carefully before adding fruit or chocolate as a finishing touch.
- Keep the finished dessert in a cool place until serving to maintain texture and flavour.
Follow these simple steps and your recipe will present beautifully. The final look reflects careful technique and the right amount of time and patience.
Creative Topping Ideas
A simple scatter of ripe berries instantly lifts the dessert’s appearance and flavour.
Fresh strawberries or raspberries add bright, natural sweetness that pairs beautifully with the vanilla custard. Finish them with a light dusting of icing sugar for a professional look and a touch of extra sweetness.

For a richer option, serve a spoonful of whipped double cream on the side. Whip the cream with a little sugar and vanilla for a soft, cloud-like accompaniment that cuts through the richness of the filling.
Chill in the fridge for at least 1 hour after decorating. This helps the fruit set, and keeps the custard firm so slices cut cleanly.
- Try a drizzle of chocolate or a few chocolate curls for contrast.
- Caramelised fruit gives a glossy, elegant finish for special occasions.
- Add toppings just minutes before serving to keep fruit fresh and vibrant.
| Topping | Effect | Quick tip |
|---|---|---|
| Fresh berries | Bright colour and acidity | Dust with icing sugar before serving |
| Whipped double cream | Balances richness | Whip with a little sugar and vanilla |
| Chocolate curls / ganache | Elegant, richer flavour | Pipe ganache sparingly for impact |
Tips for Professional Results
Simple habits in the kitchen prevent common problems like a soggy base or cracked filling. Follow a few focused techniques and your bake will look and taste like a pro’s.
Preventing Soggy Bottoms
Blind-bake the pastry thoroughly to set the base. Line the tin with parchment and fill with baking beans so the shell keeps its shape while it cooks.
Remove the beans partway through and return the shell to the oven at 180°C to dry the surface. This step helps the base stay crisp when you add the filling.
Managing Pastry Shrinkage
Keep the dough cold and rest it in the fridge before rolling. Cold butter and minimal handling keep the pastry flaky and stop it shrinking from the tin edges.
If the sides pull away during baking, press them back gently when warm and allow the shell to cool in the tin to set its shape.
Ensuring Smooth Texture
Whisk the custard constantly while heating to avoid lumps. If you see any small bits, pass the mixture through a fine sieve for a glossy finish.
Press cling film onto the surface of the cream while it cools to stop a skin forming. Also, keep your saucepan clean if you are using it for multiple recipes — residues can affect flavour.
- Light touch: Handle pastry gently for a tender crumb.
- Beans bake: Use enough baking beans to support the shell during blind baking.
- Fan ovens: Watch heat closely as edges can brown faster.
| Problem | Fix | Quick tip |
|---|---|---|
| Soggy base | Thorough blind bake with baking beans | Dry at 180°C after removing beans |
| Shrinkage | Chill dough before rolling | Keep butter and water cold |
| Lumpy custard | Sieve hot mixture | Whisk constantly while heating |
Storing and Serving Suggestions
Keep the dessert chilled between preparation and serving to protect the delicate custard. Store the tart in the fridge for up to 2 days, covered to stop the crème drying and to prevent it absorbing other flavours.
Avoid freezing: the custard will break and the texture will suffer once thawed. If you have leftover custard, transfer it to a clean bowl or airtight container and refrigerate.
Serve chilled. Do not reheat — heat will make the filling separate and the milk-based cream will lose its silkiness. The pastry base is best eaten within 48 hours to keep its crispness.
- Timing: Keep assembled tart cold until serving time; ten to twenty minutes at room temperature is fine for ease of slicing.
- Dough and pastry care: If you must prepare in advance, keep the baked shell in the fridge and fill close to serving time.
- Kitchen notes: When reheating components for other uses, warm gently in a saucepan and stir — but do not reheat the finished tart.
| Item | How long | Tip |
|---|---|---|
| Assembled tart | Up to 2 days in the fridge | Cover to prevent a skin forming on the crème |
| Leftover custard | 2–3 days in a bowl in the fridge | Use an airtight container |
| Baked pastry base | Best within 48 hours | Store separately if possible to retain crispness |
Nutritional Information
A simple nutrition snapshot shows how indulgent a single slice can be.
Per serving: this classic dessert contains approximately 380 calories, making it a rich, special-occasion treat.
Carbohydrates are about 45g per slice, providing energy for afternoon tea. Fat sits at roughly 18g, which gives the filling its creamy texture.
| Nutrient | Amount per serving | Notes |
|---|---|---|
| Calories | ≈ 380 kcal | Indulgent portion |
| Carbohydrate | ≈ 45 g | Mainly from pastry and sugar |
| Fat | ≈ 18 g | Provides richness |
| Protein | ≈ 8 g | From eggs and milk |
| Fibre | ≈ 1 g | Modest for a dessert |
| Sugar | ≈ 25 g | Balances the buttery base |
Practical tip: serve smaller slices if you want the flavours without too many calories. This tart is best enjoyed as an occasional treat.
“Enjoy in moderation and pair with tea or fresh fruit for balance.”
Conclusion
Completing the recipe proves that careful timing and simple skills deliver elegant results.
Making a mary berry classic is a rewarding way to refine basic baking techniques. Followed correctly, the crisp pastry and silky crème balance beautifully.
Remember the crucial steps: temper eggs gently, blind bake the base and chill the filling before assembly. These small actions steady the outcome and boost confidence in the oven.
Use these tips to impress at a dinner or to enjoy a special treat at home. Keep exploring similar recipes to expand your skills and enjoy more confident, consistent bakes.
FAQ
What is the best flour to use for the shortcrust pastry?
Can I use caster sugar instead of icing sugar for the filling?
How long should I blind bake the tart case?
What are baking beans and can I use something else?
How do I prevent the custard from curdling?
What gives the crème patissiere a silkier texture?
How thick should the filling be before I pour it into the tart shell?
Can I make the custard ahead and chill it?
How do I avoid a soggy bottom on the tart?
What toppings work best with this tart?
How long will the assembled tart keep in the fridge?
Can I use double cream in the custard?
What oven temperature is best for baking the pastry base?
How do I stop pastry shrinkage during baking?
Mary Berry Creme Patissiere Tart
This classic British dessert pairs a crisp, buttery pastry shell with a smooth vanilla-infused crème filling. It is an elegant choice for afternoon tea, celebrations or any occasion that calls for a refined sweet.
Ingredients
- 200g plain flour
- 100g cold unsalted butter
- 2 tbsp icing sugar
- 1 egg yolk
- 2-3 tbsp cold water
- 500ml whole milk
- 1 tsp vanilla extract
- 4 egg yolks
- 100g caster sugar
- 40g cornflour
- 25g butter
Method
- Rub 100g cold unsalted butter into 200g plain flour with 2 tbsp icing sugar until the mixture resembles coarse crumbs.
- Add 1 egg yolk and 2-3 tbsp cold water, and work briefly until the dough starts to bind.
- Chill the dough for 20 minutes.
- Roll the dough on a lightly floured surface and line a tart tin with a removable base.
- Blind bake the pastry by lining it with parchment, filling with baking beans, and baking at 180°C for 12-15 minutes.
- Remove the parchment and beans, then bake for an additional 5-8 minutes until golden.
- In a saucepan, warm 500ml whole milk with 1 tsp vanilla extract until just simmering.
- In a bowl, whisk together 4 egg yolks, 100g caster sugar, and 40g cornflour until smooth and pale.
- Temper the egg mixture by slowly adding the warm milk while whisking constantly.
- Return the mixture to the saucepan and cook over medium heat, whisking until thickened and glossy.
- Remove from heat and stir in 25g butter until melted.
- Pour the custard into the cooled pastry shell and smooth the top.
- Chill the tart in the fridge before serving.