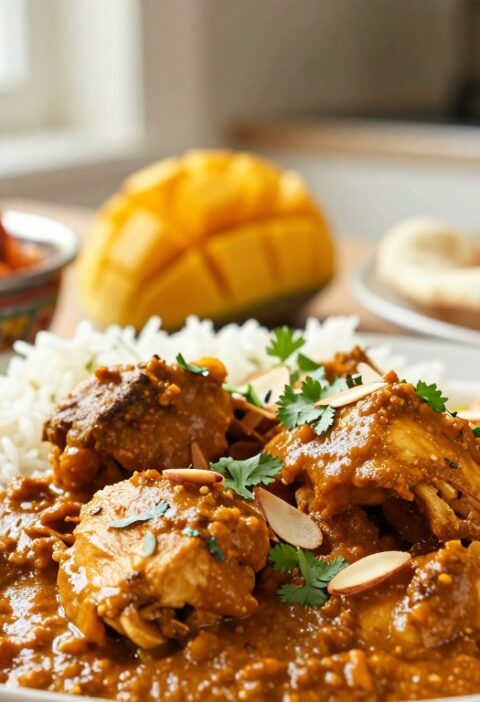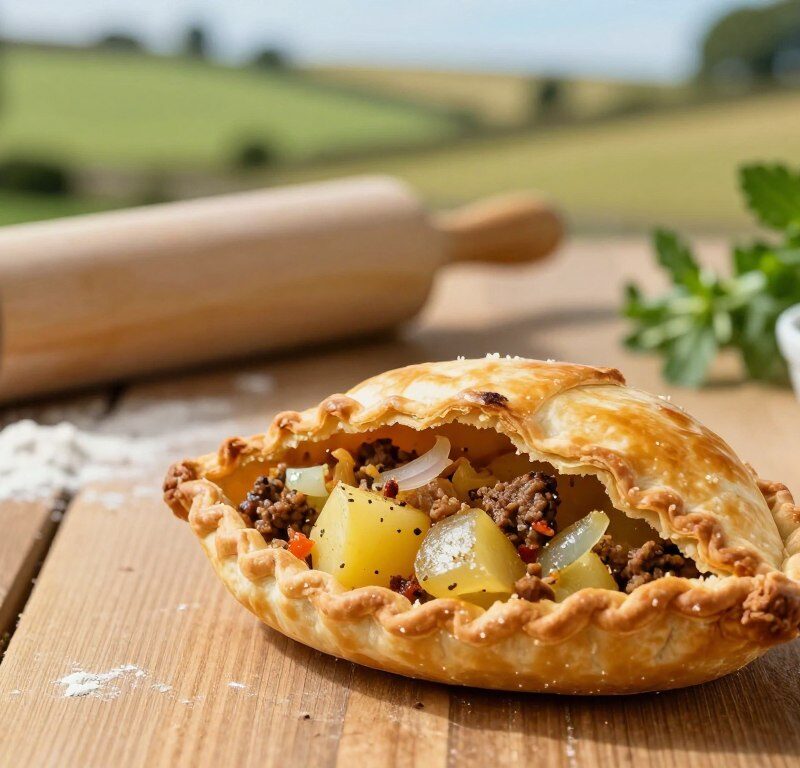
This celebrated British classic pairs a flaky, golden crust with a hearty, savoury filling. The Mary Berry Cornish Pasty is prized by home bakers across the United Kingdom for its reliable, foolproof results.
Whether you are new to baking or a seasoned cook, this short guide sets out the essentials. You will learn how a sturdy, tender pastry supports a juicy meat filling and why this pasty recipe is a household favourite.
The history of the dish shows how it became a cultural staple and a perfect hand-held meal for picnics, packed lunches or a warm family supper. Follow simple steps to achieve a golden-brown finish and a satisfying, portable treat.
Key Takeaways
- Classic Appeal: A timeless British snack with broad family appeal.
- Reliable Recipe: The cornish pasties method delivers consistent results.
- Perfect Pastry: Shortcrust pastry gives strength without losing tenderness.
- Easy for All Levels: Clear steps suit novices and experts alike.
- Versatile Serving: Ideal for lunches, picnics and cosy dinners.
The Timeless Appeal of the Mary Berry Cornish Pasty
Television and cookbooks helped this version reach millions, turning a regional favourite into a national staple. Its rise in the late 20th century made the mary berry cornish approach familiar to kitchens across the UK.
The charm is simple. The recipe uses few tools and common ingredients, so home cooks find it easy to replicate. Fans praise the balance between a tender crust and a robust filling in every pasty.
“Simple technique and good ingredients create a comforting, dependable bake.”
Why it endures:
- Consistent results that suit beginners and seasoned cooks.
- Versatility — serve a single pasty or make a batch of pasties for a crowd.
- Authentic flavour without complex steps: an ideal cornish pasty recipe for home bakers.
In short, the mary berry cornish version remains a gold standard for anyone seeking a reliable pasty recipe that honours tradition and tastes great every time.
Understanding the History of the Cornish Pasty
A: Roots of this beloved hand-held began in 19th-century mining communities, where practicality shaped every bite.
The story starts in the 1800s. Miners needed a hearty, portable meal that could be held with dirty hands. The crimped edge acted as a handle, keeping the filling clean while they worked underground.
The Mining Heritage
The Lavenders Bakery recipe dates back to the 1820s, long before modern cookbooks documented the dish. That early pasty recipe shows how necessity drove design: a tough pastry shell, filled with meat and veg, made for a sustaining lunch in the pits.
Comparing the mary berry cornish version to older traditions highlights how contemporary cooks preserved the legacy of these pasties. The evolution from mine-shift staple to national favourite shows the dish’s lasting appeal.
- Origins in the 1800s tied to mining life and hard work.
- Crimping kept food clean for hands stained by the job.
- Simple, durable pastry became a cultural symbol and a reliable recipe enjoyed across the UK.
“Every authentic pasty tells a story of Cornish mining culture and culinary practicality.”
Essential Ingredients for an Authentic Bake
Choosing the right ingredients is the simplest way to lift a classic pasty from good to outstanding. Gather quality produce and keep measurements precise for reliable results.
Selecting Quality Beef
Pick skirt steak for the best texture and flavour in the filling. Cut it into even dice so the beef cooks at the same rate as the vegetables.
Season simply with salt and black pepper to let the meat shine. Properly trimmed skirt gives a rich taste without excess fat.
Choosing the Right Vegetables
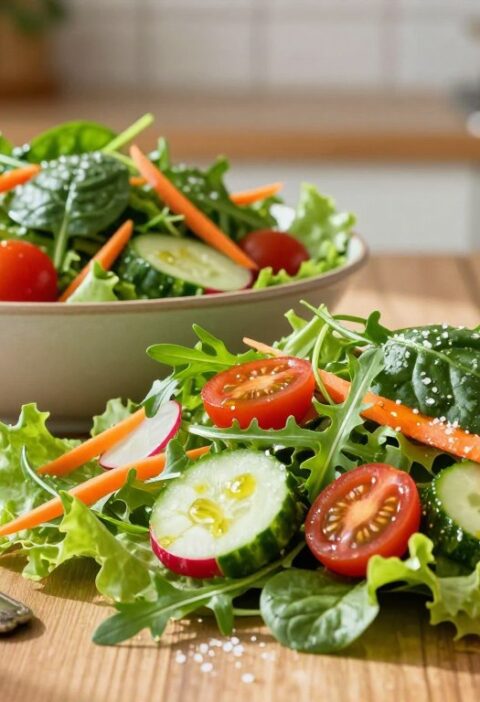
Traditional fillings use diced potatoes, swede (rutabaga) and onions. These vegetables add sweetness and body to the filling.
Use plain flour, cold butter and a little lard for the pastry to achieve a signature flaky crust. Dice all ingredients uniformly to ensure even baking and a balanced pasty every time.
- Tip: Keep ingredients cold when making pastry to encourage flakiness.
- Tip: Do not skip the rutabaga — it is essential to an authentic cornish pasty.
Preparing the Perfect Shortcrust Pastry
Good pastry begins with cold ingredients and a light touch at the mixing stage.
Keep all fats ice-cold. Chill butter and lard so the pastry turns flaky. Sift 500g plain flour into a large bowl.

Rub 250g of cold butter into the flour until the mix looks like coarse breadcrumbs. Add a pinch of salt at this point.
Gradually sprinkle in ice-cold water and mix until the dough just comes together. Stop when you have a firm, manageable ball.
“A well-rested dough is the secret to a successful bake; it stops the pastry from shrinking and helps flake.”
Follow the mary berry cornish instructions and avoid overworking the dough. Overmixing tightens the gluten and makes the pastry tough.
- Wrap the dough in cling film.
- Chill for at least 30 minutes — this relaxes the gluten and firms the fats.
- When rested, the pastry should be firm yet pliable for rolling.
| Step | Measure | Tip |
|---|---|---|
| Sift flour | 500g plain flour | Use cold bowl and sieve |
| Rub in butter | 250g cold butter | Stop at coarse breadcrumbs |
| Add water & rest | Ice-cold water, a little at a time | Chill dough 30 minutes before rolling |
Crafting the Savoury Filling
Start by cutting all ingredients into uniform 1cm cubes so everything cooks evenly.
In a large bowl, combine diced beef skirt, potatoes, swede and onion. Use plain, even pieces so the filling cooks at the same rate.
Season generously with salt and black pepper. Mix the ingredients thoroughly by hand to distribute the seasoning and juices.
If your meat is very lean, add a tablespoon of water or beef stock. This helps the filling stay moist and form a rich gravy as it bakes.
- Tip: Aim for 1cm dice for even cooking.
- Tip: A well-mixed filling yields the signature, savoury sauce inside the pasty.
“A balanced filling is the heart of any good recipe — it makes each bite satisfy.”
Rolling and Shaping Your Pasties
Take your chilled dough to a lightly floured surface and roll it to a thickness of about 3–4mm. Use plain flour sparingly so the pastry does not dry out.
Cut circles and place a generous portion of the beef and vegetable filling on one half of each round. Leave a 2cm border so you can seal the pastry without trapping air.
Dot the filling with small pieces of butter — this melts into a rich, savoury gravy during baking. Season with salt and black pepper if needed before folding.
Brush the edges with beaten egg to act as a glue. Fold the pastry over the filling to form a neat D-shape and press the rim firmly to seal.
Follow the instructions closely: a tight seal stops leaks and keeps the filling moist. Repeat the process so all pasties are uniform in size for an even, golden finish.
“Take a moment to brush each edge with beaten egg — it makes all the difference to a clean seal.”
The Art of the Traditional Crimp
The curved, pinched edge does more than decorate — it locks in flavour and juices.
The traditional crimp is the hallmark of an authentic cornish pasty. Pinch and twist the pastry along the curved side to form a firm, braided rim.
Before crimping, brush edges with beaten egg to help the seal hold. Work quickly so the dough stays cold and the pastry keeps its flaky texture.
This finish is both decorative and practical. A good crimp stops the filling from leaking during long baking and travel.
- Place a generous scoop on one half of the round, leaving a 2cm border.
- Dot with butter, season with salt and black pepper, then fold and press firmly.
- Once crimped, place pasties on a lined tray and brush the tops with more beaten egg for a golden oven bake.
“Mastering the crimp takes practice, but it makes every pasty look and hold like a pro.”
Baking for a Golden Finish
Start the bake high and finish low to coax the best colour and cooking through. Preheat your oven to 190°C so the pastry sets quickly and gains a crisp, golden top.
Bake at 190°C for 40 minutes, then reduce to 170°C for a further 10 minutes. This two-stage approach helps the meat and vegetable filling cook through without burning the crust.
Brush each pasty with beaten egg before they go in to achieve a glossy finish. If the tops brown too fast, tent the tray with foil for the final few minutes.

Tip: The total baking time is about 50 minutes. A well-baked mary berry cornish version will show a deep golden colour and a crisp, flaky shell that contrasts with a juicy, savoury interior.
“Allow the pasties to rest five minutes after cooling slightly — this helps the filling settle and makes them easier to handle.”
Pro Tips for Flaky Pastry Success
Small adjustments in technique make the biggest difference when you want reliably flaky pastry. These practical tips cover temperature, resting and preventing leaks so every pasty bakes well.
Temperature Control
Keep butter and lard cold until the last moment. If the kitchen is warm, chill the dough again before rolling.
Cold fats help the pastry puff and flake when baking.
Resting the Dough
Rest the dough for at least 30 minutes. This relaxes gluten and stops the pastry shrinking in the oven.
Handle the dough lightly to avoid toughness.
Avoiding Leaks
Leave a wide border, brush edges with beaten egg and crimp firmly. Dice potatoes and swede evenly so the filling cooks without releasing excess water.
These small steps cut leaks and keep the meat and vegetables juicy in each meal.
| Tip | Why it matters | Quick action |
|---|---|---|
| Chill fats | Creates flakiness | Keep butter in fridge |
| Rest dough | Stops shrinkage | Chill 30+ minutes |
| Seal well | Prevents leaks | Wide border + firm crimp |
| Even dice | Cook uniformly | 1cm cubes of potatoes, swede, beef |
Creative Variations to Try at Home
Small changes in ingredients can transform the familiar pasty into something new.
While the classic filling is hard to beat, try a rich cheese and onion version for a comforting twist. It bakes quickly and pairs well with mustard or chutney.
For a vegetarian take, roast root vegetables until sweet and fold in mature cheese. The result is hearty, satisfying and great for packed lunches.
- Swap beef for lamb and mint for a fresh, modern flavour.
- Add leeks or mushrooms to deepen the savoury notes.
- Experiment with goats’ cheese and herbs for a lighter option.
Creative variations let you tailor pasties to household tastes while keeping the spirit of the recipe.
“Small, thoughtful swaps make every batch feel like a new discovery.”
Storing and Reheating Your Pasties
A few simple steps will keep the pastry crisp and the filling fresh for days. Store any leftover pasties in an airtight container in the refrigerator for up to three days to maintain flavour and texture.
To reheat, preheat the oven to 180°C and warm for 15 minutes until the pastry is crisp and the filling is piping hot. This method restores the flaky texture without sogginess.
Avoid the microwave; it softens the pastry and ruins the flaky crust that makes this recipe special.
- Freeze unbaked pasties on a tray, then transfer to a freezer bag for quick, fresh bakes later.
- If frozen, thaw overnight in the fridge before baking according to the original instructions.
- Brush with beaten egg and a little melted butter before baking for best colour and shine.
“Proper storage ensures your pasties taste as good on day two as they did straight from the oven.”
Final Thoughts on Mastering the Recipe
Mastering the pastry and the crimp takes time, but each careful step rewards you with a sturdy shell and a rich filling. Keep the dough cold, season with salt and pepper, brush edges with beaten egg and add a little butter or egg for shine.
Follow the instructions on ingredient prep and oven time to let the beef, potato, swede and onion cook evenly. Allow the pasty to rest a few minutes after baking so the meat and vegetables settle into a glossy sauce.
With patience and practice this mary berry cornish recipe will become a favourite meal. Try it a few times and you will soon know each step and every minute needed for perfect baking.
FAQ
What is the best flour to use for an authentic shortcrust?
How long should I bake a pasty and at what temperature?
Can I use skirt or another cut of beef in the filling?
Should I pre-cook the vegetables like potato, swede and onion?
How do I stop the pasty leaking while baking?
What is the traditional crimping method and why does it matter?
Can I make the pastry ahead and freeze pasties?
What are handy tips to keep pastry flaky and light?
Is it OK to add cheese or other creative fillings?
How should I reheat a leftover pasty for best results?
What seasoning works best in the filling?
How much filling should I use per pasty and how big should the pastry circle be?
Mary Berry Cornish Pasty
This celebrated British classic pairs a flaky, golden crust with a hearty, savoury filling. The Mary Berry Cornish Pasty is prized by home bakers across the United Kingdom for its reliable, foolproof results.
Ingredients
- 500g plain flour
- 250g cold butter
- lard (amount not specified)
- ice-cold water (amount not specified)
- beef skirt (amount not specified)
- diced potatoes (amount not specified)
- diced swede (rutabaga) (amount not specified)
- diced onions (amount not specified)
- salt
- black pepper
- beaten egg (for sealing)
Method
- Sift 500g plain flour into a large bowl.
- Rub 250g of cold butter into the flour until the mix looks like coarse breadcrumbs.
- Add a pinch of salt and gradually sprinkle in ice-cold water until the dough just comes together.
- Wrap the dough in cling film and chill for at least 30 minutes.
- Cut all filling ingredients into uniform 1cm cubes.
- In a large bowl, combine diced beef skirt, potatoes, swede, and onion. Season generously with salt and black pepper.
- Roll the chilled dough to a thickness of about 3–4mm on a lightly floured surface.
- Cut circles from the rolled dough and place a generous portion of the filling on one half of each round.
- Dot the filling with small pieces of butter and season with salt and black pepper.
- Brush the edges with beaten egg, fold the pastry over the filling to form a D-shape, and press the rim firmly to seal.
- Crimp the edges to secure the filling and prevent leaks.
- Preheat the oven to 190°C and bake for 40 minutes, then reduce to 170°C for a further 10 minutes.
- Brush each pasty with beaten egg before baking for a glossy finish.
- Allow the pasties to rest for five minutes after baking before serving.