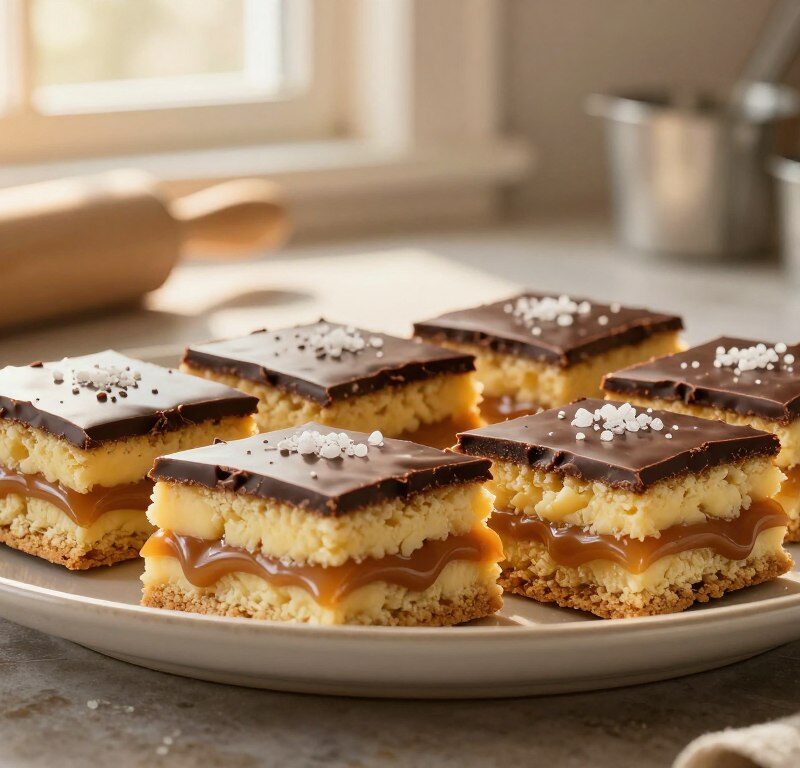
This classic traybake is a reliable and perfectly balanced dessert that never feels too sweet. It layers a buttery base with glossy chocolate and a rich caramel centre for a treat that looks as good as it tastes.
The 9-inch (23cm) square tin is important. Using the right tin keeps the layers the correct thickness so each slice serves well at afternoon tea.
The method is straightforward and uses everyday storecupboard ingredients. With a little care you can achieve a crisp shortbread base, a smooth caramel middle and a shiny chocolate top that will impress guests.
Follow this friendly guide to master the texture and harmony of flavours. The result is a dependable traybake that showcases simple baking made excellent.
Key Takeaways
- Use a 9-inch (23cm) square tin for correct layer thickness.
- The recipe yields a classic three-layer traybake with buttery base, caramel centre and chocolate top.
- Everyday ingredients make this an accessible baking project.
- Work carefully to get a crisp base and a glossy chocolate finish.
- Results are reliably balanced and not overly sweet, ideal for afternoon tea.
The Allure of Mary Berry Caramel Shortbread
Few homemade treats feel as indulgent and familiar as a well-made millionaire shortbread.
This three-layer delight lives up to its name because each bite tastes richly decadent yet comforting. The charm comes from a buttery biscuit base topped with a thick, glossy middle and a smooth chocolate topping.
- Harmonious contrast between a crisp shortbread base and a soft, sticky layer.
- Many call it millionaire shortbread for its luxurious texture and flavour.
- A shiny topping adds a final note of elegance to a simple traybake.
- Each layer is balanced so the result is rich but never cloying.
- This recipe remains a beloved British favourite, trusted for consistent results.
Essential Ingredients for Your Traybake
Start with measured, quality ingredients to ensure each layer bakes and sets correctly. The right staples give reliable texture and flavour in every slice.
Shortbread Base Components
For a crisp shortbread base you will need 225g plain flour, 150g cold diced butter and 75g caster sugar.
Use cold butter so the base stays firm and flaky once baked. Fresh flour and good butter help the base hold its shape when you slice the traybake.
Caramel and Chocolate Essentials
The caramel layer calls for 150g butter, 150g light brown sugar, 397g condensed milk and 4 tbsp golden syrup.
For the chocolate topping, combine 200g milk chocolate with 50g dark chocolate. This mix balances sweetness and gives a glossy chocolate topping that sets neatly.
- These ingredients are pantry staples and keep the recipe simple to follow.
- High-quality butter and fresh flour make a professional finish more likely.
- The blend of milk and dark chocolate ensures the chocolate layer slices cleanly and looks glossy.
Preparing the Perfect Shortbread Base
A rock‑steady base begins with the right rubbing technique and a firm press into the tin. This short section covers the essential steps to make shortbread that will hold up to the heavier layers.
Techniques for a Firm Base
Use cold butter. Rub 150g of cold butter into 225g of plain flour until the mix looks like fine breadcrumbs. Add 75g caster sugar and use your fingertips in a large mixing bowl to bring the mixture together gently.
Line a 9‑inch square tin with parchment, leaving an overhang. Press the mixture firmly and evenly into the lined tin so the base is compact and stable.
Bake the shortbread base in the oven for 20–25 minutes at 180°C (160°C fan) until it is a pale golden colour. It is vital to let the base cool completely before adding the next layer to avoid melting.
| Step | Action | Why it matters |
|---|---|---|
| 1 | Rub butter into plain flour and sugar | Creates a tender, firm base |
| 2 | Press into lined tin | Prevents crumbling when sliced |
| 3 | Bake 20–25 minutes, cool completely | Sets structure for later layers |
Mastering the Golden Caramel Layer
Patience at the stove turns simple pantry items into a rich, fudgy centre. In a heavy-bottomed saucepan, melt 150g butter with 150g light brown sugar and 397g condensed milk. Stir from the start so the mixture heats evenly.
Keep the pan over low heat and stir constantly for 6–8 minutes until the mixture thickens and takes on a deep golden colour. Test readiness by dragging a spoon through the base; a clear trail means the layer is ready.
Pour the hot caramel evenly over the cooled base and smooth with an offset spatula. Let it set at room temperature for at least 1 hour, or chill for 30 minutes if you’re short on time.

- Use a heavy pan to prevent burning.
- Stir constantly to keep the texture silky.
- Allow the layer to be firm to the touch before topping with chocolate.
| Ingredient | Weight | Purpose |
|---|---|---|
| Butter | 150g | Adds richness and smoothness |
| Light brown sugar | 150g | Creates colour and depth of flavour |
| Condensed milk | 397g | Forms the body of the layer |
| Set time | 1 hour (room) / 30 mins (fridge) | Ensures a firm layer for slicing |
Achieving a Glossy Chocolate Topping
A glossy chocolate finish turns a good traybake into an eye-catching showstopper.
Place 200g of milk chocolate and 100g of dark chocolate in a heatproof bowl. Melt gently over a bowl of simmering water or use the microwave in 20-second bursts, stirring between each burst to avoid overheating the cocoa solids.
If you want extra shine, mix in 1 teaspoon of vegetable oil while adding chocolate to the warm mix. That little trick smooths the surface and helps the topping level evenly.
- Pour the melted chocolate over the set layer and tilt the tin to spread it.
- Use an offset spatula (a favourite tip from mary berry) to create a neat, professional finish.
- Allow the topping to set at room temperature for the best gloss, or chill for 20–30 minutes if short on time.
When the chocolate is fully set, use a sharp knife warmed in hot water and dried between cuts for clean squares. This final step keeps slices tidy and attractive for serving.
Essential Equipment for Success
Gathering the right tools before you start makes each step of baking feel calm and organised.
You will need a 9-inch (23cm) square tin lined with parchment to keep the base even and to ease removal when the bake is set.
A heavy-bottomed saucepan is essential for the caramel step. It spreads heat evenly and helps prevent burning during the crucial minutes of stirring.
Use a heatproof bowl over simmering water to melt chocolate safely. The microwave can be used in short bursts as an alternative, but a bowl simmering water is the gentlest method.
“Have every utensil ready — it makes the process faster and reduces stress at each step.”
- Offset spatula or a sharp knife for smoothing and neat cutting; warm the knife for cleaner edges.
- Wooden spoon or spatula for constant stirring in the saucepan.
- Line the tin with parchment and keep all tools to hand before you begin.
| Tool | Purpose | Tip |
|---|---|---|
| 9-inch square tin | Controls layer thickness | Line with parchment for easy removal |
| Heavy-bottomed saucepan | Cook caramel evenly | Stir constantly to avoid burning |
| Heatproof bowl | Melt chocolate | Use over simmering water, not direct heat |
| Sharp knife / offset spatula | Smooth and cut | Warm knife between cuts for neat squares |
Tips for Preventing Common Baking Issues
Common faults are usually easy to fix if you know what to look for. Below are quick, practical fixes to keep each stage of your bake on track.
Fixing Runny Caramel
If the caramel is too runny it usually means it was not cooked long enough. Return the mixture to a low heat in a heavy-bottomed pan.
Stir constantly for another few minutes until the mixture thickens and leaves a clear trail on your spoon. This is the same advice for condensed milk based fillings—aim for 6–8 minutes of steady stirring.
Preventing Cracked Chocolate
To stop the chocolate topping cracking when you cut, let the traybake sit at set room temperature for 15–20 minutes. This relaxes the surface and reduces snap.
Score the surface lightly while the topping is still soft to guide your knife. When slicing, warm the knife in hot water and dry it for clean squares.
Avoiding Layer Separation
Layer separation happens when the lower layer is still warm. Always allow each layer to cool completely before adding the next one to the tin.
Press the shortbread base firmly into the tin to create a compact foundation. Also, when adding chocolate, work gently so the cold topping does not shock the soft middle.
“Always stir the caramel mixture constantly to prevent burning — a tiny scorch can spoil the whole bake.”
- Return runny caramel to the pan and cook until it thickens.
- Score the chocolate surface to prevent cracks when slicing.
- Ensure each layer is fully cool before you proceed to avoid separation.
- Warm the knife between cuts for neat, glossy squares.
Creative Variations to Try at Home
Experimenting with toppings and mix‑ins lets you adapt the bake for any occasion. Try a salted version by scattering sea salt flakes over the caramel layer before adding the chocolate top. The salt lifts the sweetness and adds contrast.
For a festive finish, press crushed candy canes or a light dusting of edible gold onto the warm chocolate. Swirling melted white chocolate over the dark chocolate gives a smart marbled effect that looks impressive.
Try these ideas:
- Replace some milk with dark chocolate for a deeper, less sugary topping.
- Fold chopped hazelnuts or almonds into the melted chocolate for crunch.
- Swap a small portion of plain flour for wholemeal flour to add fibre, as suggested by mary berry.
- Stir a teaspoon of instant coffee into the caramel to create a mocha twist.
These tweaks use familiar ingredients like butter, sugar and flour, but yield very different results. Pick one change at a time to find the combo you love most.

Serving Suggestions for Afternoon Tea
Present these traybake squares alongside a steaming drink to balance their richness. A deliberate pairing helps the layers shine and makes sharing feel special.
Pairing with Hot Beverages
A classic cup of English breakfast tea is the go-to choice. The tannins cut through the chocolate and caramel, refreshing the palate between bites.
If children are at the table, offer a glass of cold milk or a warm hot chocolate. These soft drinks complement the sweet layers and please younger tastes.
For a more decadent finish, serve a square with a scoop of vanilla ice cream or a dollop of whipped cream. Fresh raspberries or strawberries add a bright, tangy contrast to the dense shortbread and caramel layers.
“Serve in smaller portions — the richness is best enjoyed in moderation.”
- English breakfast tea pairs traditionally with this mary berry traybake.
- Cold milk or hot chocolate suits children and sweet-toothed guests.
- Fresh berries and a drizzle of fruit coulis lift the plate visually and in taste.
- Offer smaller squares to let guests try other cakes and to avoid overindulgence.
Best Practices for Storing Your Treats
How you store these treats affects texture more than almost any other step in the recipe. For the best results, keep finished squares in an airtight container at room temperature for up to 5 days.
If you live somewhere warm, store the container in the fridge so the chocolate layer stays firm and the filling holds its structure. Before serving, let the squares sit at room temperature for about 15 minutes so the caramel and chocolate reach the ideal consistency.
To keep longer, freeze individual pieces for up to 2 months. Place a sheet of parchment between each square to stop them sticking together. When ready to use, thaw at room temperature for a short time rather than using a microwave.
- Short-term: airtight, cool, dry place for up to 5 days.
- Warm climates: refrigerate to protect the chocolate surface.
- Freezing: separate squares with parchment; freeze up to 2 months.
- Serving: rest for 15 minutes at room time; avoid microwaving to soften.
| Storage | Duration | Tip |
|---|---|---|
| Room | Up to 5 days | Airtight container, cool place |
| Fridge | Up to 2 weeks | Use if ambient temperature is high |
| Freezer | Up to 2 months | Parchment between layers; thaw before serving |
“Allow time for the layers to relax before slicing — it makes neater squares.”
Nutritional Information and Dietary Considerations
Keep portion size small — one slice provides most of a day’s treat calories in a compact form.
A single square contains approximately 370–420 kcal, depending on the chocolate and butter used. This traybake supplies mainly carbohydrates and fats, so enjoy it in moderation as part of a balanced diet.
Typical nutrients per square include about 4g protein and roughly 1g fibre. These help balance the sugar, but the recipe remains an indulgence best shared.
- Make it dairy-free by using a quality vegan margarine and coconut-based condensed milk.
- Reduce sweetness by using a higher-percentage dark chocolate in the topping.
- Swap plain flour for a gluten-free blend if you need a gluten-free option.
- Always check labels on condensed milk and chocolate to match your dietary needs.
| Aspect | Typical value | Advice |
|---|---|---|
| Energy | 370–420 kcal per square | Serve small portions; share with friends |
| Protein | ~4 g | Pair with fruit to add fibre |
| Fibre | ~1 g | Use wholegrain swap for more fibre |
| Diet swaps | Dairy-free / gluten-free possible | Use labelled alternatives and check ingredients |
Why This Recipe Remains a British Favourite
This traybake endures because it turns simple pantry staples into something that looks professionally made.
The appeal is the contrast of textures: a crisp base, a creamy caramel layer and a smooth chocolate topping. Each element uses everyday ingredients, so the recipe feels approachable yet rewarding.
The method is reliable for beginners. Follow the steps and you will get consistent results for bake sales, gifts or a special afternoon tea.
Practical benefits make this traybake so popular. It keeps well, which suits busy households. A sharp knife warmed between cuts gives neat squares and a tidy finish.
“The balance of buttery base and silky filling is what makes this a timeless classic.”
- Trusted by home cooks for dependable results.
- Long shelf life makes it practical to have on hand.
- Perfect for sharing at parties and afternoon tea.
| Feature | Why it matters | How it helps |
|---|---|---|
| Simple ingredients | Easy to source | Keeps cost and fuss low |
| Layered texture | Contrast of crisp, soft and smooth | Creates an indulgent mouthfeel |
| Reliable method | Beginner-friendly | Consistent slices for sharing |
Conclusion
Finish with calm confidence. A few careful steps deliver a classic traybake that looks and tastes professional. Mastering this mary berry recipe lets you make shortbread that holds the layers and slices cleanly.
Follow each step—from pressing the base to timing the chocolate—so the base, filling and glossy chocolate top come together in harmony. Allow the bake the correct time and settle to the right temperature before slicing for neat, beautiful edges.
Enjoy the process. This is a timeless British treat that rewards patience and simple ingredients. With these tips you are ready to bake and share something truly indulgent.
FAQ
What core ingredients do I need for the shortbread base?
Can I substitute condensed milk in the caramel layer?
What’s the best method to heat the chocolate topping?
How long should the base bake before adding the caramel?
My caramel is runny — how can I thicken it?
Why does my chocolate topping crack when cutting?
How do I prevent the layers from separating?
Can I add flavour variations to the recipe?
What equipment should I use for best results?
How should I store the finished traybake?
Are there simple steps to cut neat squares?
Can this recipe accommodate dietary needs like gluten-free?
Mary Berry Caramel Shortbread
This classic traybake layers a buttery base with glossy chocolate and a rich caramel centre for a treat that looks as good as it tastes.
Ingredients
- 225g plain flour
- 150g cold diced butter (for base)
- 75g caster sugar
- 150g butter (for caramel)
- 150g light brown sugar
- 397g condensed milk
- 4 tbsp golden syrup
- 200g milk chocolate
- 50g dark chocolate
Method
- Preheat the oven to 180°C (160°C fan).
- Rub 150g of cold butter into 225g of plain flour until the mixture resembles fine breadcrumbs.
- Add 75g of caster sugar and mix gently to combine.
- Line a 9-inch square tin with parchment paper, leaving an overhang.
- Press the shortbread mixture firmly and evenly into the lined tin.
- Bake the shortbread base for 20-25 minutes until pale golden.
- Allow the base to cool completely before adding the caramel layer.
- In a heavy-bottomed saucepan, melt 150g of butter with 150g of light brown sugar and 397g of condensed milk over low heat.
- Stir constantly for 6-8 minutes until the mixture thickens and turns a deep golden color.
- Pour the hot caramel evenly over the cooled base and smooth with an offset spatula.
- Let the caramel set at room temperature for at least 1 hour or chill for 30 minutes.
- Melt 200g of milk chocolate and 50g of dark chocolate together in a heatproof bowl over simmering water or in the microwave.
- Pour the melted chocolate over the set caramel layer and tilt the tin to spread it evenly.
- Allow the chocolate topping to set at room temperature or chill for 20-30 minutes.
- Once set, use a sharp knife warmed in hot water to cut into squares.