This classic British bakebrings homely charm to any kitchen. The recipe is straightforward and kind to busy cooks, making it a dependable choice for teatime or a family supper.
Fresh fruit is at the heart of the sponge, so you can even use windfalls or those wrinkled apples at the back of the bowl. The result is a moist, warmly spiced loaf that pairs beautifully with a scoop of ice cream or a spoonful of crème fraîche.
Whether you are new to baking or have plenty of experience, this guide walks you through an easy process that yields a professional-tasting pud. It is versatile, reliable and perfect for sharing.
Key Takeaways
- Easy to follow: a simple recipe suited to all skill levels.
- Use fresh fruit: windfalls work well and add flavour.
- Serve warm: best with ice cream or crème fraîche.
- Versatile bake: ideal for teatime or casual gatherings.
- Consistent results: delivers a moist, tasty sponge every time.
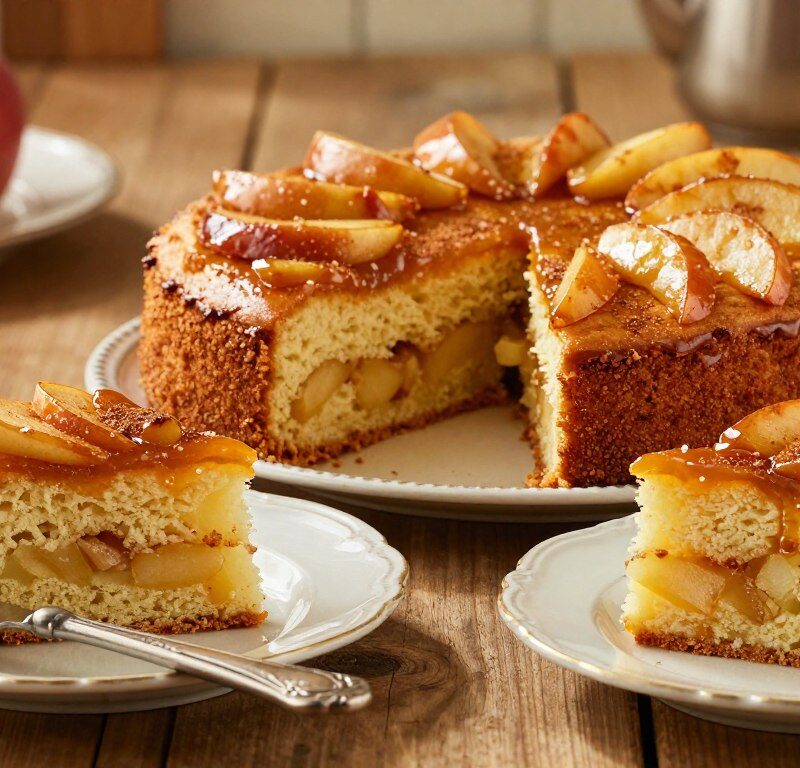
The Timeless Appeal of Mary Berry Apple Dessert Cake
A timeless loaf, it blends humble ingredients into a fluffy, comforting treat.
Mary Berry is widely recognised across the UK for her influence on traditional cooking and baking. Home cooks trust her methods because they deliver steady results.
The charm of this apple cake lies in its fine sponge. Each slice has a light crumb that soaks up the fruit juices and keeps the loaf moist.
Many people enjoy a piece with a hot cup of coffee in the morning. The tartness of the fruit balances the sweet sponge, creating a satisfying flavour profile.
- Reliable recipe: easy to follow and forgiving.
- Soft sponge: airy texture that pleases most palates.
- Serve with cream: a small dollop adds an indulgent finish.
Essential Ingredients for Your Sponge
Start by gathering the ingredients that guarantee a light, even rise and a pleasing fruit balance.
Choosing the Right Apples
Cooking apples that keep their shape work best. Bramley is traditional, but Granny Smith gives a bright, tart note and holds up well during baking.
Use two medium apples, peeled and sliced, so the pieces don’t sink and give uniform fruit pockets in the loaf.
Pantry Staples
You will need 225g of self-raising flour for reliable lift. If you only have plain flour, add 1 tsp baking powder to replace the self-raising option.
Softened butter, 150–175g caster sugar, two quality eggs and a splash of milk create the right batter texture.
- Use caster sugar for a smooth crumb.
- One tsp of baking powder helps if you substitute plain flour.
- Add a few drops of almond extract or vanilla for depth; a handful of chopped almonds can add crunch.
Preparing Your Kitchen and Equipment
Start by setting up your workspace so every tool and ingredient is within reach. This makes the whole cooking process calmer and faster.
Preheat your oven to 180°C (160°C fan) or 350°F. A steady oven temperature gives an even bake and helps the loaf colour in the correct time frame—about 1 ¼ hours for preparation and baking combined.
Line the sides and bottom of an 8-inch cake tin with parchment paper. Proper greasing and lining ensure the sponge releases cleanly when cooled.

Prepare ingredients in advance: peel and thinly slice the apples so the fruit softens evenly while baking. Use a large mixing bowl to combine ingredients without overworking the batter.
- Check the tin size: an 8-inch round pan is standard for this recipe.
- Organise tools: spatula, mixer and measuring spoons save time.
- Quick tip: allow a few minutes for oven to reach temperature—fan ovens may heat slightly quicker.
Mixing the Perfect Batter
Good technique matters from the first beat. Begin by creaming the butter and caster sugar until the mixture turns pale and airy. This step traps tiny bubbles that lift the sponge as it bakes.
Creaming Butter and Sugar
Use softened butter and 150–175g of caster sugar. Beat with a handheld mixer or wooden spoon until the sugar has dissolved and the mix is fluffy.
Add the eggs one at a time, beating well after each addition. This keeps the mixture stable and helps it emulsify.
Gently fold in 225g of self-raising flour with 1 tsp of baking powder. Use a spatula and turn the batter over, so you do not knock the air out.
For extra flavour, stir in a drop of almond extract. Aim for a thick yet smooth batter before you tip it into the tin.
Layering the Apples and Sponge
Start the layering by spreading half the mixture evenly across the base of your prepared tin. Use a spatula to smooth the surface so the batter bakes at a uniform rate.
Arrange half of the apples slices over this first layer. Place them in a single patterned layer so each slice has space to cook and soften.
Cover the fruit with the remaining batter, making sure the apples are completely hidden. This creates a moist, hidden-layer effect that keeps the centre juicy.
Finally, lay the remaining slices on the very top of the cake. These will caramelise at the top and give a rustic finish once baked.
Tip: the sponge will rise around the fruit, creating pockets of tender apple that give the bake its characteristic texture.
- Layering ensures each slice contains a good balance of sponge and fruit.
- Spread the mixture evenly to help the flour and air bubbles work through the tin.
- Top slices caramelise lightly, adding extra flavour and visual appeal.
Baking to Golden Perfection
Keep an eye on the oven as the final stages of baking transform the batter into a deeply flavoured, golden brown loaf.
Testing for Doneness
Preheat oven to 180°C (160°C fan) and bake the loaf for about 1 ¼ hours. Check the colour: a rich golden brown top and slightly pulled-away sides are good signs.
Insert a skewer into the centre; it should emerge clean. If crumbs cling to the skewer, return the tin and bake a few more minutes.
If the top browns too quickly, tent loose foil over the tin for the last 10 minutes to prevent over-colouring while the inside finishes baking.
Cooling the Cake
Once removed from the oven, leave the tin to rest for 10 minutes. Cooling briefly in the tin helps the structure set and makes it easier to turn out.
After 10 minutes, transfer to a wire rack to cool completely. This prevents moisture building up on the top and keeps slices neat when you cut them.
| Stage | Temperature | Time | Check |
|---|---|---|---|
| Preheat oven | 180°C (160°C fan) | — | Ensure oven reaches temperature before placing tin |
| Bake | 180°C (160°C fan) | 1 ¼ hours | Golden brown top; sides pull from tin |
| Final check | — | Last 10 minutes | Skewer comes out clean; cover with foil if over-browning |
| Cooling | Room temp | 10 minutes in tin, then cool on rack | Firm centre and neat slices when cooled |
Serving Suggestions for a Warm Treat
When the loaf is still warm, a coat of cold cream brightens the spiced notes and melts slightly into the crumb.
Serve slices with a generous scoop of ice cream or a spoonful of crème fraîche for a classic finish. A warm drizzle of custard makes this apple dessert cake particularly cosy on a chilly day.
To restore that just-baked feel, reheat individual portions in the microwave for 20–30 minutes — actually 20–30 seconds is best for a single slice—so the centre becomes soft again.
- Serve warm to enhance the natural sweetness of the apples and buttery sponge.
- Choose ice cream or custard for a creamy contrast to the spiced loaf.
- Keep it simple for breakfast or present it as a refined dessert for guests.
| Serving | Why it works | Timing |
|---|---|---|
| Ice cream | Cold contrast highlights warm spice and sugar | Serve immediately with warm slice |
| Warm custard | Adds silky texture and extra warmth on a cold day | Pour just before serving |
| Crème fraîche or cream | Light acidity balances richness | Add a spoonful per portion |
Storing Your Cake for Maximum Freshness
Storing the finished loaf correctly helps preserve its texture and flavour.
Room temperature: Once fully cooled, place the slice or whole loaf in an airtight container. Kept out of direct heat and light, it will stay fresh for up to 3 days. This method preserves the soft crumb and the balance of sugar and butter in the sponge.
Refrigeration: For longer use, refrigerate for up to 5 days. Wrap the loaf tightly in cling film or foil before placing it in the tin or container. Chilling slows staling while keeping moisture in the crumb.
Freezing for later: Wrap individual portions or the whole loaf in plastic wrap, then foil. Label with the date and freeze. You can store the bake for up to 2 months. Thaw completely at room temperature before serving and do not refreeze once thawed.
Tip: label packages with the date so you can track the two-month limit for frozen portions.
| Method | Duration | How to store |
|---|---|---|
| Room temperature | Up to 3 days | Airtight container; cool and dry place |
| Refrigerator | Up to 5 days | Wrapped tightly in foil or cling film; place in tin or container |
| Freezer | Up to 2 months | Double wrap (plastic then foil); label with date; thaw at room temperature |
Expert Tips for a Lighter Texture
A pale, fluffy creamed mix is the single most important step to a tender, lifted loaf.
Cream butter and sugar until very light. This traps air that helps the sponge rise and keeps the top even.
Fold in flour gently to avoid knocking out the air. Overmixing makes a dense mixture and a heavy cake.
Replace a small portion of butter with Greek yoghurt for a lighter, lower-fat sponge. It keeps crumbs soft without losing flavour.

Tip: a pinch of salt balances the sugar and enhances the batter’s overall taste.
- Use firm cooking apples like Granny Smith so slices hold shape while baking.
- Check the correct amount of baking powder when using self-raising flour; too much will blow the sponge and then collapse.
- Bake in the centre of the oven for even heat and a reliable rise.
- Add a drop of almond extract or a few crushed almonds for subtle nutty depth.
| Issue | Fix | Why it matters |
|---|---|---|
| Dense crumb | Fold flour, don’t beat | Preserves trapped air for a lighter sponge |
| Mushy fruit | Use firm cooking apples, thin slices | Slices soften without collapsing the structure |
| Poor rise | Check tsp of baking powder/self-raising flour | Correct leavening gives steady lift and a neat top |
Conclusion
Follow a few careful steps and you will end up with a golden brown loaf that pleases at any teatime.
This recipe shows how simple ingredients and steady technique make a moist, fluffy sponge that balances the tartness of fresh apple and slices of fruit.
Use good-quality butter, proper self-raising flour and ripe apples. Take care when creaming and folding to keep the batter light.
Serve warm with custard or enjoy cold. You can freeze portions for up to 2 months so a golden brown treat is always ready to serve.
FAQ
What cake tin size should I use?
Which apples work best for baking?
Can I substitute self-raising flour with plain flour?
How do I know when the cake is cooked?
What temperature should I preheat the oven to for a fan oven?
How can I prevent the fruit from sinking to the bottom?
Is it better to cream butter and sugar by hand or with an electric mixer?
Can I add almonds or almond extract for extra flavour?
How long should the cake cool before slicing?
What are good serving options?
How should I store leftovers?
Can I freeze the cake and for how long?
Any tips to make the sponge lighter?
Can I reduce the sugar without affecting texture?
Is there a way to make the top more golden?
Mary Berry Apple Dessert Cake
This classic British bake brings homely charm to any kitchen. The recipe is straightforward and kind to busy cooks, making it a dependable choice for teatime or a family supper.
Ingredients
- 2 medium apples, peeled and sliced
- 225g self-raising flour
- 150-175g caster sugar
- 150g softened butter
- 2 quality eggs
- splash of milk
- 1 tsp baking powder (if using plain flour)
- few drops of almond extract or vanilla (optional)
- handful of chopped almonds (optional)
Method
- Preheat your oven to 180°C (160°C fan) or 350°F.
- Line the sides and bottom of an 8-inch cake tin with parchment paper.
- Cream the softened butter and caster sugar until pale and airy.
- Add the eggs one at a time, beating well after each addition.
- Gently fold in the self-raising flour and baking powder until just combined.
- Spread half of the batter evenly across the base of the prepared tin.
- Arrange half of the apple slices over the first layer of batter.
- Cover the apples with the remaining batter, ensuring the apples are completely hidden.
- Lay the remaining apple slices on top of the cake.
- Bake in the preheated oven for about 1 ¼ hours, or until golden brown and a skewer comes out clean.
- Allow the cake to cool in the tin for 10 minutes before transferring to a wire rack to cool completely.