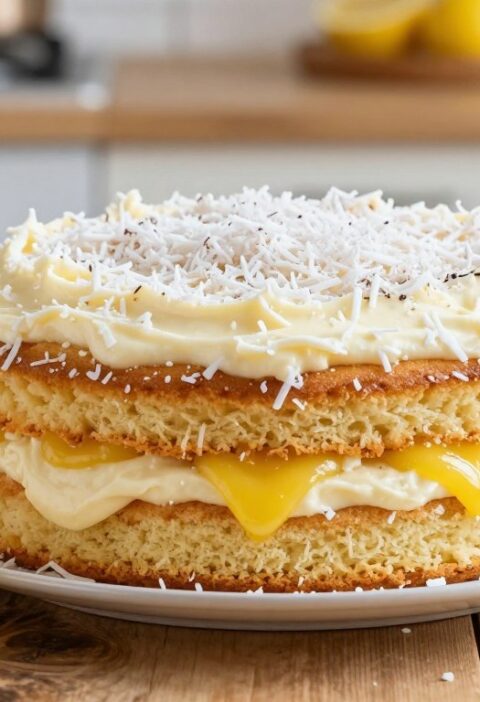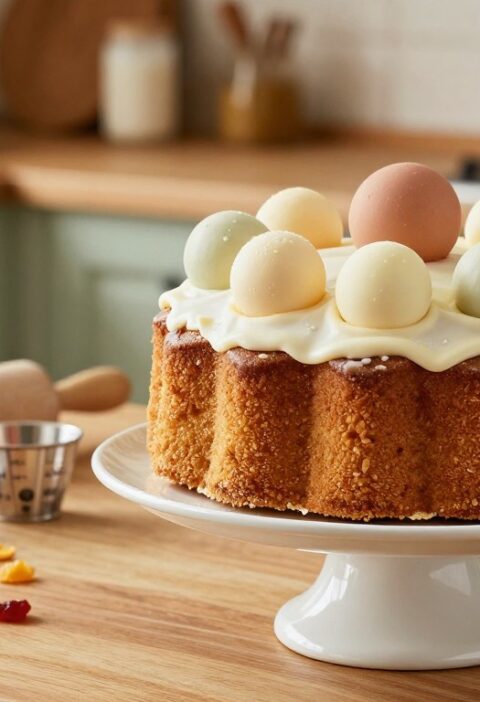
Simple, reliable and designed for two—this small-batch dessert comes from the trusted pages of Mary Berry’s Complete Cookbook, as shared by Marie Rayner.
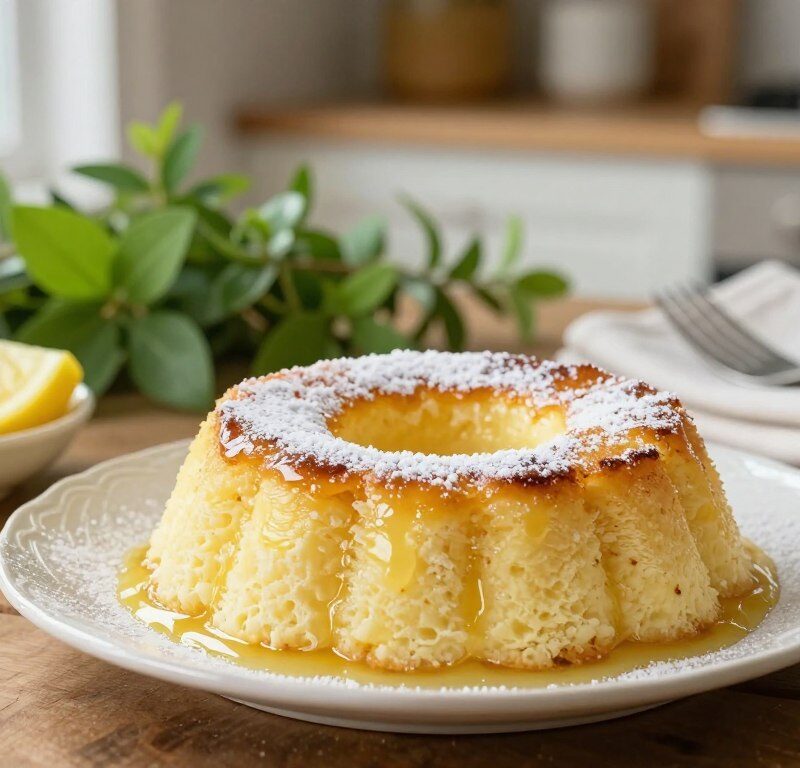
The recipe is a classic that creates a light sponge topping and a silky custard beneath while you bake. It uses basic pantry staples such as butter, caster sugar, flour, milk and an egg, with fresh lemon juice and zest to lift the flavour.
This dish is ideal when you need a winner in minutes. Prepare a 1/2 pint size dish and set your oven to the suggested temperature (typically 160C fan) to achieve a perfect rise and set.
Fail-proof for home bakers: the method is straightforward, scalable and dependable whether you are a beginner or confident baker. The result feels refined with minimal fuss.
Key Takeaways
- This recipe originates from the Berry Complete Cookbook, ensuring reliability for home cooks.
- Small batch serves two; scale up by adjusting the size of your baking dish.
- Basic ingredients—butter, caster sugar, flour, milk, egg and lemon—create impressive results.
- Use a 160C fan oven and a 1/2 pint dish for the classic small version.
- The method produces a sponge top and custard base in a single bake.
The Appeal of Mary Berry Magic Lemon Pudding
When baked, this dessert separates into two delightful layers: a fluffy sponge top and a silky custard base. The contrast between the airy sponge and the smooth sauce is instantly pleasing and easy to explain to guests.
Perfect for Sunday lunches and family dinners, this recipe from the berry complete cookbook feels both comforting and unfussy. It shines when you want a warm, light dessert that does not weigh the meal down.
The bake time is forgiving and the prep takes only about 15 minutes, so it works well when time is short. The top develops a gentle golden colour and the base stays fresh and gently sweet, making it ideal for serving with cream or fresh fruit.
- Two-layer effect: a risen sponge sits above a tangy sauce.
- Quick to make: minimal time, maximum impact.
- Family favourite: familiar, cosy and reliably enjoyable.
Understanding the Magic Behind the Sponge
During baking, contrast forms: an aerated cake layer rises and a denser custard collects beneath. This is not luck but science in action.
The Science of Separation
Density matters. The lighter sponge topping contains trapped air from the whisked whites, so it floats upwards. The heavier, citrus‑flavoured custard is denser and settles to the base.
Whisk egg whites to soft peaks so they carry enough air. Folding them into the base preserves bubbles that expand in the oven and lift the sponge topping.
Why It Is Called Self-Saucing
The term self-saucing describes how the sauce forms beneath the sponge without extra steps. Milk and lemon interact during baking to create a silky, tangy layer under the sponge.
- Correctly whisked whites add the air needed for rise.
- The mixture separates naturally by weight and heat.
- The result is a sponge topping above a sauce-like custard.
| Stage | What Happens | Tip |
|---|---|---|
| Mixing | Air incorporated into whites | Whisk to soft peaks |
| Baking | Sponge rises; custard settles | Use correct oven temperature |
| Serving | Sponge with silky sauce beneath | Serve warm for best texture |
Essential Ingredients for Your Pantry
With just a few cupboard essentials you can create a light sponge and a silky sauce in one bake.
Gather these measured items before you start. They keep the method simple and ensure the correct texture.
- 1oz (2 tbsp / 28g) butter, at room temperature — adds richness.
- 1/4 cup (45g) fine caster sugar for balanced sweetness.
- 1 large egg, separated — the whites give lift; the yolk adds body.
- 2 tbsp (15g) plain all-purpose flour to bind the sponge.
- 3 fl oz (83ml) whole milk for the silky sauce beneath the sponge.
- Finely grated zest and juice of 1/2 a large lemon for bright flavour.
A light dusting of icing sugar is optional when serving. Make sure ingredients are at room temperature so butter creams smoothly with sugar.
| Ingredient | Amount | Role |
|---|---|---|
| Butter | 1oz | Richness |
| Caster sugar | 45g | Sweetness |
| Egg (separated) | 1 | Structure & lift |
| Milk | 83ml | Moisture for sauce |
Preparing Your Baking Dish and Oven
Get the oven and container ready before you start mixing. This small step helps the bake set evenly and avoids over-browning of the top while the centre cooks through.

Correct Oven Temperatures
Preheat to 325°F / 160°C / gas mark 3. A properly preheated oven gives the sponge a steady lift and lets the sauce form beneath.
- Use a fan oven at 160C where possible to keep temperature consistent.
- Butter a 1/2 pint (1 1/4 cup) dish thoroughly so the sponge releases easily after baking.
- Place the baking dish inside a larger roasting tin to create a Bain Marie; this gentle heat is crucial for the delicate texture.
Allow everything to come to temperature and check the size of your dish before you begin. When the oven is at the correct heat, you can place the dish in the centre and bake in a preheated oven for about 25 to 30 minutes. This careful setup saves time later and helps you achieve the best lemon-scented result from the mary berry recipe.
Creaming the Butter and Sugar
Start with soft butter and caster sugar, beating until the texture looks light and airy. Add finely grated lemon zest while creaming so the oils blend into the fat. This step builds flavour and helps the sponge rise evenly.
Beat in the egg yolk, flour and a splash of lemon juice to form a smooth base. Work briefly so the mixture stays pale and glossy. Use room‑temperature butter for an easier, quicker result.
When you add the milk the mixture may look slightly curdled; this is normal. Keep stirring gently — the batter will come together as you fold in the whisked whites later.
- Ensure butter is soft but not melted to ease creaming.
- Use fine caster sugar for a lighter texture.
- Grate zest directly into the bowl to capture the oils.
| Action | Why it matters | Quick tip |
|---|---|---|
| Cream butter & sugar | Incorporates air for lift | Beat 2–3 minutes until pale |
| Add zest & juice | Distributes citrus flavour | Grate zest straight over bowl |
| Mix in yolk, flour & milk | Forms the batter base | Don’t overwork after adding milk |
Incorporating the Egg Yolks and Flour
Introduce the egg yolks gradually and alternate flour with milk to avoid lumps and overworking.
Beat the egg yolks in one at a time. This steadies the creamed butter and sugar and keeps the batter smooth.
Add the flour a spoonful at a time, alternating with small splashes of milk. The alternating method prevents lumps and gives a silkier mixture.
Stir in the lemon juice and a little lemon zest carefully so the acid balances the richness of the eggs and butter.
Scrape down the sides of your mixing dish often to ensure every bit of flour and yolk is folded into the batter. When all milk is added, the batter should be thin and smooth—ready for the next stage.
- Beat yolks one by one to keep stability.
- Alternate flour and milk to avoid lumps.
- Ensure zest and juice are well distributed.
| Step | Action | Why it matters |
|---|---|---|
| Yolks | Beat in individually | Maintains creamed texture |
| Flour & Milk | Alternate additions | Prevents lumps; smooth batter |
| Zest & Juice | Add carefully | Balances richness; adds aroma |
Whisking the Egg Whites to Perfection
A few careful minutes with an electric whisk transforms plain whites into a glossy, airy mass.
Use room temperature egg whites whenever possible. They beat up lighter and fuller than cold ones, making it easier to trap air for the sponge topping.
Whisk egg whites until they form stiff peaks but stay glossy. Be careful not to over-whisk — dry, grainy whites will sink and lose volume.
“The whites should hold their shape when you lift the whisk — that is your cue to stop.”
- Quick check: peaks should stand but bend slightly at the tip.
- Timing: this typically takes a few minutes with a reliable electric whisk.
- Hygiene tip: use a perfectly clean, dry bowl — any grease will prevent proper rise.
| Step | What to look for | Tip |
|---|---|---|
| Start | Room temperature whites | Separate eggs carefully |
| Whisk | Glossy, stiff peaks | Use an electric whisk on medium |
| Finish | Hold shape, not dry | Fold in immediately to keep air |
Folding Techniques for an Airy Texture
Gently folding the whites into the batter is the final, most delicate step to secure a lofty sponge.
Use a large metal spoon or flexible spatula and work with a slow, sweeping motion. Cut down through the centre, lift the mixture from the bottom and fold over the top. This preserves the air you created when you whisked the egg whites.
Take care not to knock out the bubbles. Stop as soon as the streaks disappear; over-mixing gives a denser result. The mixture should remain light and airy, ready to rise in the oven.
When combined, pour the batter evenly into your prepared dish. A gentle tap on the worktop settles the surface and helps even cooking during baking.

- Fold until just combined to keep volume.
- Use brief, patient motions rather than rapid stirring.
- Ensure the batter spreads evenly in the dish for consistent baking.
Using a Bain Marie for Even Cooking
A bain marie gives steady, gentle heat so the sponge rises evenly and the sauce stays silky.
Place your prepared dish into a roasting tin and pour hot water around it. The water should come halfway up the side of the baking dish.
This method keeps the dessert soft, rich and unctuous. It prevents the edges from cooking too fast while the centre sets.
Set the oven to a preheated fan temperature and bake for 25 to 30 minutes. You’ll know it is ready when the sponge feels springy and is light golden.
“Handle the roasting tin carefully when lifting to avoid splashes—hot water can ruin the top and waste time.”
- Use hot water to speed heat transfer.
- Keep water level at half the dish height for even cooking.
- Check for springy sponge and gentle colour after the allocated minutes.
| Action | Why | Tip |
|---|---|---|
| Place dish in roasting tin | Creates a water bath for gentle heat | Pour hot water slowly to avoid splashes |
| Water level | Halfway up the dish | Ensures even sides and centre |
| Bake time | 25–30 minutes | Use a preheated fan oven for consistency |
Serving Suggestions for a Tangy Treat
A few simple finishing touches lift this classic into a memorable, tangy treat. Serve warm and spoon straight into individual bowls so every guest gets the soft sponge and silky sauce together.
Adding Double Cream
Drizzle a little double cream over each portion for richness. The cream softens the tart edges and complements the citrus notes.
Alternatively, add a neat dollop of freshly whipped cream for a lighter finish that still feels indulgent.
Fresh Fruit Garnishes
Bright berries and small fruit segments add colour and a fresh contrast to the warm sponge. Scatter a few on top or around the rim of the dish for a smart finish.
Serving Warm
Always serve warm. Warmth keeps the sauce loose and the sponge tender. Reheat gently for a few minutes if needed so the texture returns.
- Spoon into bowls to serve warm and inviting portions.
- Dust with icing sugar for a pretty, sweet balance to the tangy lemon juice and zest.
- A light drizzle of cream or a dollop of whipped cream lifts the experience.
“Serve warm to enjoy the sponge and sauce at their best.”
Storage and Reheating Advice
Treat leftovers gently — they will still taste excellent the next day. The dessert is best enjoyed on the day of baking, but you can save any portions for short-term storage.
Cover the dish well and refrigerate for up to 24 hours to preserve the layers and prevent the sponge from drying out or picking up other flavours.
When reheating, be gentle. Use a low oven for a few minutes so the texture returns without overcooking. Alternatively, microwave portions for short bursts of time until just warm — check every 15–30 seconds.
Portion size affects reheating time. Smaller servings heat faster, so monitor them to avoid a tough top or scalded sauce. If you dusted with icing sugar, it may dissolve in the fridge; add a fresh sprinkle before serving.
| Action | Why it matters | Quick tip |
|---|---|---|
| Refrigerate (up to 24 hours) | Maintains texture and flavour | Cover the dish tightly |
| Low oven reheat | Even warming without drying | Warm for a few minutes until just hot |
| Microwave reheat | Fast, but watch the top | Heat in short bursts and rest |
Conclusion
This final note invites you to turn a few pantry staples into a memorable family dessert. Use creaming, gentle folding and a bain marie for reliable results.
The mary berry magic lemon pudding shows that simple ingredients — sugar, egg, milk and flour — can form something impressive. Whisk egg whites carefully and bake in a preheated oven so the sponge topping rises and the sauce forms beneath in minutes.
Serve warm with a little cream or a dusting of icing for the best finish. With short prep time and straightforward baking, this lemon pudding will become a favourite at your table.
FAQ
What makes this magic lemon pudding so special?
What are the essential ingredients I should keep in my pantry?
How important is the oven temperature and baking time?
Why does the recipe call for whisking egg whites separately?
Can I use a bain-marie, and when should I use one?
How do I fold the whites without losing air?
Is creaming butter and sugar necessary for this pudding?
Can I make this in individual ramekins or one large dish?
How should I serve the pudding for the best taste?
Can I make the pudding ahead and reheat it?
What adjustments are needed for high-altitude or fan ovens?
Is there a gluten-free option for this recipe?
How do I prevent the sponge from becoming soggy?
Can I reduce sugar without losing structure?
Mary Berry Magic Lemon Pudding
A classic dessert that creates a light sponge topping and a silky custard beneath while you bake, perfect for two.
Ingredients
- 1 oz (2 tbsp / 28g) butter, at room temperature
- 1/4 cup (45g) fine caster sugar
- 1 large egg, separated
- 2 tbsp (15g) plain all-purpose flour
- 3 fl oz (83ml) whole milk
- Finely grated zest and juice of 1/2 a large lemon
Method
- Preheat the oven to 160C (325F). Butter a 1/2 pint dish and place it in a larger roasting tin.
- In a bowl, cream the butter and sugar until light and airy. Add the lemon zest and mix well.
- Beat in the egg yolk, flour, and a splash of lemon juice to form a smooth batter.
- In a separate bowl, whisk the egg whites until they form stiff peaks.
- Gently fold the egg whites into the batter until just combined.
- Pour the mixture into the prepared dish and tap gently to settle.
- Pour hot water into the roasting tin until it comes halfway up the sides of the dish.
- Bake for 25-30 minutes until the sponge is golden and springy.
- Serve warm, optionally dusted with icing sugar and accompanied by cream or fresh fruit.