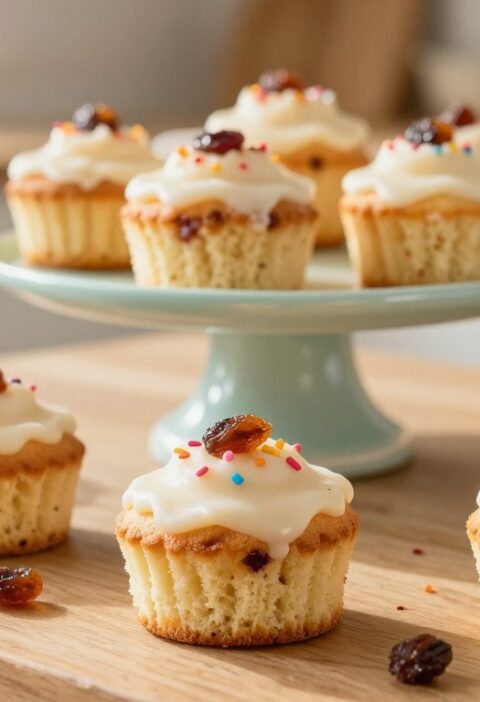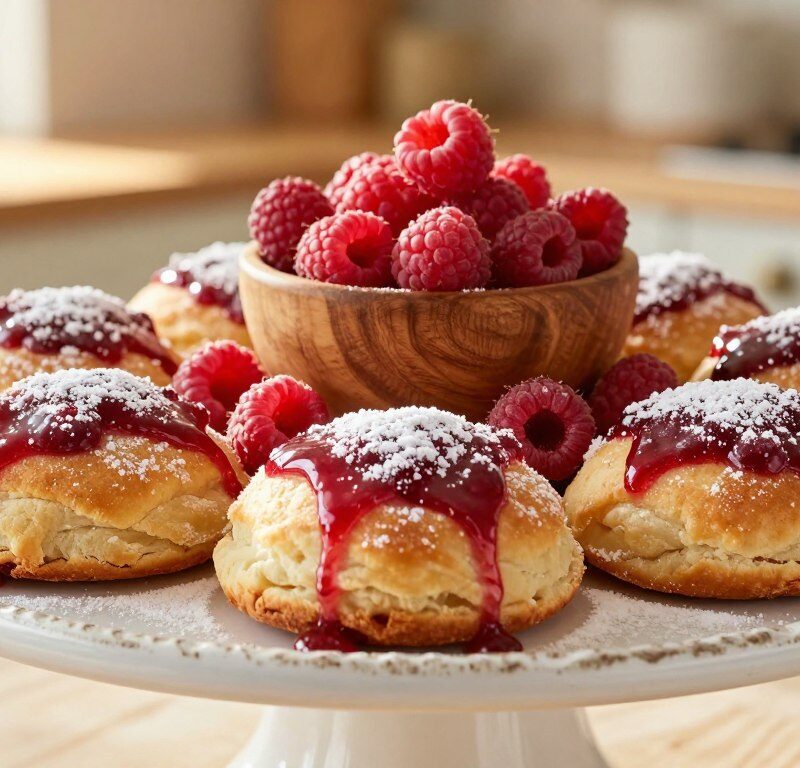
Mary Berry Raspberry Buns are a classic British treat that combine a light, buttery crumb with the gentle sharpness of fresh raspberry. This simple bake brings a familiar, comforting flavour to your kitchen with very little fuss.
This recipe is designed for beginners and seasoned home cooks alike. With minimal resting time, you can mix, shape and bake in one relaxed session. The method keeps ingredients straightforward so the result is soft, tender buns every time.
Perfect for afternoon tea, these rolls pair wonderfully with a hot cup and make a lovely addition to a weekend spread. Follow a few clear steps and you will enjoy a fruit-scented treat that honours traditional British baking.
Key Takeaways
- Simple, beginner-friendly recipe for a classic teatime treat.
- Light texture with a subtle raspberry note.
- Quick to prepare — minimal resting time needed.
- Ideal served warm with a cup of tea.
- Great for weekend baking or an easy family dessert.
The Charm of Mary Berry Raspberry Buns
A cake-style batter gives each bun a soft, airy bite that feels much more refined than usual rolls. The result is a light crumb that melts on the tongue and showcases the fruit within.
Balanced sweetness is key. The natural sharpness of the raspberry cuts through sugar, so the flavour stays bright rather than cloying. A spoonful of jam or a few fresh berries adds colour and cheer to each bun.
These raspberry buns often evoke warm memories of family teatimes. Serving a warm bun with a cup of strong tea turns a simple bake into a comforting ritual.
Because the method uses a quick batter instead of yeast, these treats are reliable and fast. Focus on good ingredients and you will get a consistent golden top and an airy texture.
| Feature | Why it matters | Result |
|---|---|---|
| Light batter | Gives quick rise and tender crumb | Soft, cake-like bun |
| Fresh fruit or jam | Balances sweetness and adds colour | Bright, flavourful centre |
| Simple method | Less hands-on time than yeast bakes | Perfect for family teatime |
Essential Ingredients for Your Baking
Start by laying out every ingredient to keep the process smooth and stress-free. A tidy workspace helps you measure accurately and avoid mistakes when making raspberry buns.
Dry Ingredients
What you need:
- 200g self-raising flour — this gives lift and a light crumb.
- 100g caster sugar — use fine caster sugar for the best texture.
- A pinch of salt to balance the sweetness.
Wet Ingredients
Combine these for a soft batter:
- 100g unsalted butter, softened so it creams easily with the sugar.
- 2 large eggs, beaten.
- 2 tablespoons milk and 1 teaspoon vanilla extract to bind the mixture.
- Optional: a small spoonful of jam for a fruity centre or a few fresh raspberry for bursts of flavour.
Top tips: Ensure butter is at room temperature for a smooth dough. Measure flour carefully; too much makes a heavy bun, too little and the mixture won’t hold its shape.
Necessary Kitchen Equipment
A few well-chosen tools save time and lift results when you bake.
Start with a large mixing bowl. It gives plenty of room to cream butter and caster sugar and to fold in flour without losing air.
Choose a reliable baking tray and line it with greaseproof paper. A prepared baking tray means your buns will bake evenly and won’t stick.
Have an electric hand mixer or a sturdy wooden spoon. Either one will help you reach the smooth consistency needed for the dough.
- Cooling rack — lets air circulate so the bases stay crisp, not soggy.
- Teaspoon — perfect for making a small well if you add jam to each bun.
- Muffin tray — optional, but useful for uniform shape; a flat tray works too.
Ensure all equipment is clean and dry before you begin. Preparing your tray and tools in advance helps you move quickly once the dough is ready and improves the final rise.
Preparing the Oven and Trays
Get your oven and trays ready before you mix anything so the bake can go straight from bowl to heat. This simple step saves time and helps the dough set correctly as soon as it enters the oven.
Temperature settings
Preheat to 180°C (160°C fan) so the heat is steady when the tray goes in. Use an oven thermometer if you suspect your appliance runs hot or cold.
Fan ovens can run warmer. Reduce the setting to 160°C for a fan-assisted oven and check results the first time you try this recipe.
- Line the baking tray with high-quality greaseproof paper to stop sticking and ease cleaning.
- Place the shelf in the middle to promote even circulation of heat around each bun.
- Preparing tray and oven beforehand means the whole baking time is predictable and reliable.
| Task | Why it matters | Quick tip |
|---|---|---|
| Preheat to correct temperature | Ensures even bake and sets the crumb | 180°C (160°C fan); use thermometer |
| Line baking tray | Prevents sticking and eases cleanup | Use greaseproof paper, smooth edges |
| Position shelf | Promotes steady heat circulation | Middle shelf gives best, even colour |
Creaming Butter and Sugar
A fluffy texture starts the moment you cream the butter and sugar together.
Creaming traps air and this is what gives raspberry buns their signature light crumb. Use 100g unsalted butter and 100g caster sugar. Beat them with an electric mixer until the mixture is pale and noticeably increased in volume.
Take your time here. A rushed creaming stage can leave the dough heavy and greasy. Stop occasionally to scrape down the sides of the bowl so every bit of butter and sugar is folded in.
If you prefer the school-style method, rub butter into the flour and sugar until it looks like fine breadcrumbs. That approach also works but gives a slightly different texture to the bun.
When the mixture is ready it should look light and creamy. That signals you can add eggs, jam or other flavourings and fold in the flour without losing the air you have trapped.
| Step | Why it matters | Quick tip |
|---|---|---|
| Cream butter & caster sugar | Traps air for a light texture | Beat until pale and fluffy |
| Scrape the bowl | Ensures even mixing | Use a spatula between bursts |
| Rub-in alternative | Gives crumbly, short texture | Use for traditional school-style recipe |
Incorporating Eggs and Flavourings
Introduce the eggs one at a time, beating until each is fully blended before adding the next. This keeps the mixture smooth and protects the structure of the dough.
After the eggs, stir in a teaspoon of vanilla and two tablespoons of milk very gently. Use a wooden spoon if you prefer tactile control; it helps you feel when the batter is just right.
If you used the rub butter method, add the beaten eggs and milk only until a soft, non-sticky ball forms. Be careful not to add too much liquid — a wet dough will be hard to shape and to place on the tray for baking.
Fold in a spoonful of jam or a few fresh raspberry if you like, and taste for balance with the sugar. When the mixture looks homogenous in the bowl, it is ready for the final flour and fruit additions before the oven.
- Tip: Beat eggs slowly to avoid curdling.
- Tip: Aim for a light, stable batter rather than a heavy dough ball.
Folding in the Flour
Now comes the delicate step: folding in flour so the texture stays tender.
Sift the flour into the bowl to remove lumps and keep the mixture smooth. Use self-raising flour for ease, or add a teaspoon of baking powder if you use plain flour.
Fold with a large metal spoon or spatula. Use a gentle cutting and folding motion. This protects the air trapped during creaming and keeps the crumb light.
Avoid overmixing. Stop as soon as the flour disappears; continued stirring makes the dough tough.
When the dough looks soft and slightly sticky, it is ready. Divide it into even portions so each ball bakes at the same rate in the oven.
Keep the total folding time short — a few quick minutes is enough. The result is a tender crumb ready for jam or fresh raspberry additions before baking.
Adding Raspberries for a Burst of Flavour
Gently fold 150g of fresh or frozen raspberries into the batter so they remain mostly whole. This preserves the bright, sharp notes that cut through the sugar and lift the overall sweetness.
If using frozen fruit, fold them in straight from the freezer. Do not thaw first, which can stain the dough and make the mix watery. Tossing the fruit in a little flour before adding them helps stop the berries sinking to the bottom.
For a jam-filled version, skip fresh fruit and make a small well in each dough ball to hold a teaspoon of jam. That gives a neat, jammy centre without altering the batter texture.
Handle the dough with care during this final addition so the fruit stays evenly distributed. The berries will soften and break a little while baking, creating delicious pockets of jammy goodness that keep each bun moist.

| Tip | Why it helps | Quick result |
|---|---|---|
| Toss fruit in flour | Prevents sinking | Even fruit distribution |
| Use frozen unthawed | Stops colour bleeding | Clean, bright crumb |
| Create jam well | Keeps jam contained | Neat jam centre in each ball |
Baking to Golden Perfection
Slide the tray into the preheated oven and set a timer to guard the bake. Bake for 18–22 minutes until the tops are lightly golden brown and springy to the touch.
Use a reliable timer: every oven behaves differently, so oven minutes can vary. The smell of baking is a good hint, but always test for doneness rather than rely on scent alone.
When the buns are ready, remove them from the baking tray without delay and place them on a wire rack to cool slightly. Leaving them on the hot baking tray will carry on cooking the bases and can dry the crumb.
- Check texture: a perfect bun feels light for its size and gives slightly when pressed.
- Appearance: the golden brown top shows the sugar has caramelised, adding depth to the flavour.
- Serve: best enjoyed warm with a cup of strong tea, or split and spread with a little jam.
| Task | Why it matters | Quick tip |
|---|---|---|
| Timing | Prevents undercooking or drying out | Set timer for 18–22 minutes |
| Cooling | Stops residual heat overcooking the dough | Move to a wire rack straight away |
| Final check | Ensures soft, airy interior with golden crust | Press gently; tops should spring back |
Troubleshooting Common Baking Issues
A few simple checks will solve most problems that occur during baking. Read these tips to get lighter results, avoid sinking fruit and test for doneness with confidence.
Preventing Dense Texture
If your buns turn out dense, it is usually because the dough was overmixed or the flour was folded in too aggressively. Stop folding as soon as the flour vanishes.
Also check your fat and protein balance: too much liquid or extra mixing breaks down air pockets. For a lower‑fat option, try reduced‑fat butter or semi‑skimmed milk, but expect a slightly different texture.
Avoiding Sinking Fruit
To stop fruit sinking, toss fresh or frozen raspberry in a teaspoon of flour before folding them in. This helps the pieces stay suspended throughout the batter.
For jam centres, use a thick jam and seal the dough firmly around the filling to prevent leakage during the baking stage.
Checking Doneness
Insert a skewer into the centre of a bun; it should come out clean or with a few moist crumbs. If tops go too dark, your oven may run hot — check the temperature.
Aiming for a pale golden brown and using correct oven minutes (18–22) usually gives a light interior with balanced sweetness.
| Problem | Likely cause | Quick fix |
|---|---|---|
| Dense texture | Overmixing or too much flour | Fold gently; measure flour accurately |
| Sinking fruit | Untreated berries or heavy filling | Toss fruit in flour; use thick jam |
| Over‑browning | High oven temperature | Check oven thermometer; reduce by 10–20°C |
Creative Variations to Try
Experimenting with fillings and toppings is an easy way to personalise the bake.
Swap the jam for strawberry, blueberry or blackcurrant to change the fruity note. Try a teaspoon of jam in the centre for a neat, jam-filled version that kids adore.
For extra indulgence, fold in 50g white chocolate chips — they contrast nicely with a tart raspberry hit. Add a little lemon zest to the dough for a fresh, citrus lift.
Sprinkle flaked almonds for crunch or use light brown sugar instead of caster sugar for a deeper, caramel taste. Small changes will alter baking time, so check the tray a few minutes early.
| Variation | Effect on flavour/texture | Quick tip |
|---|---|---|
| Different berry jam | New fruity note, bright colour | Use thick jam, seal dough well |
| White chocolate chips | Sweet, creamy pockets | Fold in gently to avoid melting |
| Lemon zest in dough | Fresh, tangy lift | Add 1 tsp finely grated zest |
| Flaked almonds / brown sugar | Crunch and caramel depth | Watch for quicker browning |
Storing Your Buns for Freshness
A little care after baking preserves the soft crumb and jam pockets. Let each bun cool fully on a wire rack before you pack them. Cooling prevents trapped steam and keeps the texture light.

Freezing for Later
If you want to keep buns longer, wrap each one well and place them in an airtight container or a freezer bag. Freeze for up to two months and label with the date.
To refresh frozen bakes, warm them in a low oven at 150°C for 5–7 minutes. This restores softness without overcooking the jam or melting the butter into the crumb.
- Store cooled buns in an airtight container at room temperature for up to 2 days.
- For up to 4 days, keep them chilled in an airtight container in the fridge.
- Never place warm buns into a sealed box — the trapped moisture makes them soggy.
- If slightly dry, a 10–15 second microwave blast will soften the crumb; check the dough first.
| Storage method | Duration | Reheat tip |
|---|---|---|
| Room temperature, airtight container | Up to 2 days | No reheat needed; serve warm if preferred |
| Refrigerator, airtight container | Up to 4 days | Warm for 3–5 minutes at 150°C on a tray |
| Freezer, wrapped + airtight container | Up to 2 months | Defrost then warm 5–7 minutes at 150°C |
Conclusion
Few treats match the comfort of freshly baked rolls shared over a cup of tea. Follow this recipe and you will master light, fluffy buns that please a hungry family.
Choose the fresh fruit or jam‑filled version for contrast, and use a spoonful of raspberry jam if you prefer a sweet centre. Handle the batter gently and favour good ingredients for the best texture.
Once cooled, store your bake in an airtight container to keep them fresh for several days. Enjoy warm with a hot cup and share the results — we hope this guide inspires you to bake and to tell us how your own version turns out.
FAQ
What ingredients do I need for the classic raspberry jam buns?
How should I prepare the oven and baking tray?
What is the best method for creaming butter and sugar?
How do I avoid dense buns?
Can I use frozen raspberries instead of fresh?
How do I stop fruit from sinking to the bottom?
How long should I bake the buns until golden?
How do I check doneness without drying them out?
What storage method keeps buns fresh best?
Can I freeze these jam buns for later?
Are there simple variations to change the flavour?
What equipment is essential for consistent results?
Any tips for getting a light, tender crumb?
Mary Berry Raspberry Buns
Mary Berry Raspberry Buns are a classic British treat that combine a light, buttery crumb with the gentle sharpness of fresh raspberry. This simple bake brings a familiar, comforting flavour to your kitchen with very little fuss.
Ingredients
- 200g self-raising flour
- 100g caster sugar
- A pinch of salt
- 100g unsalted butter, softened
- 2 large eggs, beaten
- 2 tablespoons milk
- 1 teaspoon vanilla extract
- 150g fresh or frozen raspberries
- Optional: a small spoonful of jam
Method
- Preheat the oven to 180°C (160°C fan) and line a baking tray with greaseproof paper.
- In a large mixing bowl, cream together the softened butter and caster sugar until pale and fluffy.
- Add the beaten eggs one at a time, mixing well after each addition.
- Stir in the milk and vanilla extract gently until combined.
- Sift in the self-raising flour and fold it into the mixture carefully to maintain air in the batter.
- Gently fold in the raspberries, ensuring they remain mostly whole.
- Divide the mixture into even portions and place them on the prepared baking tray.
- Bake in the preheated oven for 18-22 minutes until the tops are lightly golden brown and springy to the touch.
- Remove from the oven and transfer to a wire rack to cool slightly before serving.