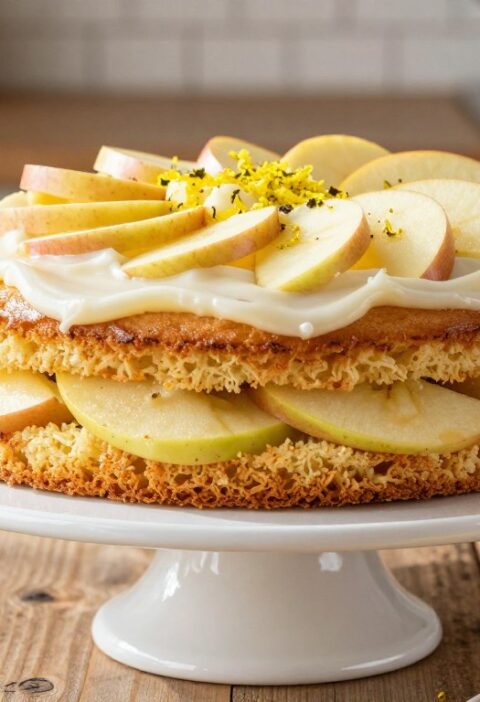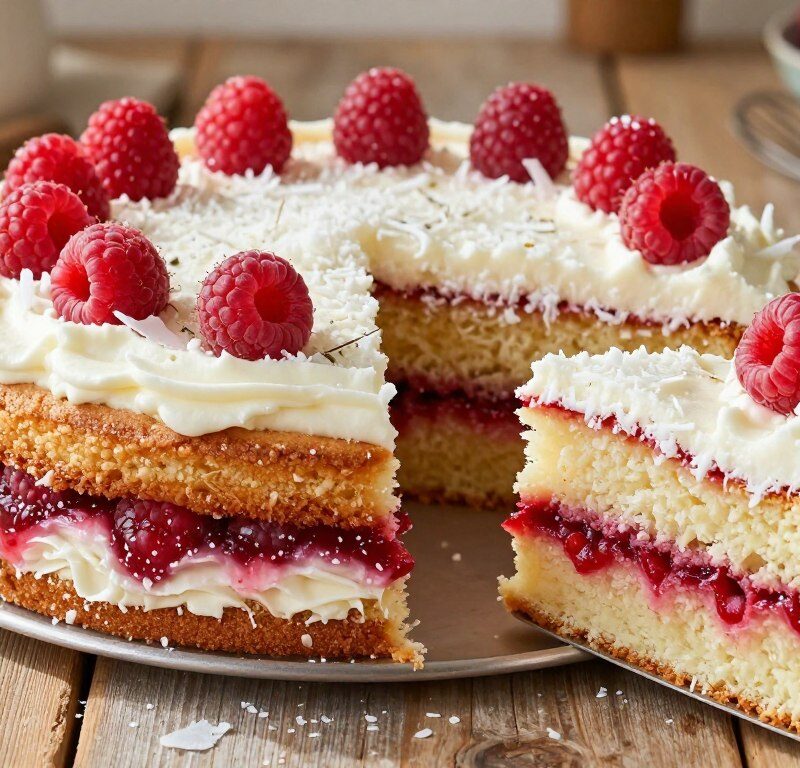
This softly textured sponge brings together the sharp freshness of raspberries with the gentle sweetness of desiccated coconut.
It is a quintessential British bake that suits a casual afternoon treat or a small celebration. The method is reliable and straightforward, ideal for home bakers who value consistent results.
The crumb is light and moist, thanks to the balance of fruit and coconut. When you follow this recipe, you use a proven approach honed by years of professional baking experience.
Key Takeaways
- The recipe produces a light, moist sponge that highlights fresh raspberries.
- Simple steps make it suitable for home baking and for those learning to bake.
- Desiccated coconut adds gentle sweetness and texture without overpowering the fruit.
- Following the method helps achieve consistent results every time.
- It represents a classic British bake that works for many occasions.
The Appeal of a Classic Mary Berry Raspberry And Coconut Cake
The recipe achieves a pleasing contrast: zingy fruit pockets set against an evenly tender, coconut-tinged sponge.
Raspberries give little bursts of freshness, while the shredded coconut keeps the crumb moist and soft. This balance creates a light texture that stays pleasant to eat over several days.
It suits an afternoon tea or a casual family gathering. A slice with coffee makes a simple, refined moment in busy time.
- Bright fruit cuts through gentle sweetness to keep each mouthful lively.
- Stays moist for up to three days, so it’s handy for baking ahead.
- Light sponge means it feels delicate rather than heavy at tea.
| Occasion | Texture | Storage |
|---|---|---|
| Afternoon tea | Light and tender | Fresh for 3 days |
| Family gathering | Moist crumb | Keep covered at room temperature |
| Make-ahead treat | Evenly textured | Freeze slices for longer |
Essential Ingredients for Your Sponge
Gathering the right pantry items sets the tone for a reliable sponge every time.
Dry pantry staples
Measure accurately before you start. For a classic Mary Berry inspired bake you need self-raising flour and a light leavening touch from baking powder.
- 175 g self-raising flour
- 175 g caster sugar
- A pinch of baking powder
Fresh produce
Use room-temperature eggs and soft unsalted butter to help the batter emulsify properly.
- 175 g unsalted butter, softened
- 3 large eggs
- 150 g fresh or frozen raspberries and 75 g desiccated coconut
Tip: Accurate weighing is the first step to a consistent result and makes the next step far easier.
| Ingredient | Amount | Role |
|---|---|---|
| Unsalted butter | 175 g | Fat for structure and flavour |
| Self-raising flour | 175 g | Framework for the sponge |
| Raspberries | 150 g | Fresh acidity and fruit pockets |
Preparing Your Kitchen and Equipment
A tidy kitchen and the right tools make baking this sponge far easier.
Preheat the oven to 180°C (160°C fan) so the temperature is steady before the batter goes in. This simple first step helps the sponge rise evenly.
Choose a 900 g loaf tin or a 20 cm round cake tin to ensure even baking through the centre. Line the tin with parchment paper or tin parchment for a clean release.
- Use a large mixing bowl so you can beat butter and sugar without spillover.
- Bring unsalted butter to room temperature for a smooth emulsion.
- Arrange all ingredients nearby to follow each step of the recipe calmly.
Final tip: prepare your bowl and tin first. Proper kit prep is a hallmark of the methodical approach favoured by mary berry and saves time during baking.
Creaming the Butter and Sugar
Begin with a gentle but thorough beating of butter and caster sugar to introduce air. This first action sets the base for a light, even cake sponge.
Achieving the Perfect Texture
Use a large mixing bowl so you have room to whip the butter without spillover. Softened butter at room temperature blends more quickly with caster sugar.
Beat until pale and fluffy. A pale, airy butter sugar combination traps air that will lift the batter during baking.
- Start on a low speed, then raise the mixer to medium for two to three minutes.
- Gradually add the eggs to keep the emulsion stable.
- Fold in self-raising flour with a pinch of baking powder to retain the aeration.
This careful creaming step supports the later addition of coconut and raspberries and helps produce a consistently light crumb. Patience here makes the next steps far easier and improves the final texture.
Incorporating Eggs and Vanilla
Add the eggs slowly, letting each one blend fully so the batter stays smooth and airy. Work at a steady mixer speed and stop to scrape the sides of the bowl between additions.
If the mixture looks like it is curdling, rescue it by stirring in a tablespoon of measured flour. This quick stabiliser helps the emulsion re-form and keeps the texture even.
Once all the eggs are incorporated, fold in a small amount of vanilla extract. Stir gently so the aroma spreads through the batter without knocking out the air you have created.
- Add the eggs one at a time, fully combining each before the next.
- Use a tablespoon of flour to stabilise a curdled mix.
- Keep a constant mixer speed to preserve aeration.
“A calm approach at this stage guarantees an even, reliable sponge and a light final crumb.”
Folding in the Dry Ingredients
Work gently now: the way you combine dry ingredients decides the sponge’s final texture.
Start by sifting the self-raising flour with a pinch of baking powder into a bowl. Add the desiccated coconut so it can spread through the dry mix.
Use a large metal spoon or a silicone spatula. Fold the flour and coconut into the creamed butter and caster sugar in stages.
Add flour gradually to avoid overworking the batter. Too much mixing will flatten the air you created and produce a dense cake.
The goal is an even distribution of coconut so every slice has the same flavour and slight texture throughout.
When the batter looks thick and homogenous, it is ready for the fresh raspberries. Handle the mixture with care to keep the light crumb.
“Gentle folding preserves the air that lifts the sponge and delivers a reliable bake.”
Preparing Raspberries to Prevent Sinking
Lightly coating the fruit in flour is a tiny step that makes a big difference to the final top of the cake. Toss your raspberries in a teaspoon of flour so each berry gets a faint dusting before it meets the batter.
This simple move helps the berries stay suspended as the sponge rises in the oven. The light coating grips the outer surface and reduces the chance of the fruit sliding to the bottom of the tin.
Make sure your tin parchment or parchment paper sits neatly in the cake tin. A well-fitted lining gives the batter a clean surface and keeps the fruit where you want it.
- To prevent sinking, toss raspberries with a teaspoon of flour.
- Fold the berries into the batter with extreme care to avoid breaking them.
- This step improves the cake’s top appearance and ensures even fruit distribution.
mary berry often recommends this method for fruit sponges. It takes only a minute or two, yet it changes the way the finished bake looks and slices.
Combining the Batter and Fruit
With the fruit folded through, the batter takes on a lively hue and scent that promises a bright bake. This is the moment to decide whether to keep the bake simple or add a small twist.
Adding Chocolate Chips
If you want a richer profile, gently stir in a handful of dark chocolate chips. They contrast nicely with the tart raspberries and the subtle texture of desiccated coconut.
Use no more than 75 g so the chips do not weigh the batter down. Fold them in lightly to keep the air you created during creaming.
Achieving a Smooth Batter
Pour the mixture into the lined tin and level the top with a spatula. A smooth surface helps the cake bake evenly from centre to edge.
Take your time to ensure the fruit and coconut distribute evenly. Mary Berry advises smoothing the top as the final step before baking.
| Action | Why it matters | Tip |
|---|---|---|
| Fold raspberries in gently | Prevents crushing and sinking | Use a wide spatula and work from the base |
| Add dark chocolate chips | Adds depth and contrast | Limit to one small handful (≈75 g) |
| Smooth and level batter | Ensures even rise and neat top | Run a spatula across the tin before baking |
Once the tin is ready, slide it into the preheated oven. If you’d like the original recipe details and ingredient notes, see the full version at Mary Berry coconut recipe.
Baking to Golden Perfection
Slide the lined tin into the centre of the preheated oven and bake steadily for 45 to 50 minutes until the top is a warm golden colour.
Check doneness by inserting a skewer into the centre: it should come out clean, showing the sponge has cooked through. The top should spring back when lightly pressed — a reliable sign the bake is ready.
Keep parchment paper or tin parchment clear of the oven’s heating elements. If paper touches hot places it can scorch, so make sure the lining sits neatly inside the cake tin.
The steady heat protects the light crumb and lets the coconut and raspberries bake evenly. Monitor the minutes closely: even a small change in time can affect moisture and texture.
Tip: If the top browns too quickly, lay a sheet of foil loosely over the tin for the last 10 minutes to stop further colouring while the centre finishes.
“A steady oven and a calm check at the right time are the simplest guarantees of a perfect home bake.”
Cooling and Resting the Cake
A calm cooling stage is the secret that preserves the top and crumb after baking.
Once the skewer comes clean, leave the tin on a wire rack for at least 10 minutes. This brief rest helps the sponge set so it won’t break when you turn it out.
After those minutes, run a knife around the edge and gently transfer the loaf to a wire rack to cool fully at room temperature. Cooling slowly allows the flour and sugar to settle and the batter structure to finish firming up.
If you try to remove the loaf too soon the delicate crumb may tear and the raspberries can sink or smear. Patience at this step is as important as careful mixing.
“Allowing a cake to cool properly protects the texture and improves slicing.”
mary berry often stresses that resting matters. When completely cool the top will feel firm and the interior will be ready to serve.

| Action | Why it matters | Timing |
|---|---|---|
| Rest in tin | Prevents collapse when unmoulding | Minimum 10 minutes |
| Transfer to wire rack | Even cooling at room temperature | Until fully cool (approx 1–2 hours) |
| Check with skewer | Confirms the bake comes clean | Before resting |
Adding the Finishing Touches
Small finishing details give the bake a polished look without fuss. A light dusting of icing sugar across the top adds instant appeal and a touch of sweetness.
For serving, place a neat spoonful of freshly whipped cream beside each slice. The cool cream complements tart raspberries and the subtle warmth of coconut.
Sprinkle a little desiccated coconut over the top for texture and a clear flavour signal. A few fresh raspberries to one side make the presentation elegant for a special occasion.
Keep the final step simple. As mary berry often advises, gentle garnishes let quality ingredients shine without overworking the palate.
“A modest garnish shows respect for good baking — not distraction.”
- Dust with icing sugar for visual finish.
- Serve with a dollop of cream or a spoon of whipped cream.
- Scatter desiccated coconut and add fresh raspberries for colour.
Storing Your Bake for Maximum Freshness
A good post-bake routine makes sure every slice keeps its moisture and flavour.
Room temperature storage: To maintain maximum freshness, place the sliced loaf in a high-quality airtight container at room temperature. Wrapped and stored this way, the cake will stay soft for up to 3 days.
Freezing for Later
If you need to keep slices longer, freeze individual portions. Wrap each slice tightly, then pop them into an airtight container or a freezer-safe bag.
- Freeze up to 1 month to avoid freezer burn.
- When ready to eat, thaw slices naturally at room temperature for the best texture and flavour.
- Do not refrigerate unless your home is very warm; refrigeration can dry the sponge and dull the coconut note.
Practical tip: using a quality airtight container protects the delicate crumb and keeps the desiccated coconut from losing moisture. For full recipe notes and timing, see the full recipe details.
Creative Variations and Flavour Twists
There are easy ways to refresh this recipe without changing the method. Small additions brighten the flavour and keep the sponge light.
Add a hint of lime zest to the batter to lift the desiccated coconut and sharpen the fruit notes. It is a simple change that adds freshness.
Replace part of the butter with natural yoghurt for a lighter crumb. This swap keeps the sponge moist while reducing overall fat.
For a different fruit profile, try blueberries or blackberries instead of raspberries. They give a similar colour and a pleasing balance with the coconut.
Adjust the amount of caster sugar to suit your taste. mary berry herself encourages bakers to personalise sweetness so the final slice suits your preference.
For extra texture, sprinkle toasted coconut on the top before baking. It creates a crisp contrast to the soft, tender interior.
“Small twists let you adapt the classic to seasonal fruit and personal taste.”
- Try lime zest for brightness.
- Swap part of the butter for yoghurt to lower fat.
- Use different berries for seasonal variety.
- Toast a little coconut for crunch on the top.
Serving Suggestions for Afternoon Tea
Serve this sponge with a pot of Earl Grey to bring out the coconut and fruit notes. The bergamot in the tea complements the sweet crumb and lifts each mouthful.
For a more indulgent serving, add a little extra jam or a generous spoonful of whipped cream on the side. A small bowl of fresh raspberries offers a bright contrast to the soft sponge.
Best at once: the loaf is at its tenderest within a few minutes of slicing, so aim to serve soon after cutting. This preserves texture and flavour for every guest.
Afternoon tea is the perfect time to showcase this bake. Its simple elegance fits naturally into a traditional British tea service and suits both quiet moments and friendly gatherings.
- Pair with Earl Grey for balance and warmth.
- Add a little jam or cream for extra indulgence.
- Offer raspberries to refresh the palate.
“Small touches make the tea time feel special and keep every slice tasting at its best.”
| Serving Style | What to Add | Best for |
|---|---|---|
| Classic | Earl Grey, dust of icing sugar | Traditional afternoon tea |
| Indulgent | Whipped cream, extra jam | Small celebration |
| Light | Fresh raspberries, no cream | Quiet tea time |
| Host’s choice | Mix of small bowls (jam, cream, fruit) | Friends or family gathering |
Troubleshooting Common Baking Issues
Small faults in the bake are often easy to fix if you know the likely causes.
If your raspberries sink, lightly dust them with a little flour before folding into the batter. This tiny step helps them remain suspended and keeps the top looking even.
Dense sponge from overmixing: use a gentle folding motion when combining dry ingredients. Overworking the mix destroys air and makes the crumb heavy.
Cutting too soon causes crumbs and collapse. Allow the loaf to rest in the tin for around ten minutes, then cool fully so the structure sets.
Other quick checks: confirm the oven temperature is accurate and that the skewer comes clean before you remove the bake. Also check the top for springiness a few minutes before the suggested time.
Practical tip: always ensure your ingredients are at the right temperature; that simple preparation often fixes small problems in the recipe.

| Issue | Likely cause | Quick fix |
|---|---|---|
| Fruit sinks | Too heavy or wet fruit | Coat raspberries in flour; fold gently |
| Dense crumb | Overmixed batter | Fold slowly; stop when just combined |
| Undercooked centre | Wrong oven temperature | Check temperature; bake a few extra minutes |
“Careful attention to small steps prevents most common faults.”
Conclusion
Good technique transforms modest pantry items into a bake that feels special. This recipe shows how simple steps and careful timing create a tender loaf studded with raspberries and a light shredded texture.
Follow the method and you will make mary berry style bakes that stay moist and full of flavour. The guide aims to give you the confidence to reproduce a classic, whether serving at tea or for a small gathering.
Use quality ingredients and take your time when mixing and baking. Try small variations, make mary inspired swaps and consult the recipemary berry notes if you need extra tips. Enjoy sharing each slice with friends and family.
FAQ
How do I stop desiccated coconut from making the sponge dry?
What temperature and time should I use for an even bake?
How can I prevent the raspberries from sinking?
Can I use self‑raising flour instead of plain flour and baking powder?
Is it better to weigh ingredients or use cups for this recipe?
How do I know when the butter and sugar are creamed properly?
Can I add chocolate chips or other mix‑ins?
What’s the best way to cool and store the cake?
How should I prepare the tin and parchment paper?
Can I make the batter ahead of time?
How do I achieve a light sponge without overmixing?
What filling or finishing touches work well for afternoon tea?
Any tips for freezing and thawing the bake?
Mary Berry Raspberry And Coconut Cake
This softly textured sponge brings together the sharp freshness of raspberries with the gentle sweetness of desiccated coconut. It is a quintessential British bake that suits a casual afternoon treat or a small celebration.
Ingredients
- 175 g self-raising flour
- 175 g caster sugar
- A pinch of baking powder
- 175 g unsalted butter, softened
- 3 large eggs
- 150 g fresh or frozen raspberries
- 75 g desiccated coconut
Method
- Preheat the oven to 180°C (160°C fan).
- Grease a 900 g loaf tin or a 20 cm round cake tin and line it with parchment paper.
- In a large mixing bowl, cream together the softened butter and caster sugar until pale and fluffy.
- Gradually add the eggs, mixing well after each addition.
- Fold in the self-raising flour and a pinch of baking powder gently to retain aeration.
- Toss the raspberries in a teaspoon of flour to prevent sinking and fold them into the batter carefully.
- Pour the batter into the prepared tin and level the top with a spatula.
- Bake in the preheated oven for 45 to 50 minutes, or until a skewer inserted into the center comes out clean.
- Allow the cake to cool in the tin for at least 10 minutes before transferring it to a wire rack to cool completely.
- Dust with icing sugar and serve with whipped cream and fresh raspberries if desired.